In the last post, I showed you how to deploy vSphere with Taznu with HAProxy load balancer. Today, I want to give you tutorial, how to do this with a different load balancer – NSX Advanced Load Balancer also known as AVI.
vSphere with Tanzu gives you ability to run Kubernetes clusters natively on VMware vSphere.
With VMware Sphere 7.0 U1, there is a possibility to run it by using vSphere Distributed Switch Portgroups with your own network topology. In contrast to configuring vSphere with Tanzu with NSX-T, where you need to build and prepare new infrastructure.
Requriements:
- vCenter – min. v7.0 U1. Here is 7.0 U3;
- Officially minimum 3x ESXi 7.0 hosts. But, of course you can do this on a single physical host like me and get fullly functional Tanzu cluster;
- vSphere cluster – in this tutorial cluster consist from one ESXi host;
- HA + DRS enabled;
- vSphere Distributed Swtich (VDS), remember to set min. MTU=1500;
- Three Networks (portgroups created on DVS);
- Storage.
CIDRs of three networks:
| VLAN-111 | 10.111.10.0/24 | Management |
| VLAN-40-Tanzu-Workload | 10.0.40.0/24 | Workload |
| VLAN-222-Tanzu-Frontend | 10.222.1.0/24 | Frontend |
IP assigments:
| 10.111.10.13 | NSX-ALB IP Address |
| 10.111.10.20-10.111.10.34 | Service Engines VMs IP Range (NSX-ALB) |
| 10.111.10.40-10.111.10.44 | SupervisorControlPlaneVM(s) |
| 10.0.40.2-10.0.40.40 | Workload Network for the Cluster (K8S) Nodes |
| 10.222.1.2-10.222.1.40 | Load Balancer VIPs |
| 192.168.1.121 | DNS |
| 0.pl.pool.ntp.org | NTP |
Main steps:
- Configuration Storege Policy and Tags.
- Creating Tanzu Content Library.
- Deploying load balancer – NSX Advanced Load Balancer (AVI).
- Configuration NSX ALB;
- Enabling Workload Management.
- Creation of the namespace.
- Logging in to the namespace and creation Tanzu Kubernetes cluster.
- Deploying pods and deployments.
Configuration Storage Policy and Tags & Creating Tanzu Content Library
Step by step instruction how to create Storage Policy and Content Library is desribe here:
https://vmattroman.com/vsphere-with-tanzu-deployment-tutorial-vds-haproxy/
Please check it, to don’t double things.
Deploying load balancer – NSX Advanced Load Balancer (AVI)
Load balancer is needed to provide load balancing capabilities to vSphere with Tanzu Kubernetes workloads.
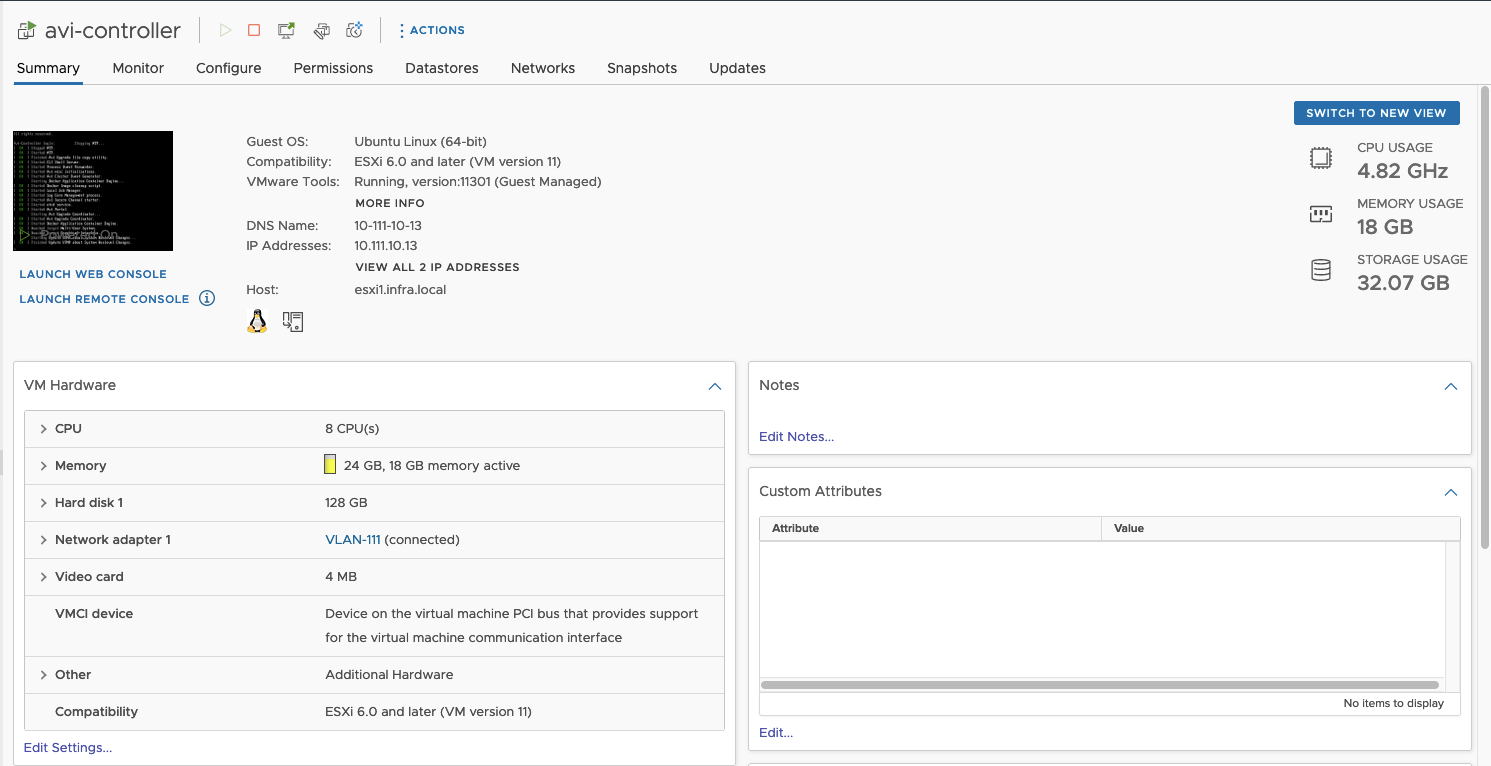
In this tutorial, I use AVI controller with 21.1.2-9124 version.
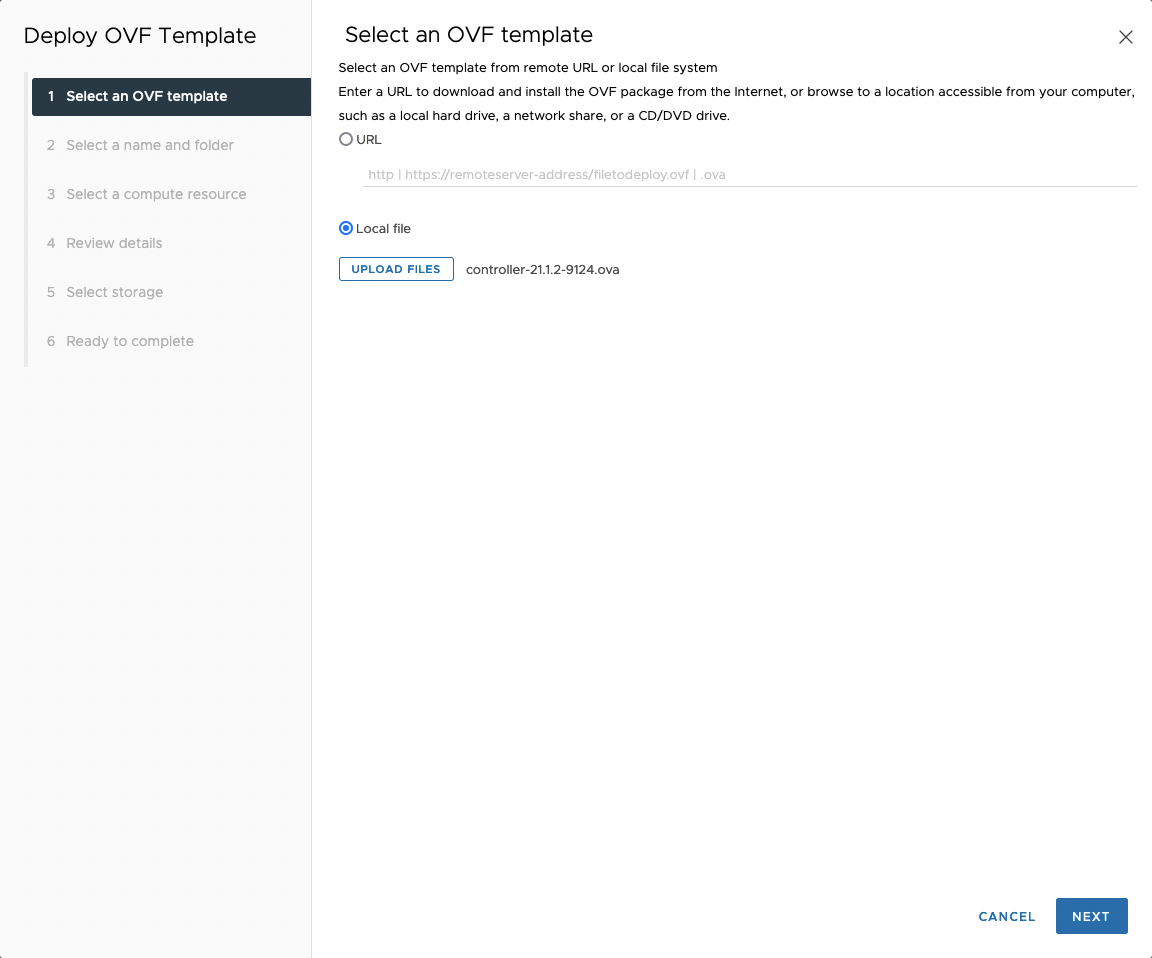
- Download AVI OVA image from: https://customerconnect.vmware.com/en/downloads/info/slug/networking_security/vmware_nsx_advanced_load_balancer/21_1_x
- Deploy template to vCenter. Choose Deploy OVF Template from ESXi or Cluster level.

3. Choose Local file -> Upload files and select controller-21.1.2-9124.ova from your local disk.
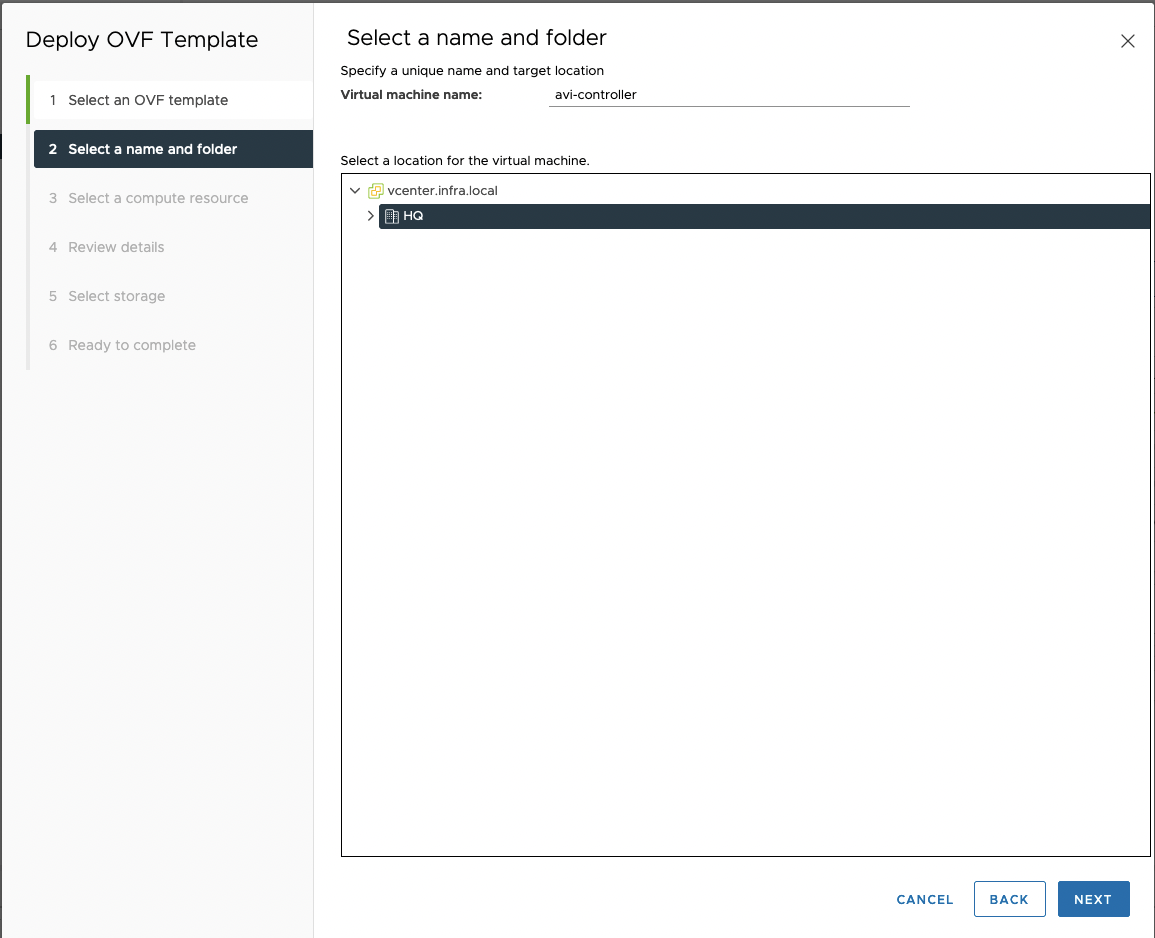
4. Choose Virtual machine name and target location folder.
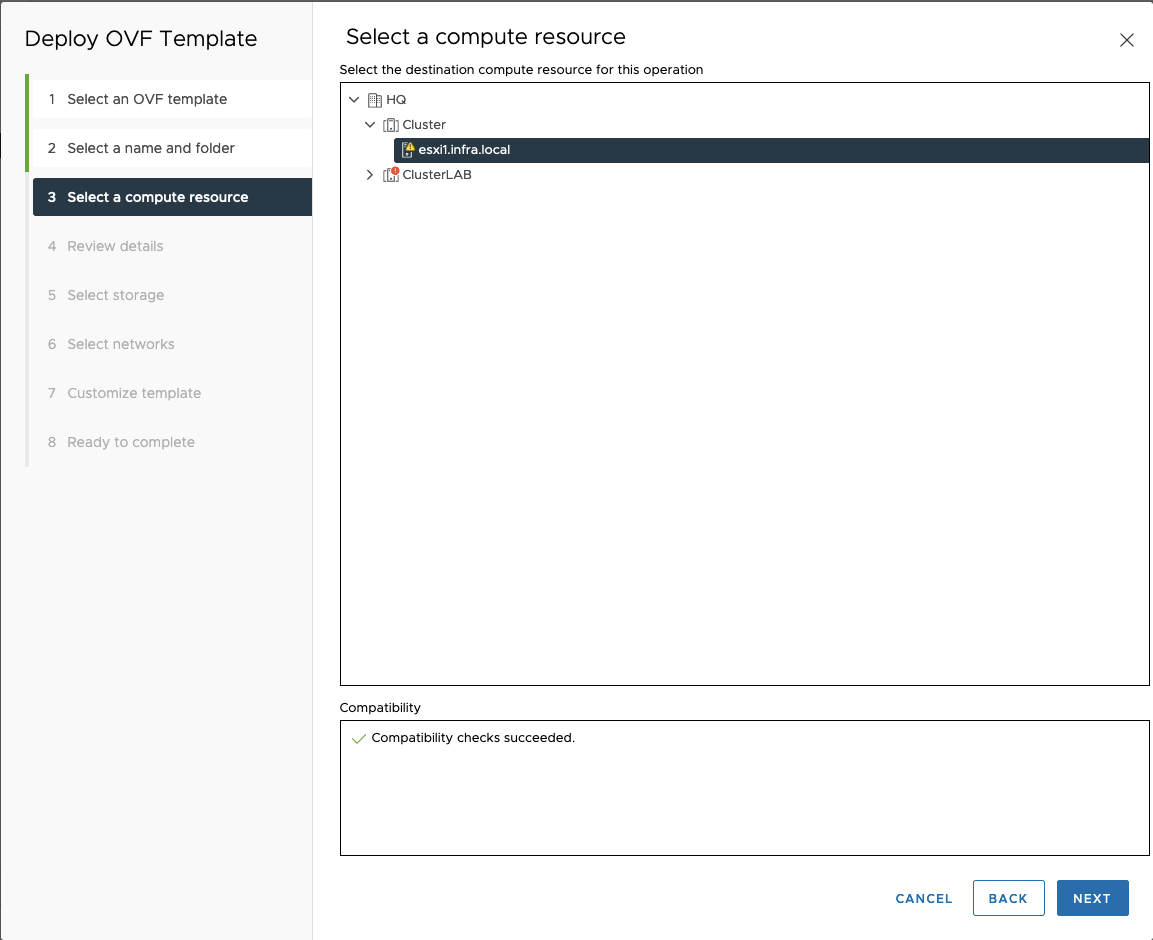
5. Choose ESXi where AVI appliance should be deployed.
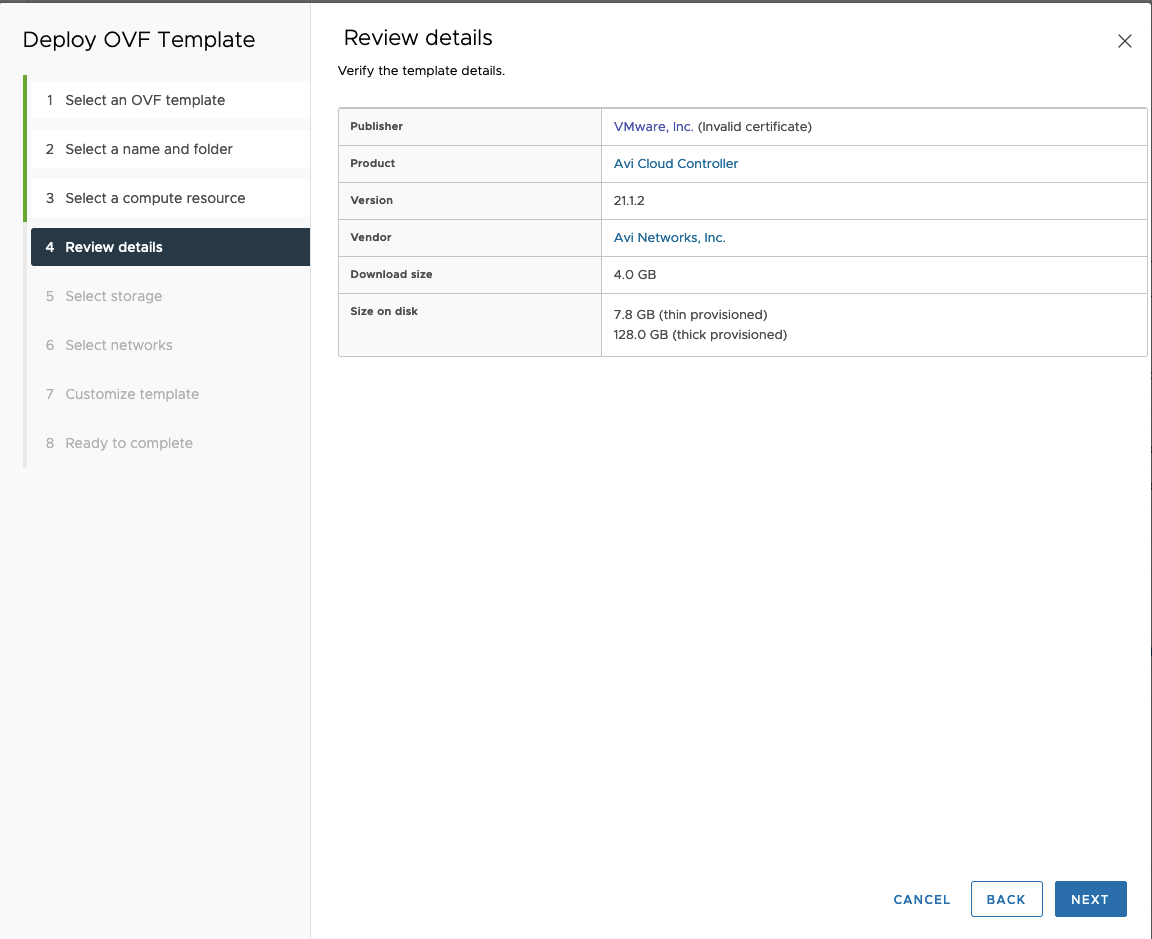
6. Review details.
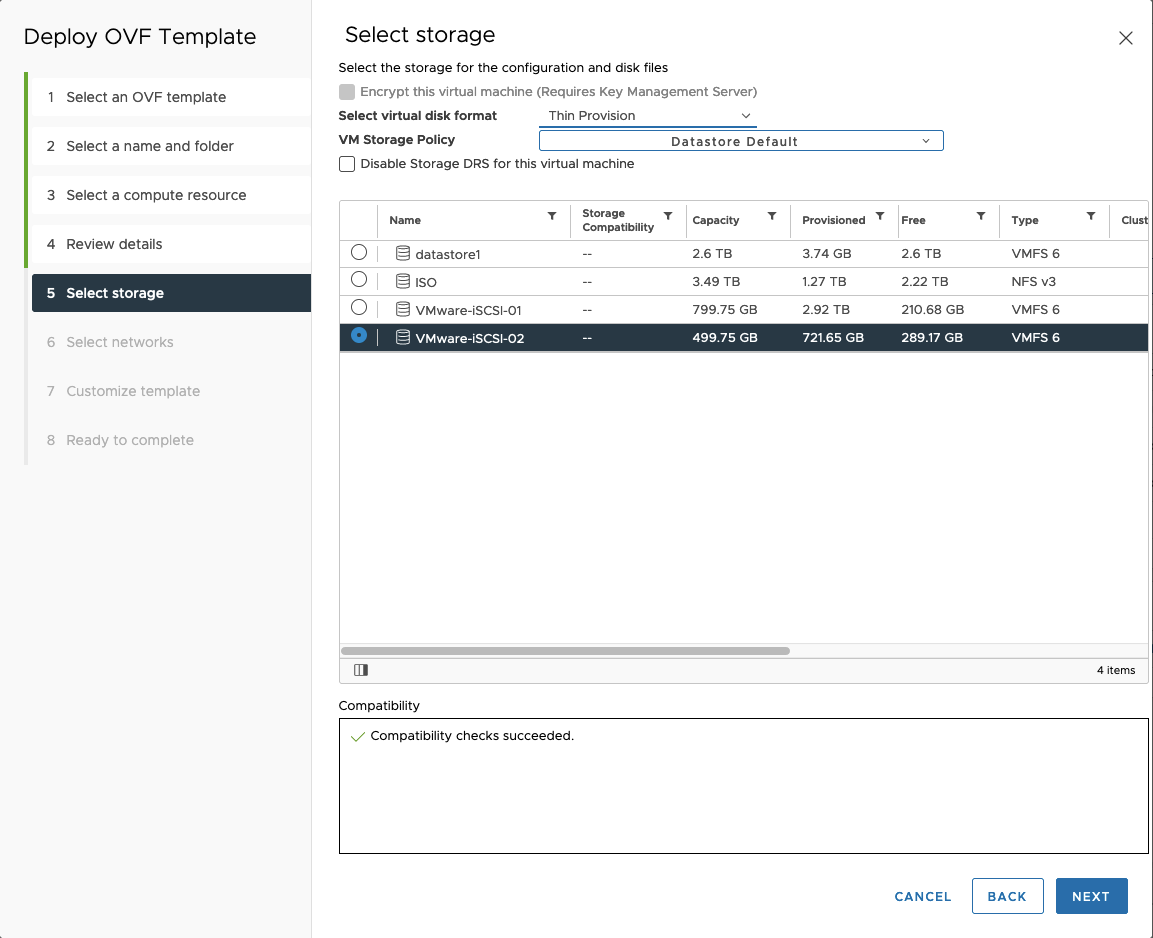
7. Select storage.
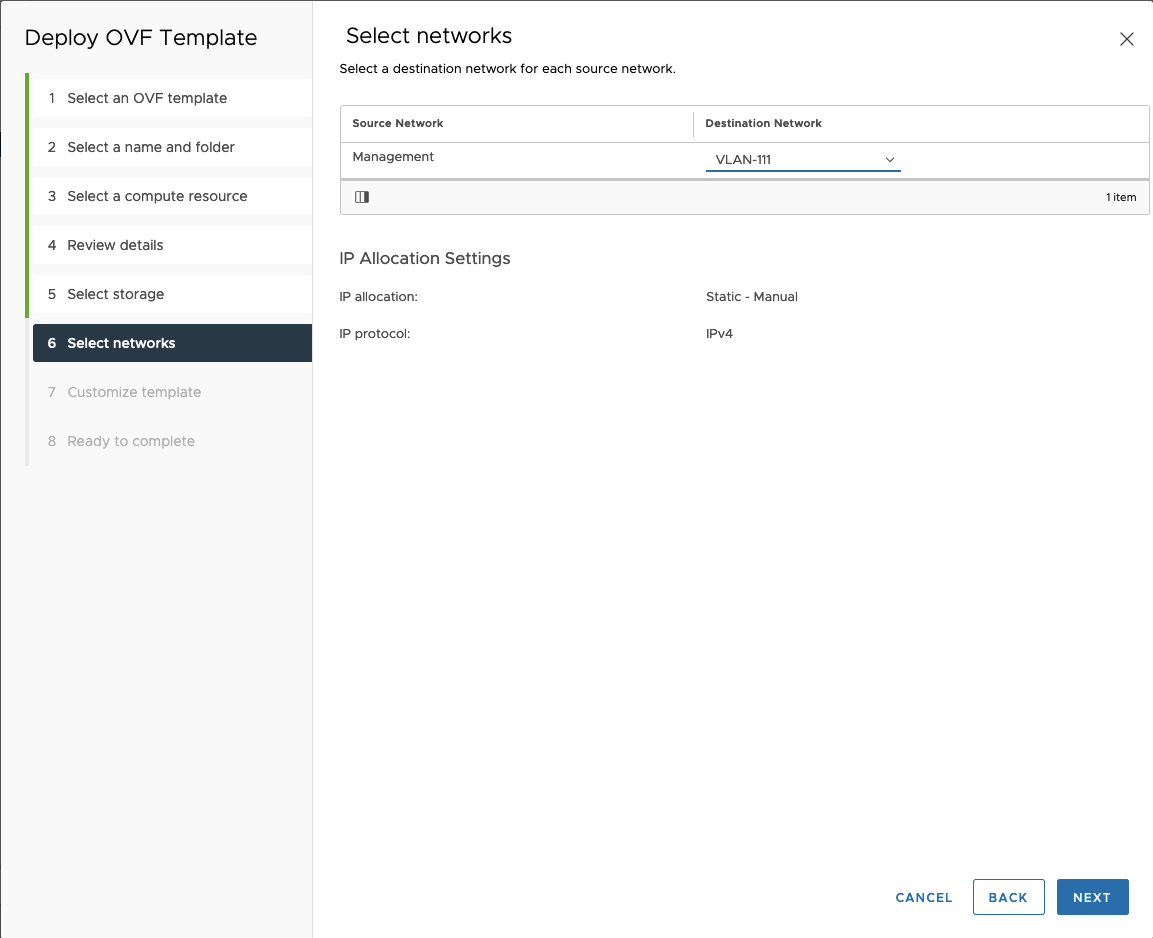
8. Select Management network – VLAN-111
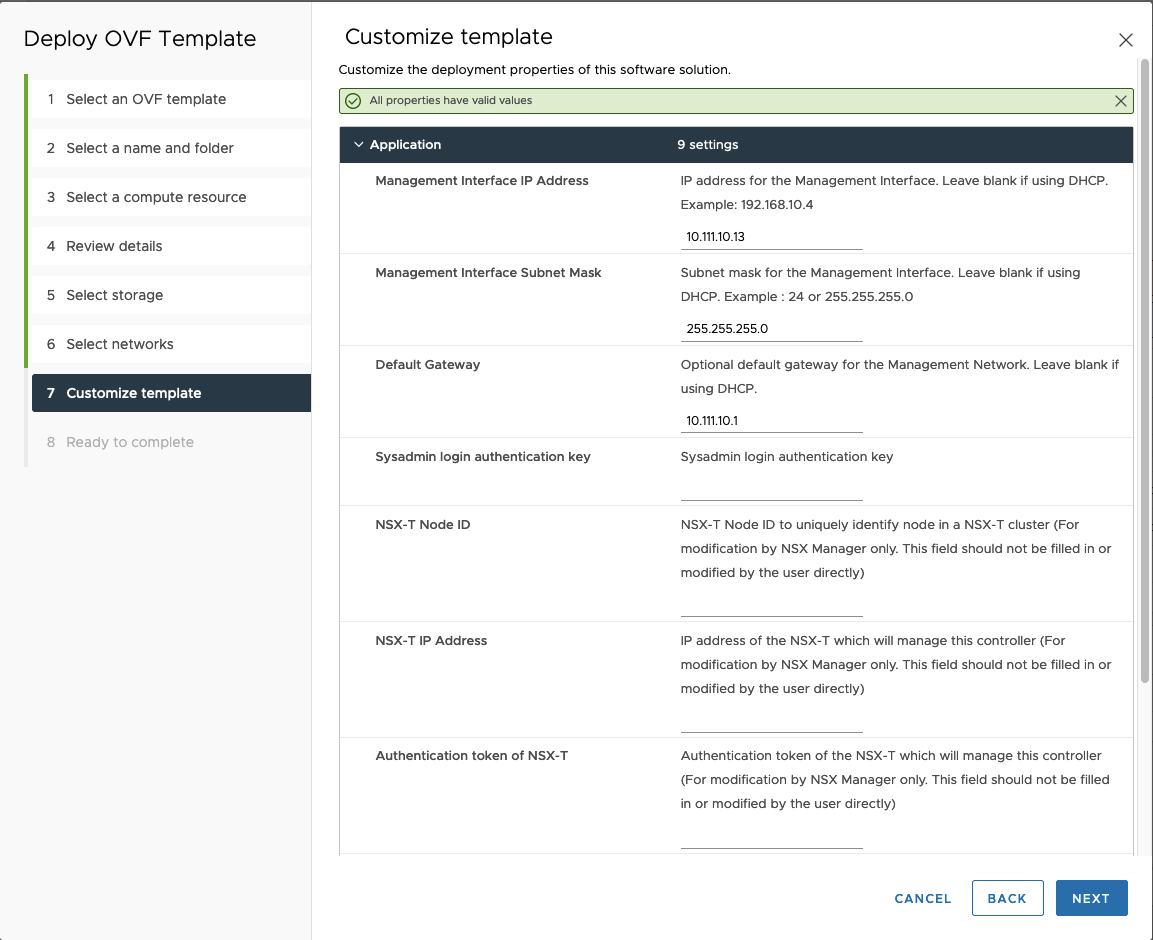
9. Type Management Interface IP Address, Management Interface Subnet Mask and Default Gateway and click Next.
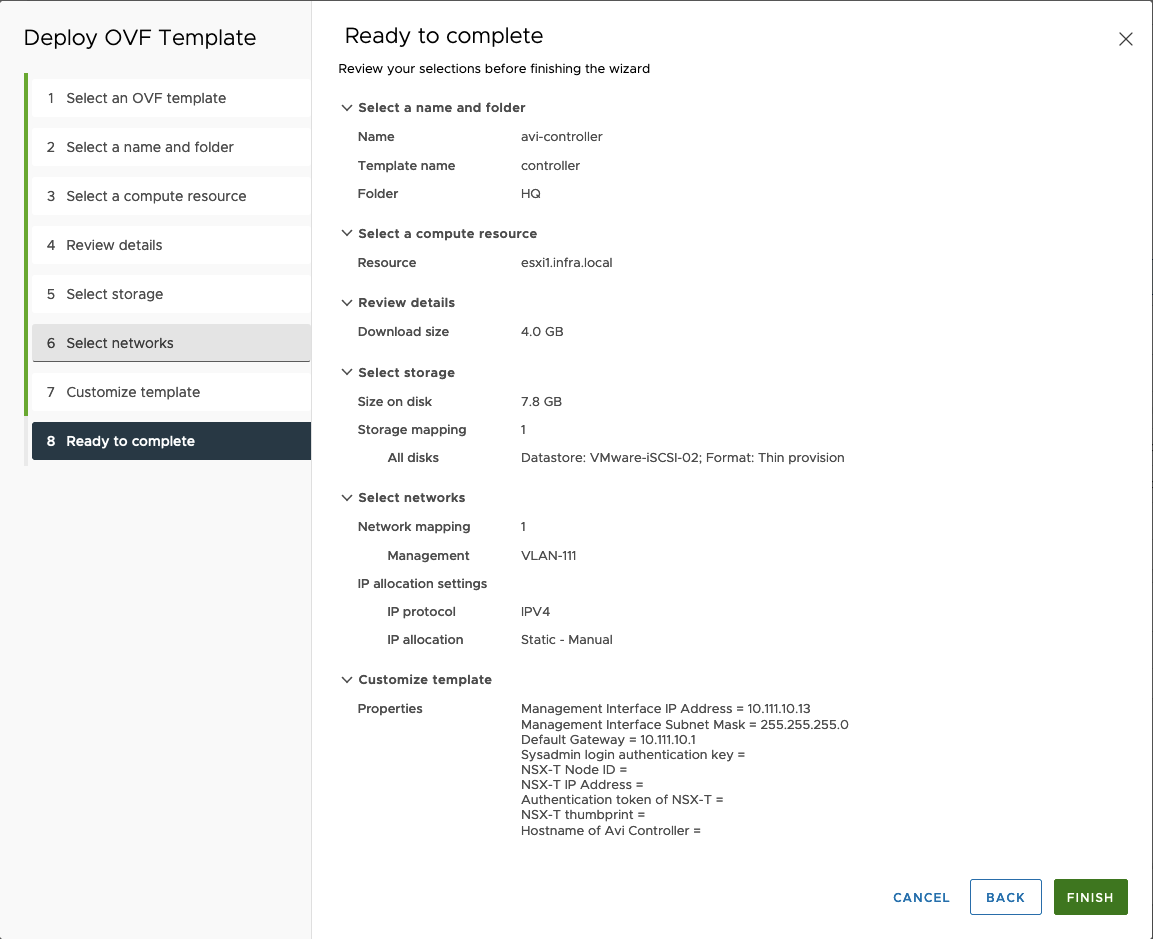
10. Review details and click finish.
11. After deployment, power on VM and wait few minutes unitl boots up.
Confiugration NSX AVI
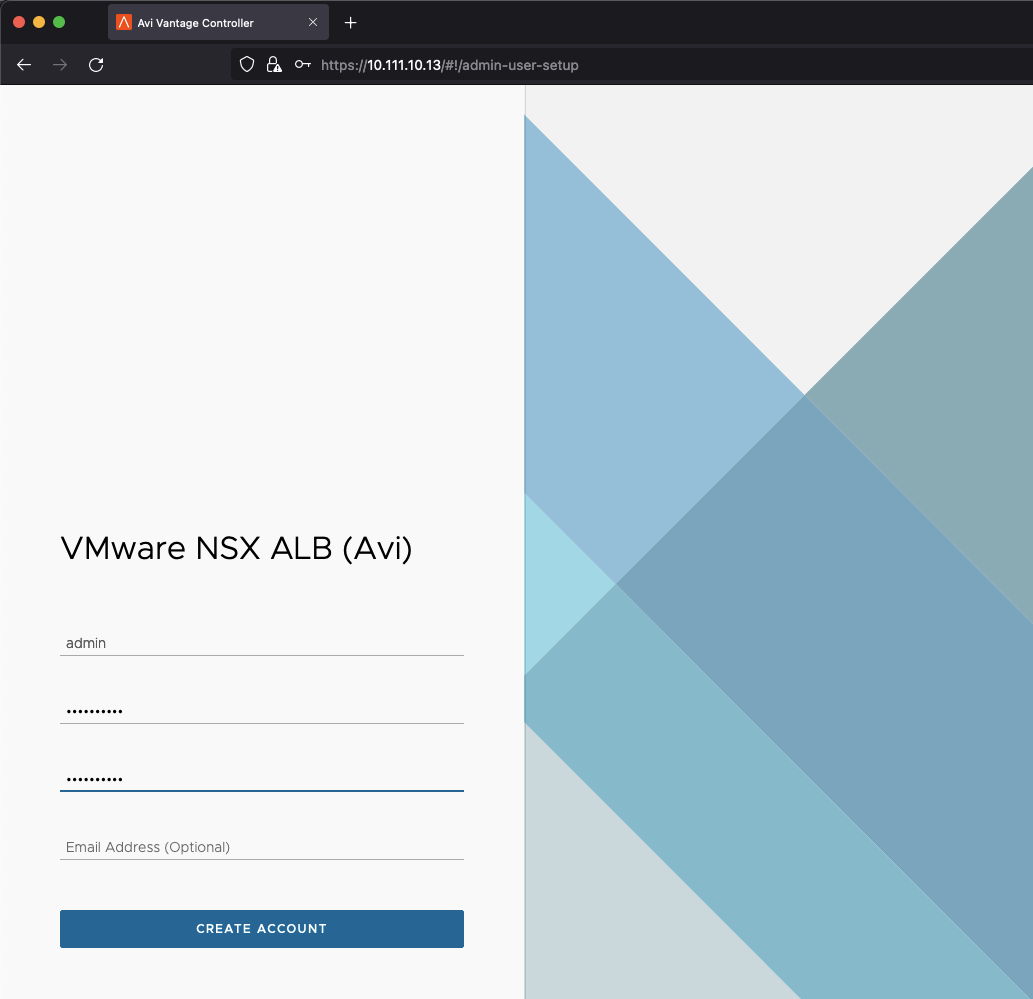
- Open browser and go to the NSX ALB login screen. Type new password and click Create Account.
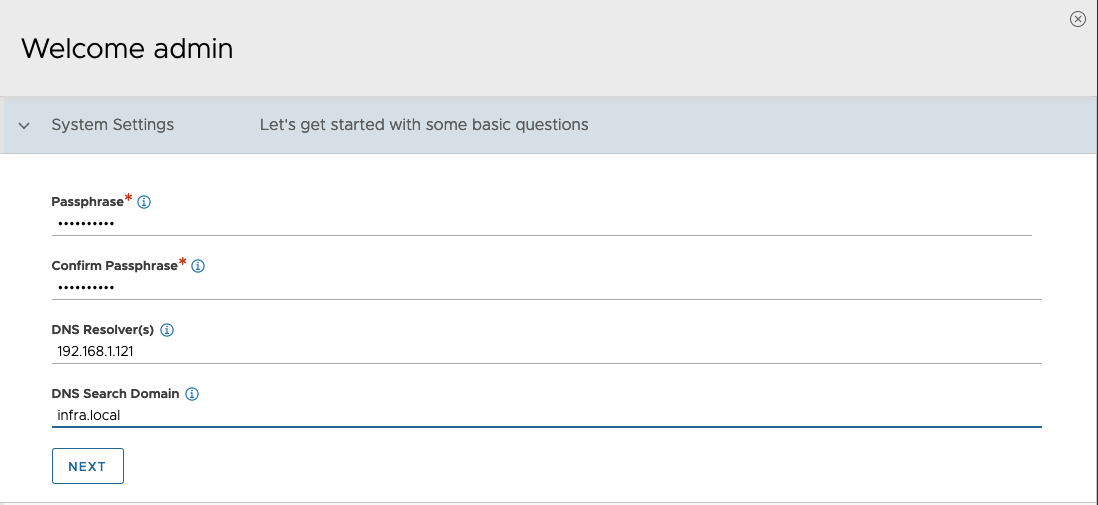
2. Type Passphrase, DNS and DNS Search Domain.
3. Choose None in Email/SMTP section. If you want, you can set it up.

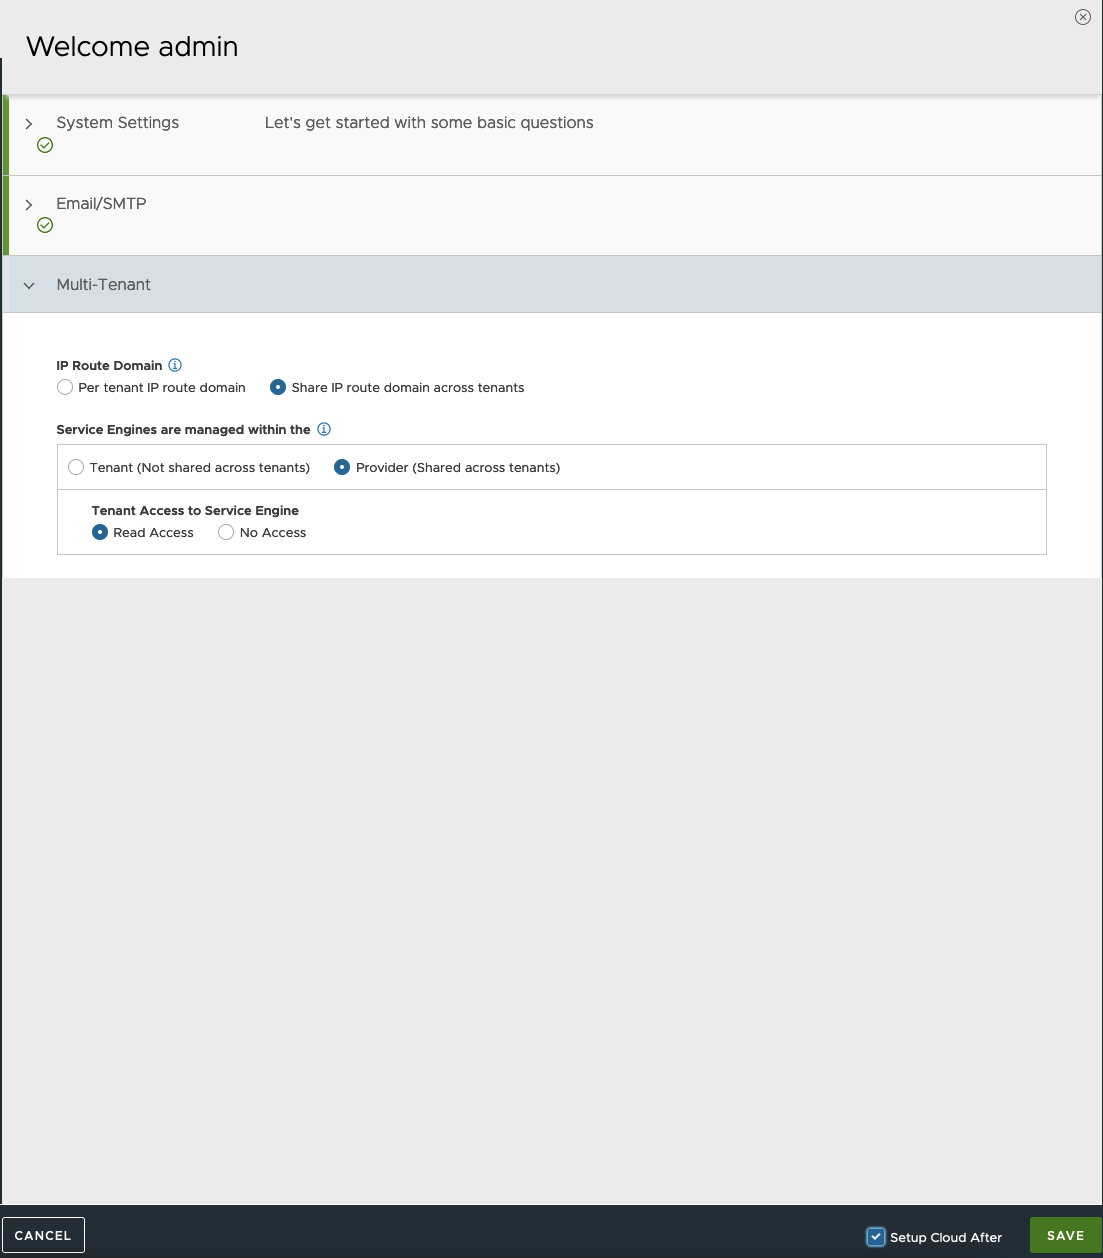
4. Leave default values in Multi-Tenant tab. At the bottom, check Setup Cloud After and Save.
5. Choose vmware logo as a Default Cloud Provider.
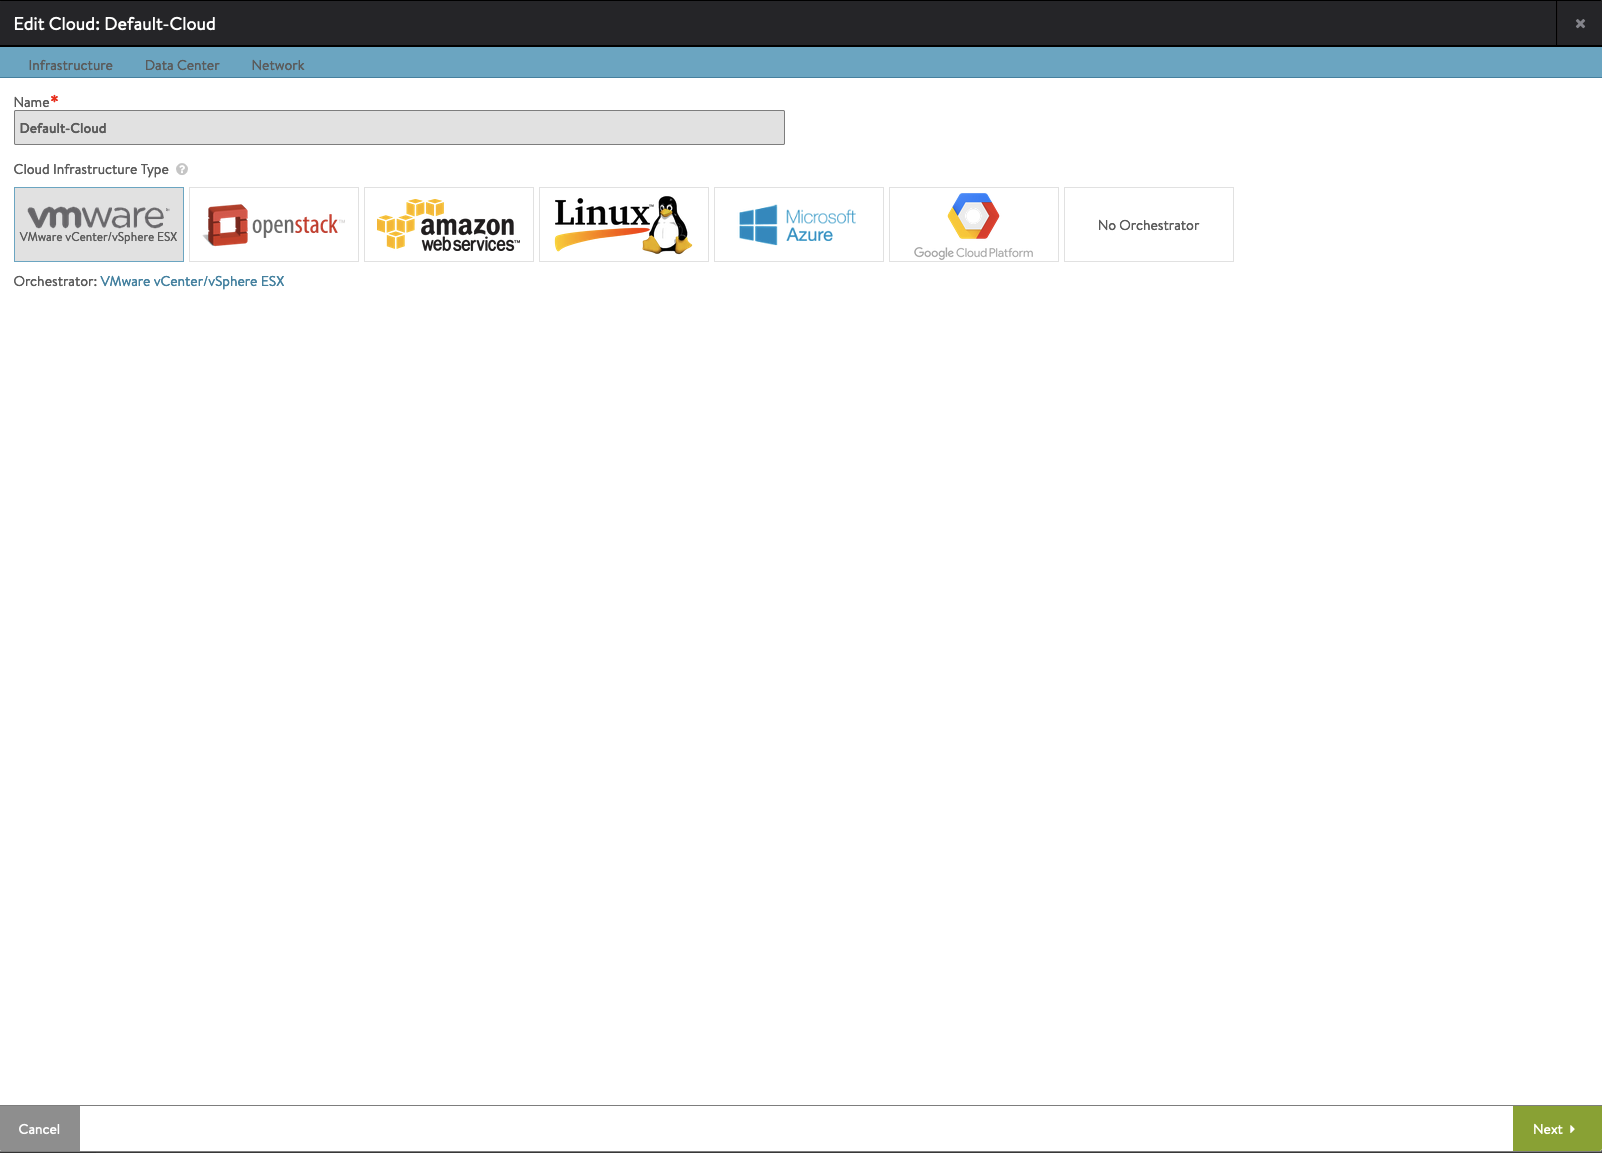
6. Enter Username, Password and IP/FQDN of the vCenter.
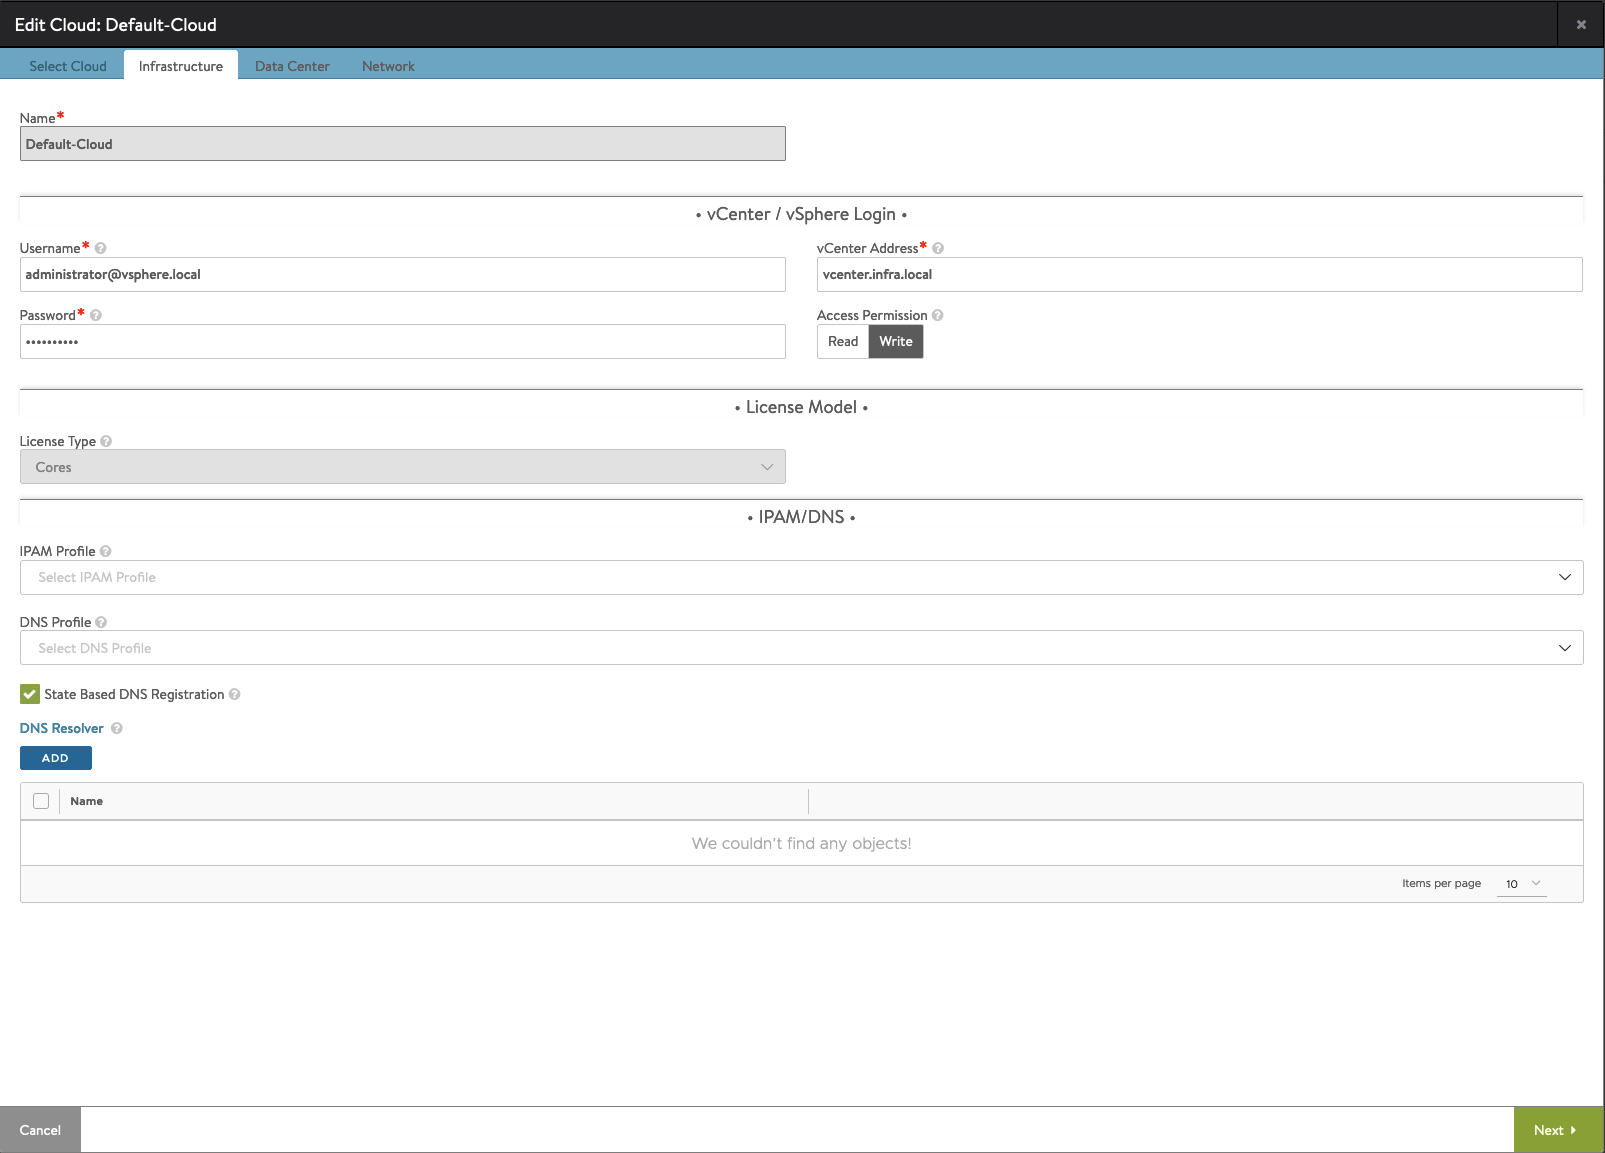
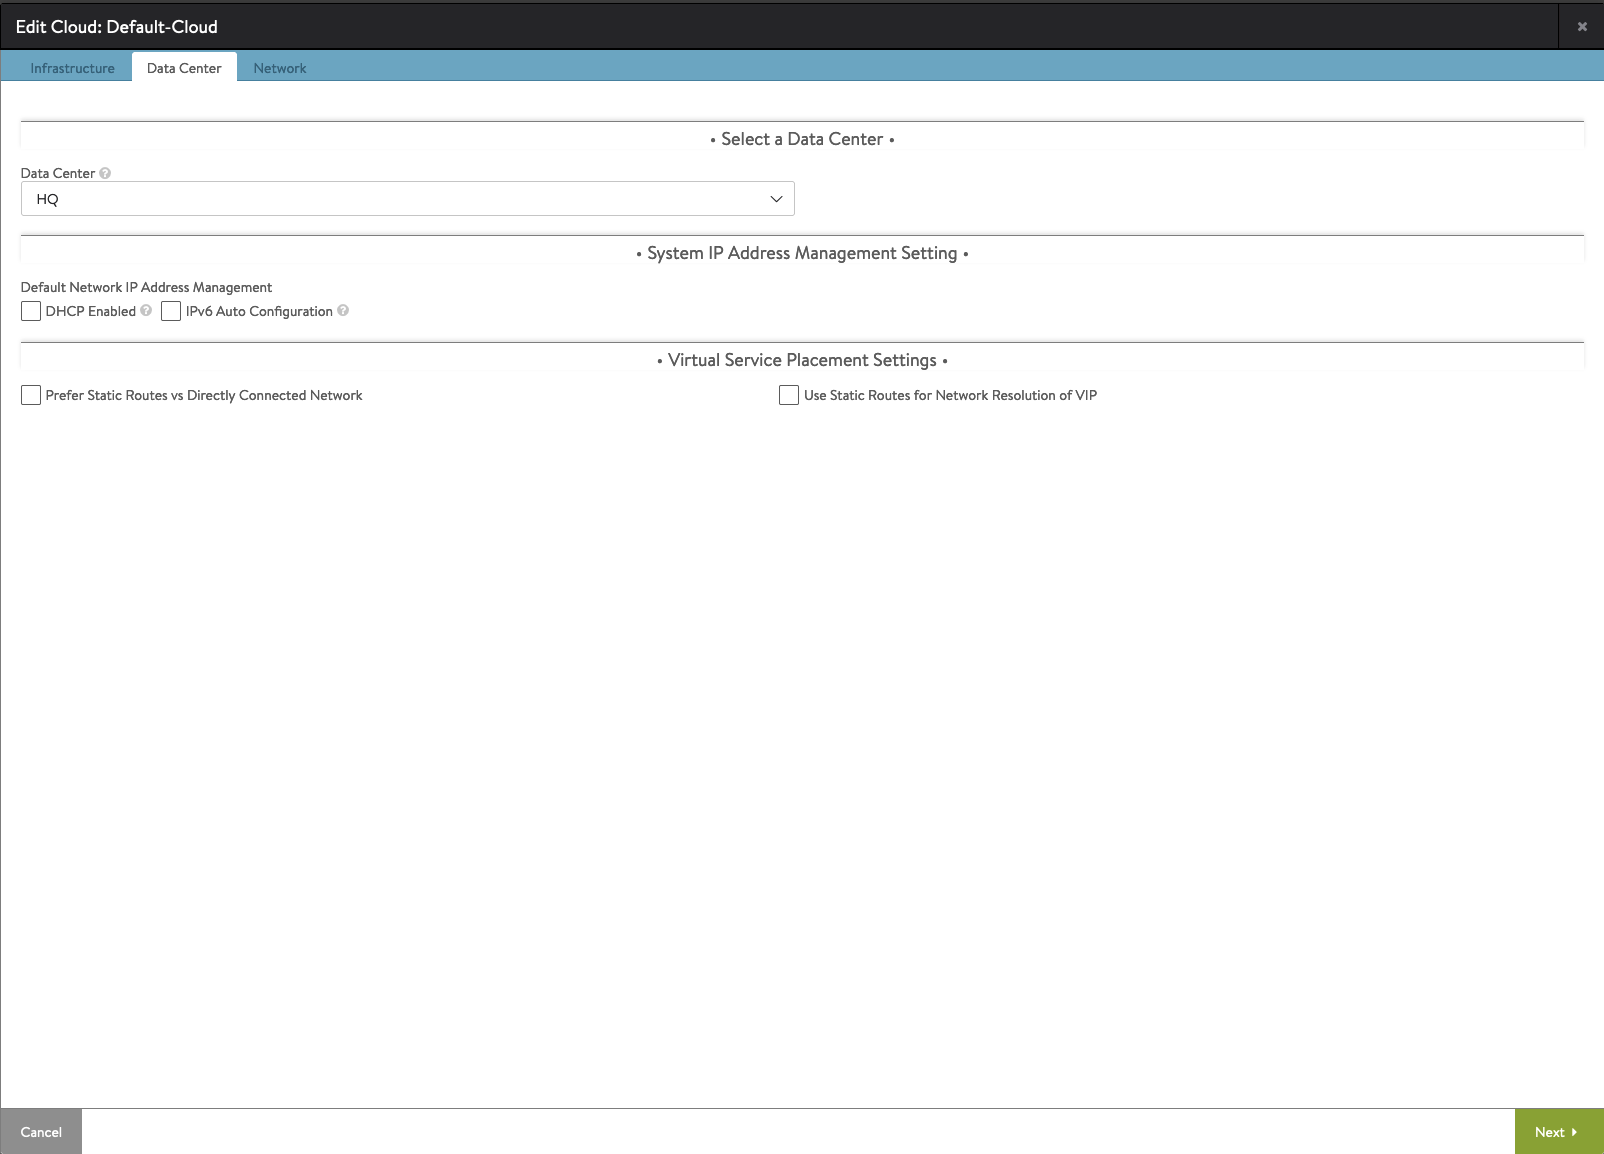
7. Choose vCenter Datacenter.
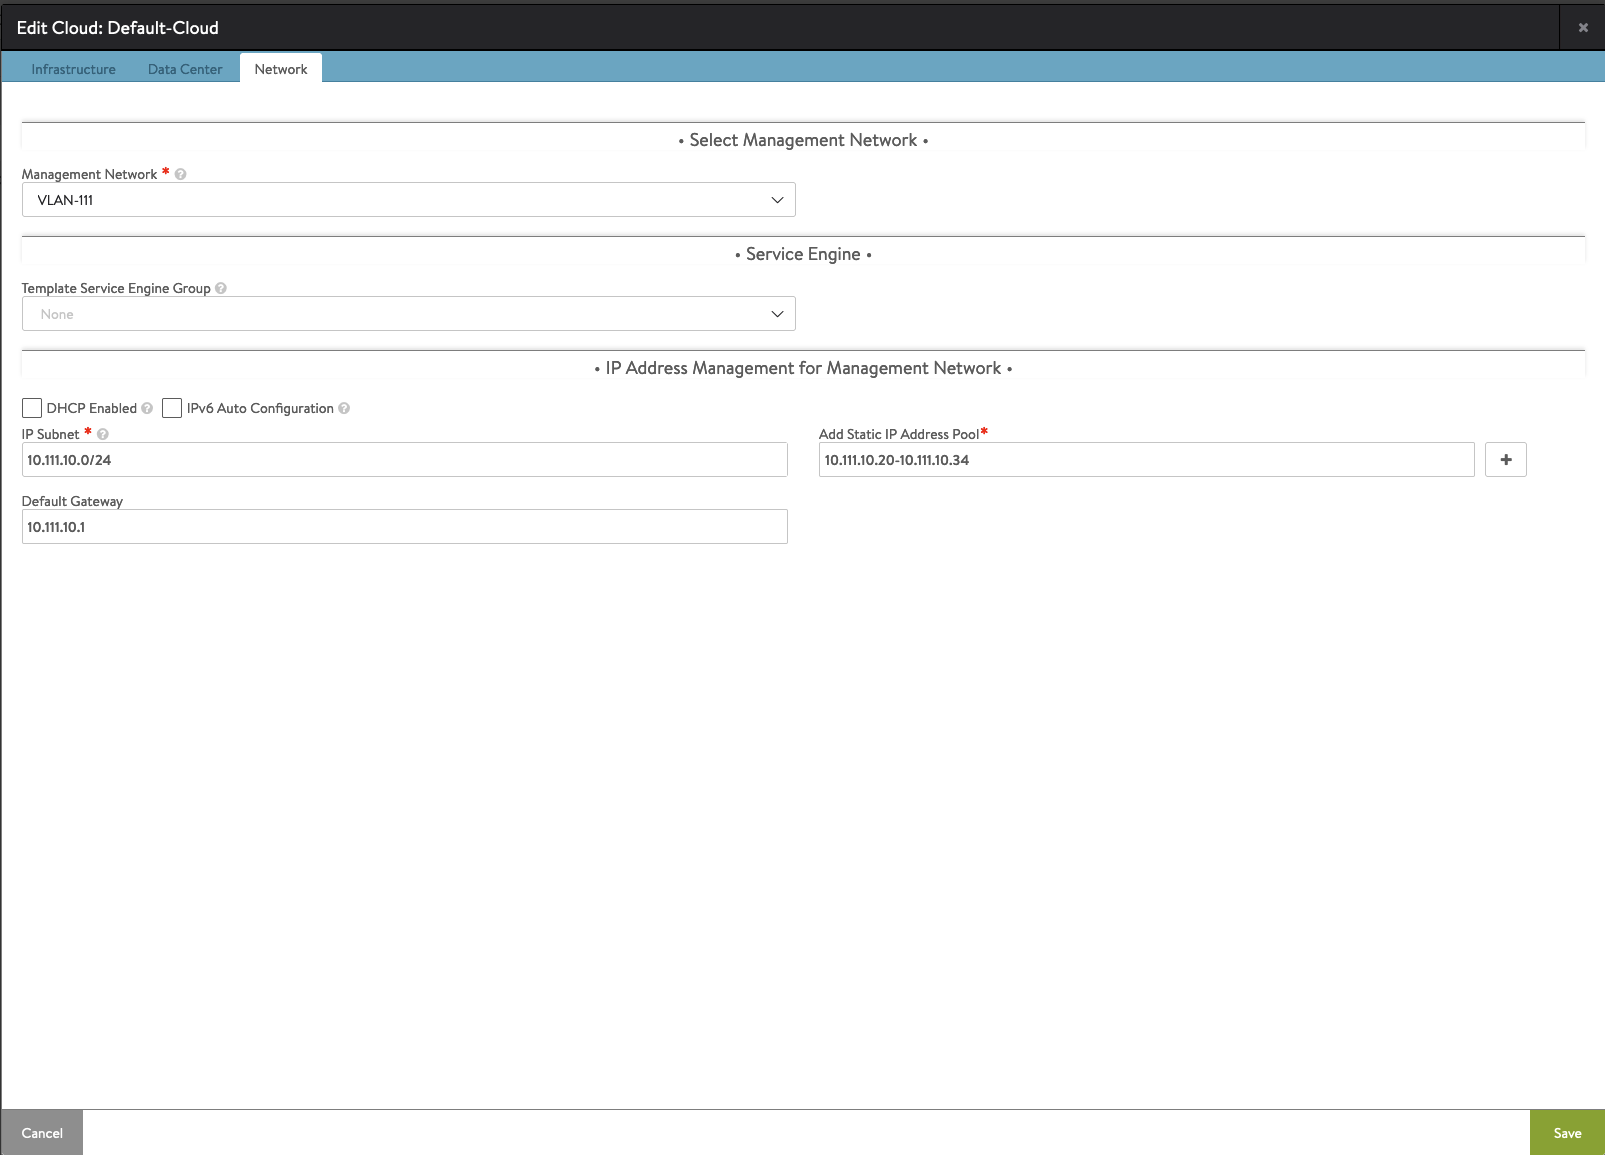
8. Choose Management Network. This subnet will be used to address Service Engines.
Fill IP Subnet, Default Gateway and Add Static IP Address Pools.
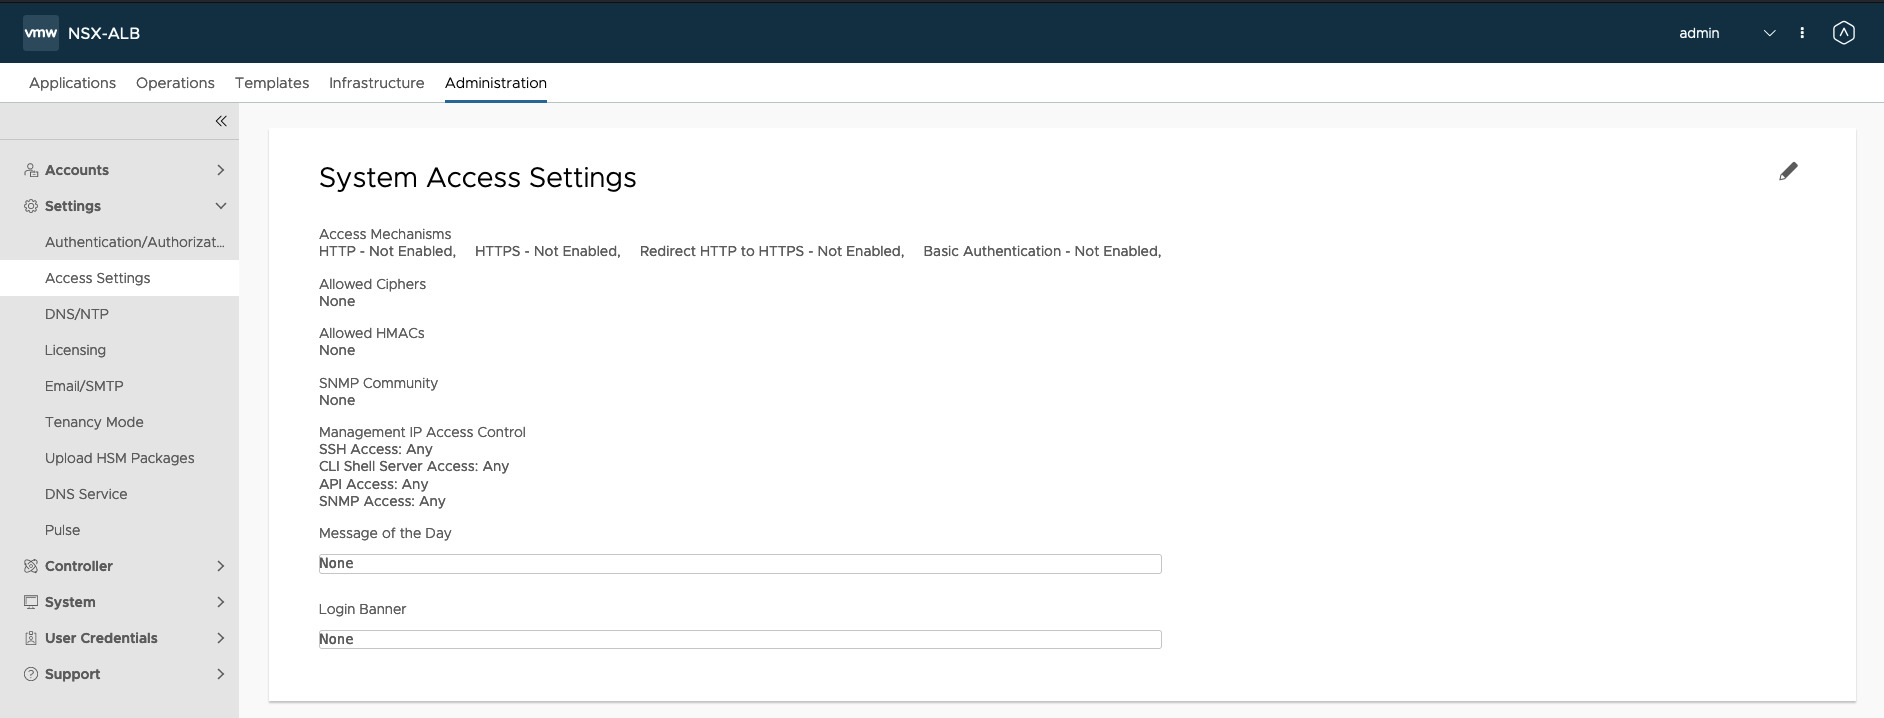
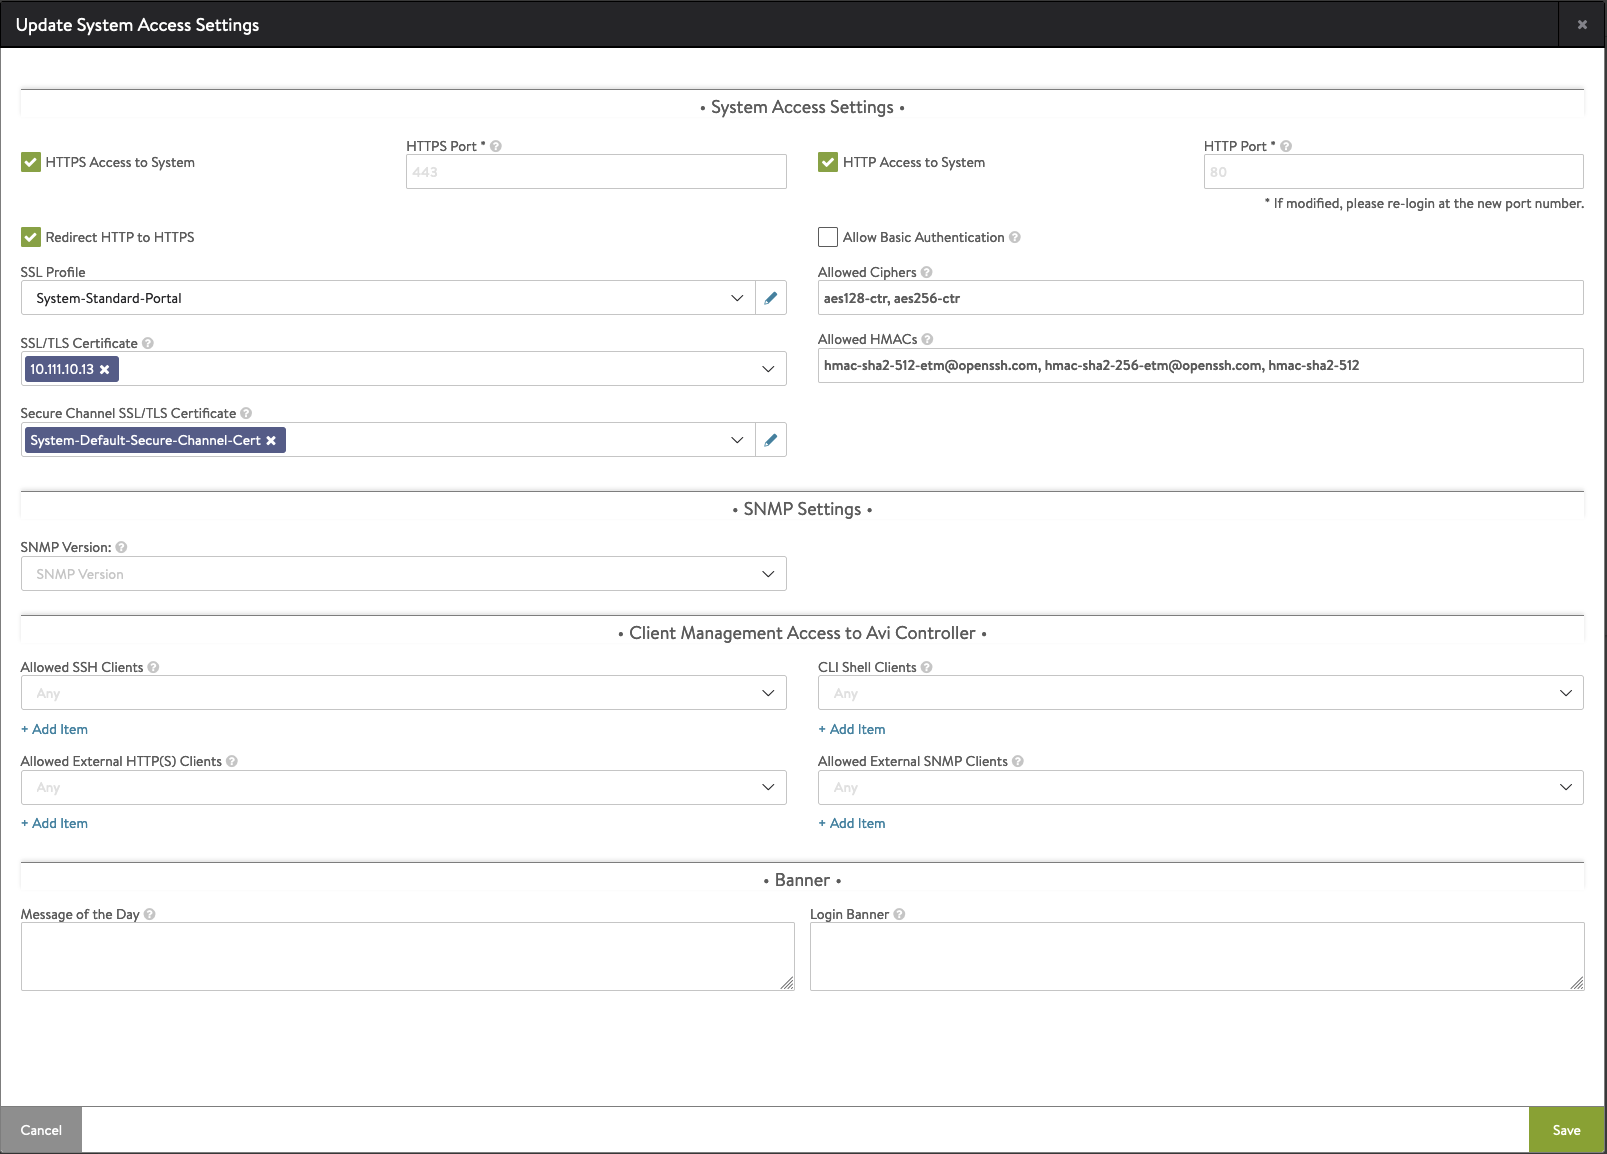
9. Configure Authentication – to deploy Supervisor Cluster you need to create own self-signed cert instead of default one.
Go to Administration -> Settings -> Access Settings and click pencil icon to edit.
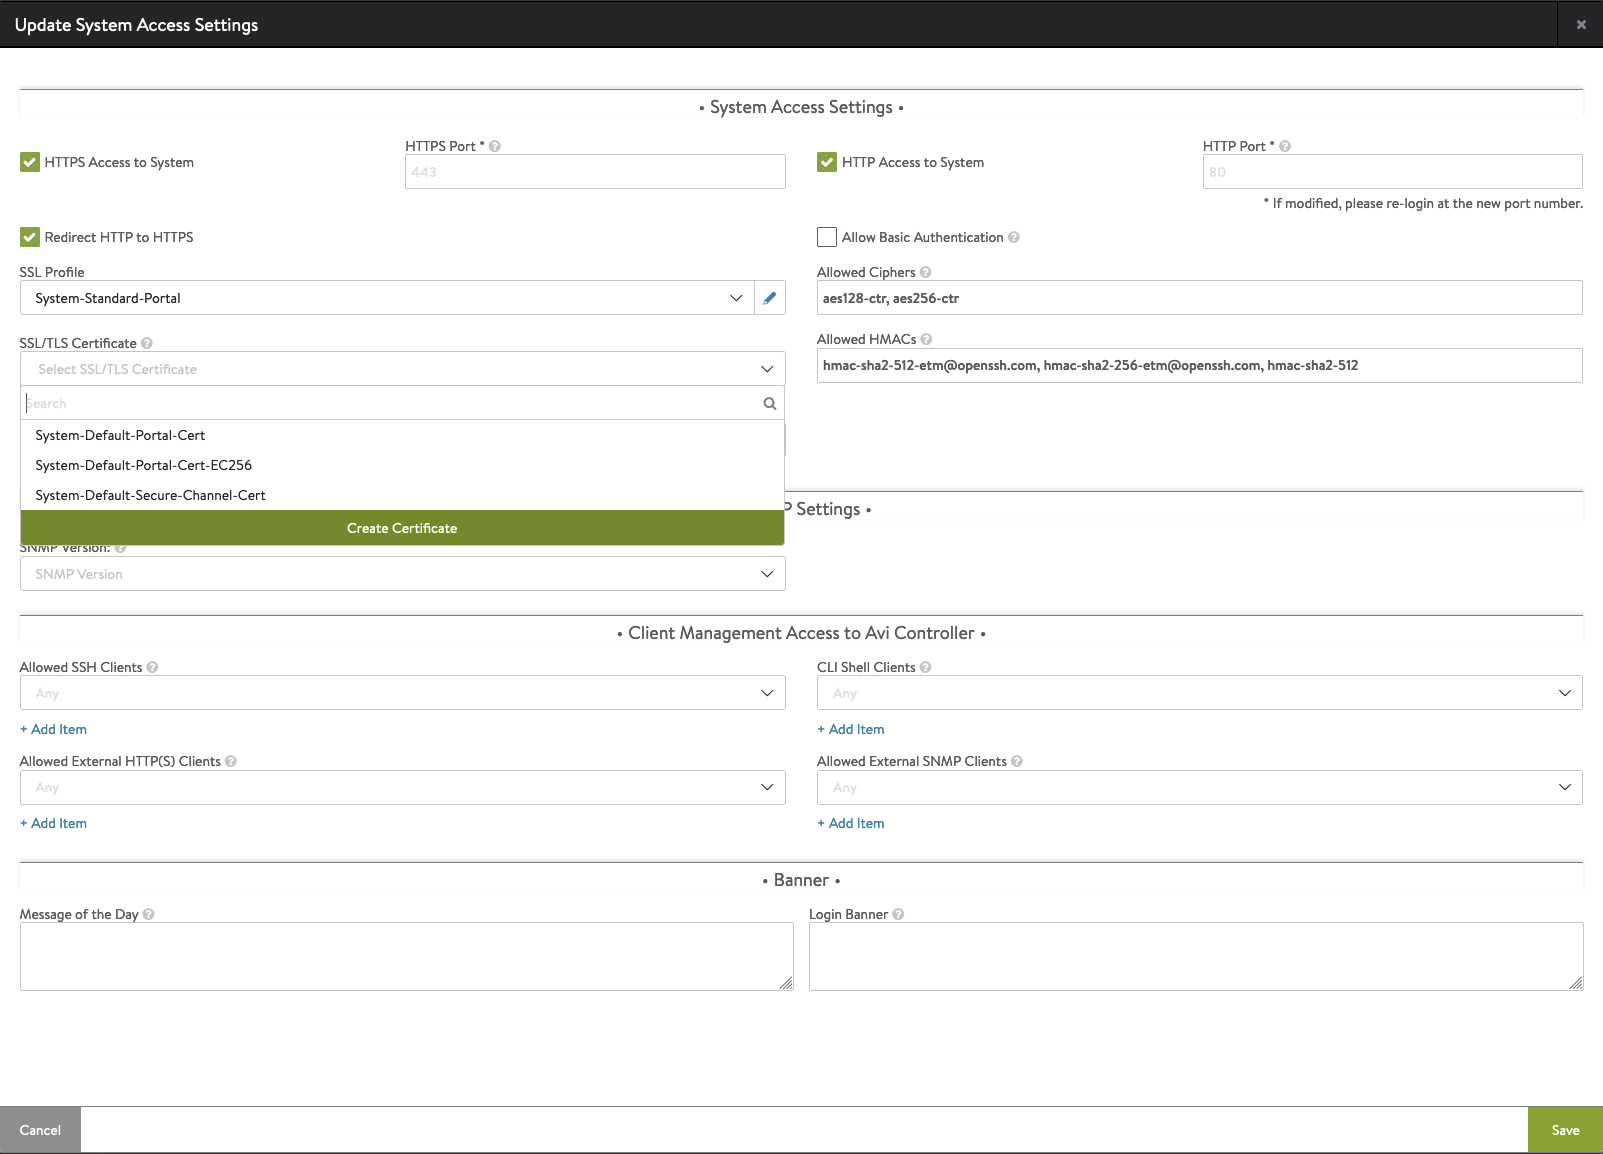
10. Delete System-Default-Portal-Cert and System-Default-Portal-Cert-EC256 from SSL/TLS section.
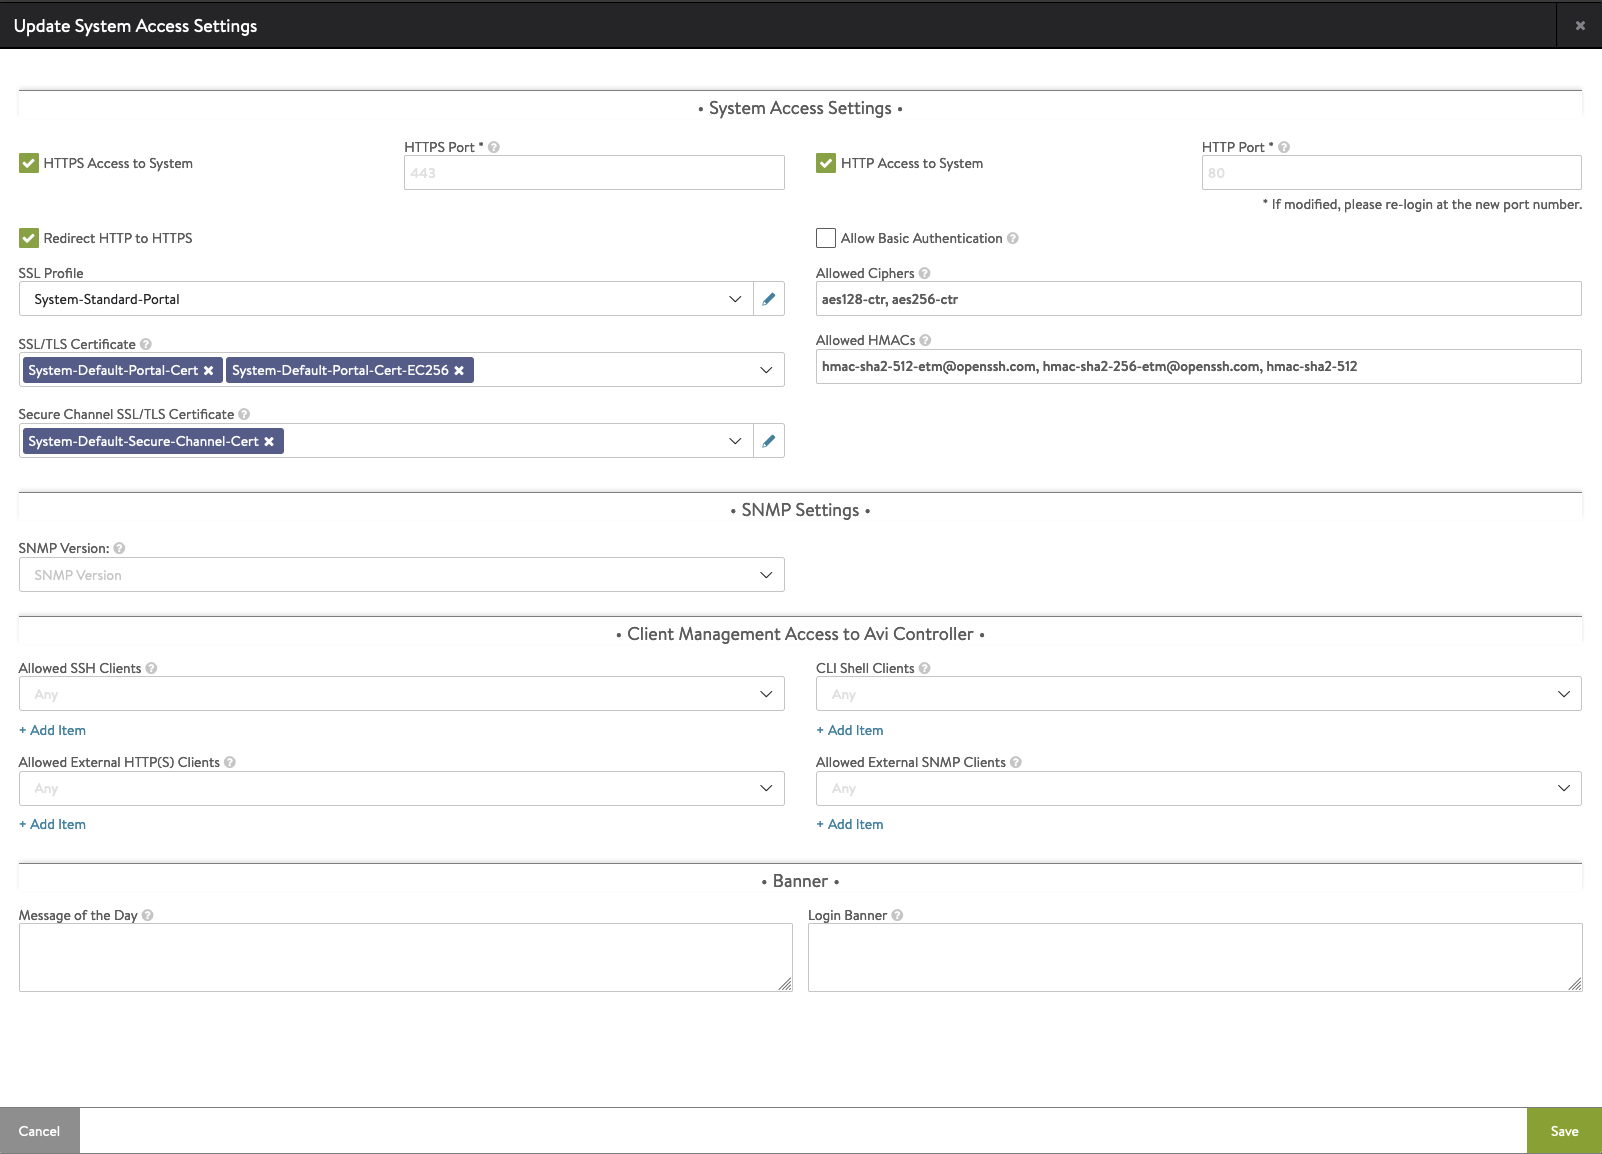
11. After that, click arrow in this section and from dropdown list, choose Create Certificate.
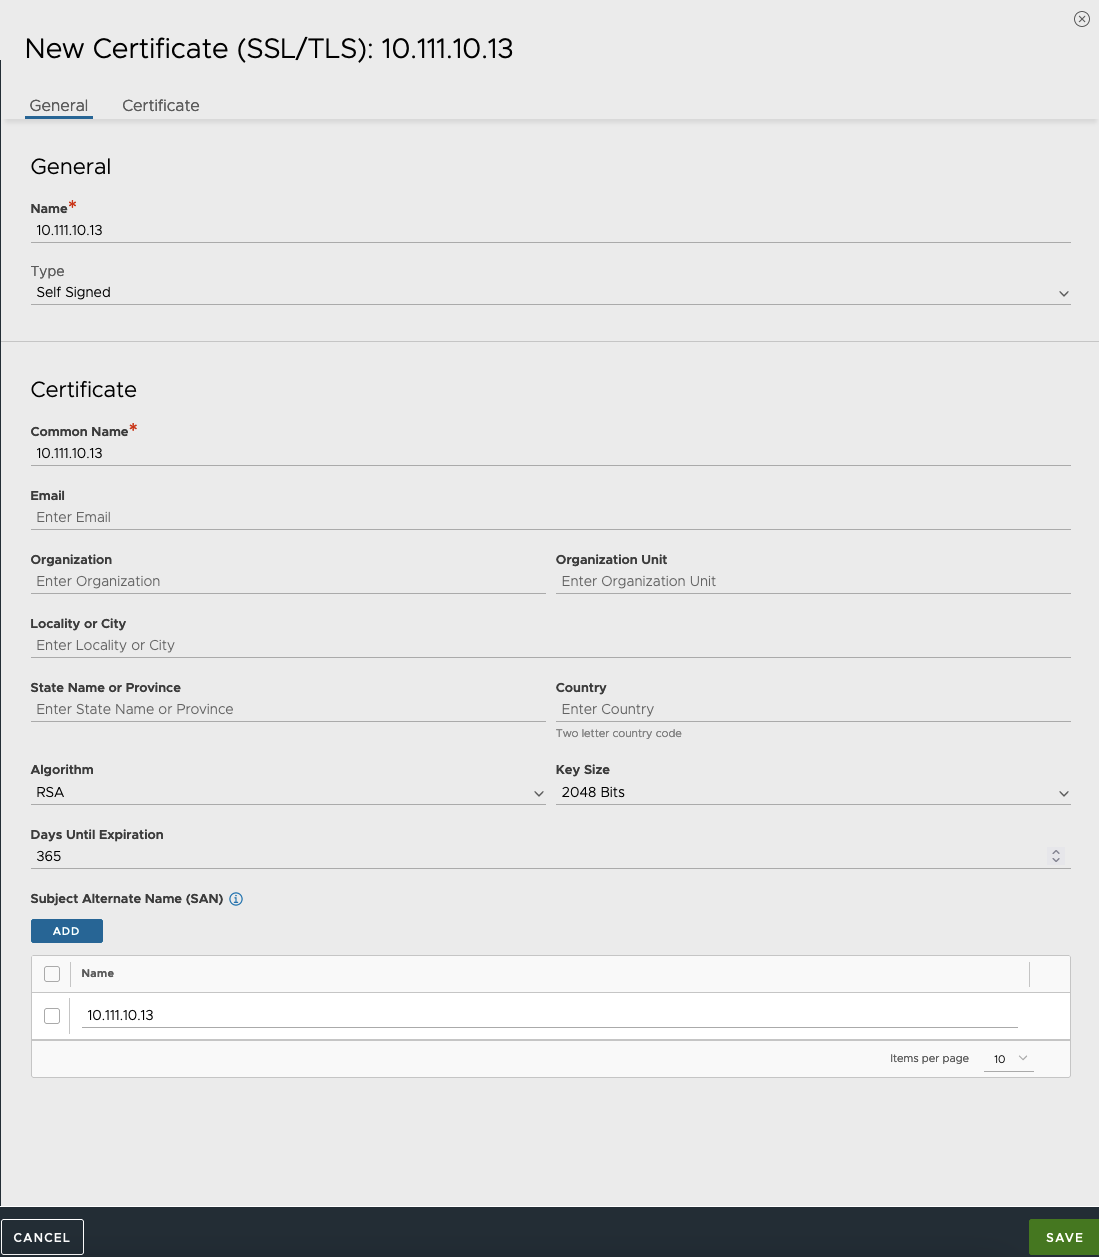
12. In the new window, type NSX ALB IP address in the three places: Name, Common Name, Subject Alternattive Name(SAN) and click Save.
After that, you may refresh browser and accept new certificate.
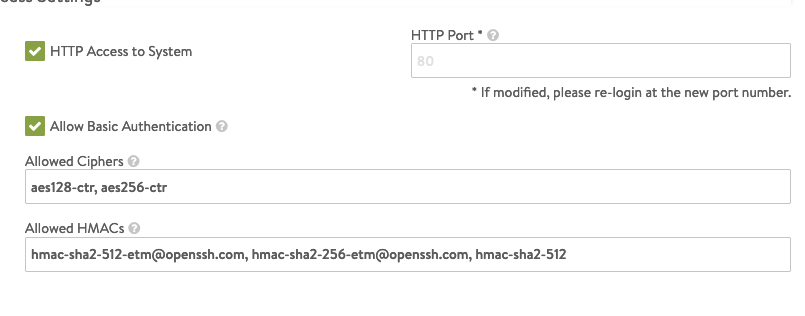
13. In the Access Settings window be sure the new certifciate is in SSL/TLS section. If you have vCenter 7.0.3 remeber to check Allow Basic Authentication.
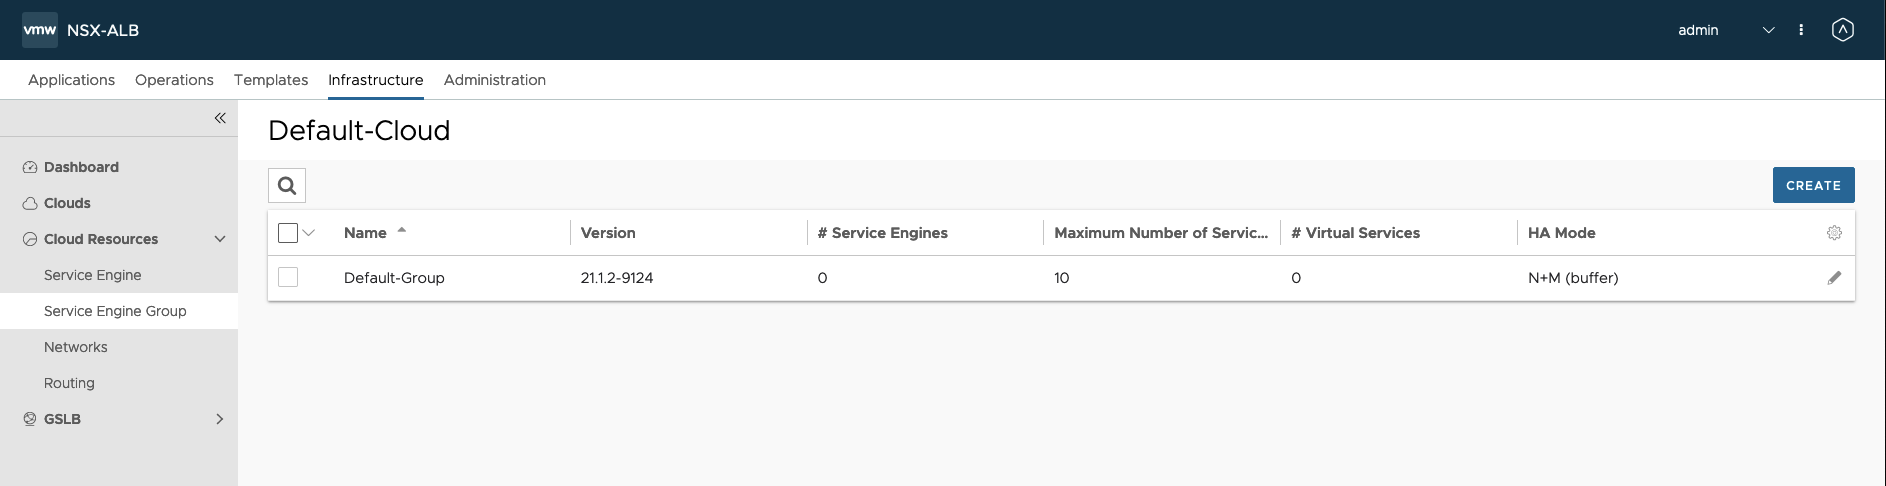
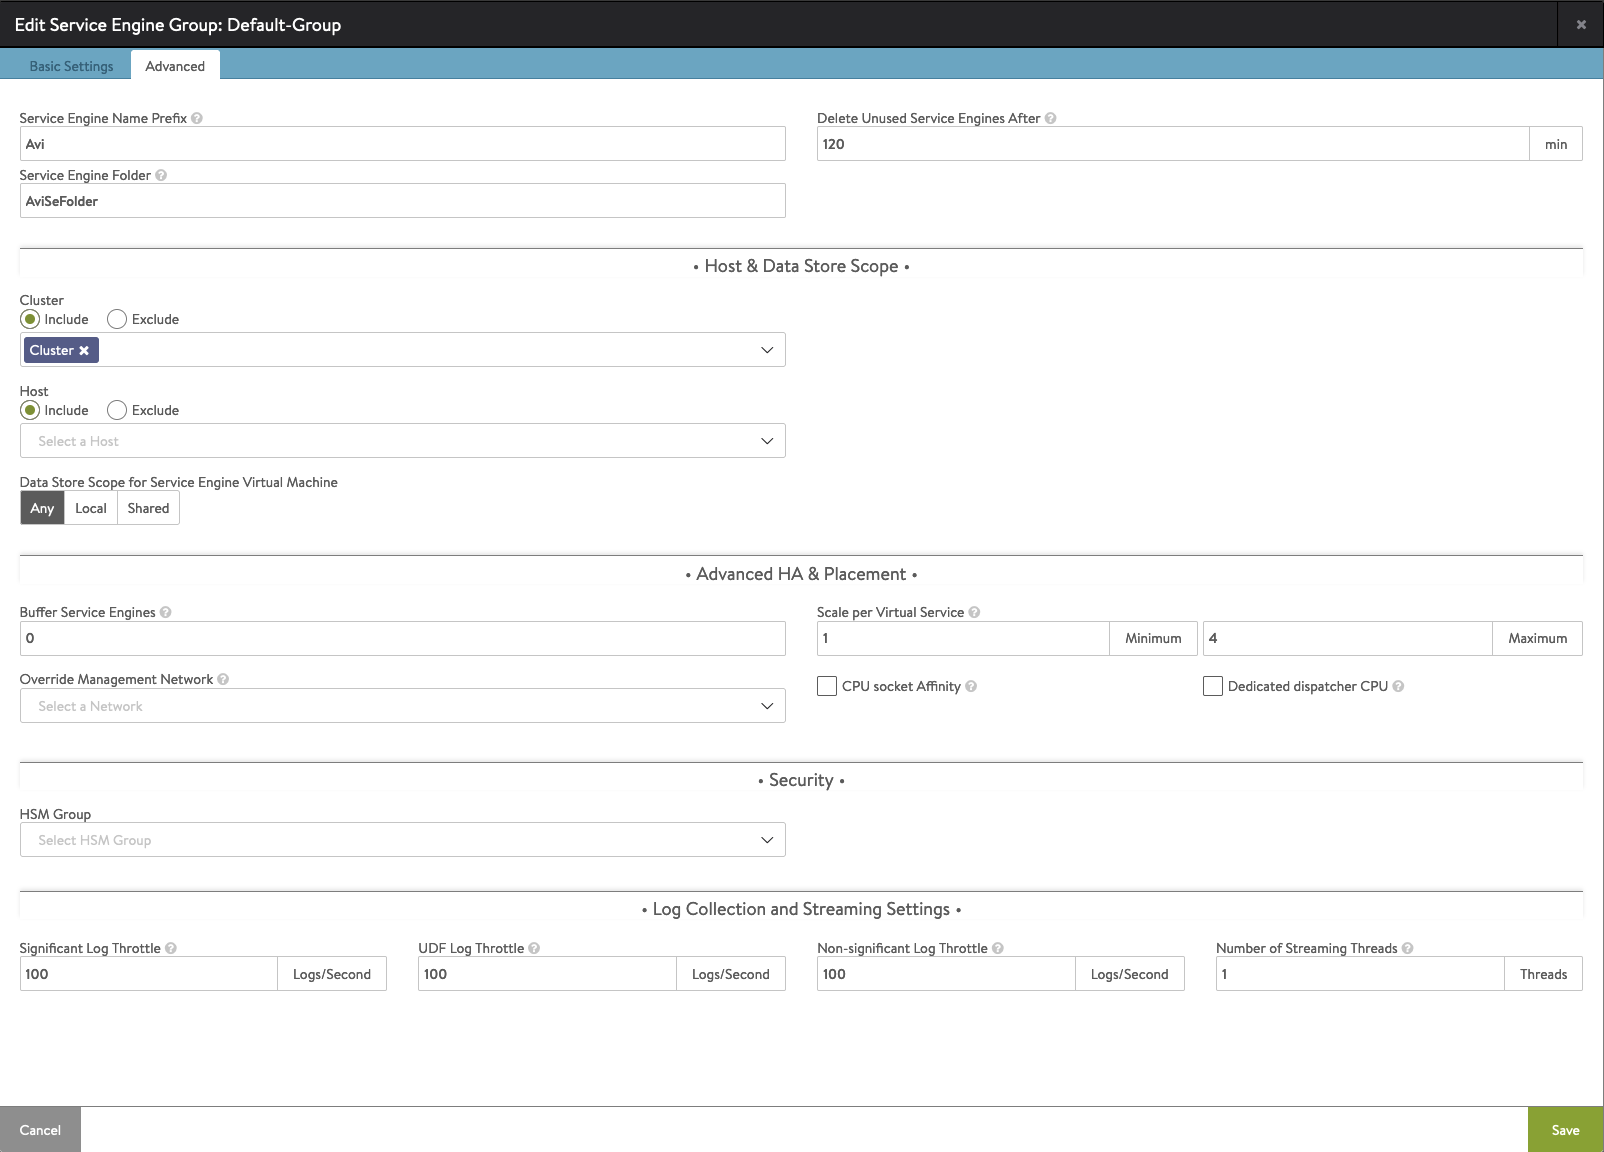
14. Configure Service Engine Group – Service Engines VMs load balancing user traffic. They have routes to the workload netowork.
Go to Infrastructure -> Cloud Resources -> Service Engine Group
Click on pencil icon to edit Default-Group and go to the Advanced tab. Choose vCenter Cluster and save.
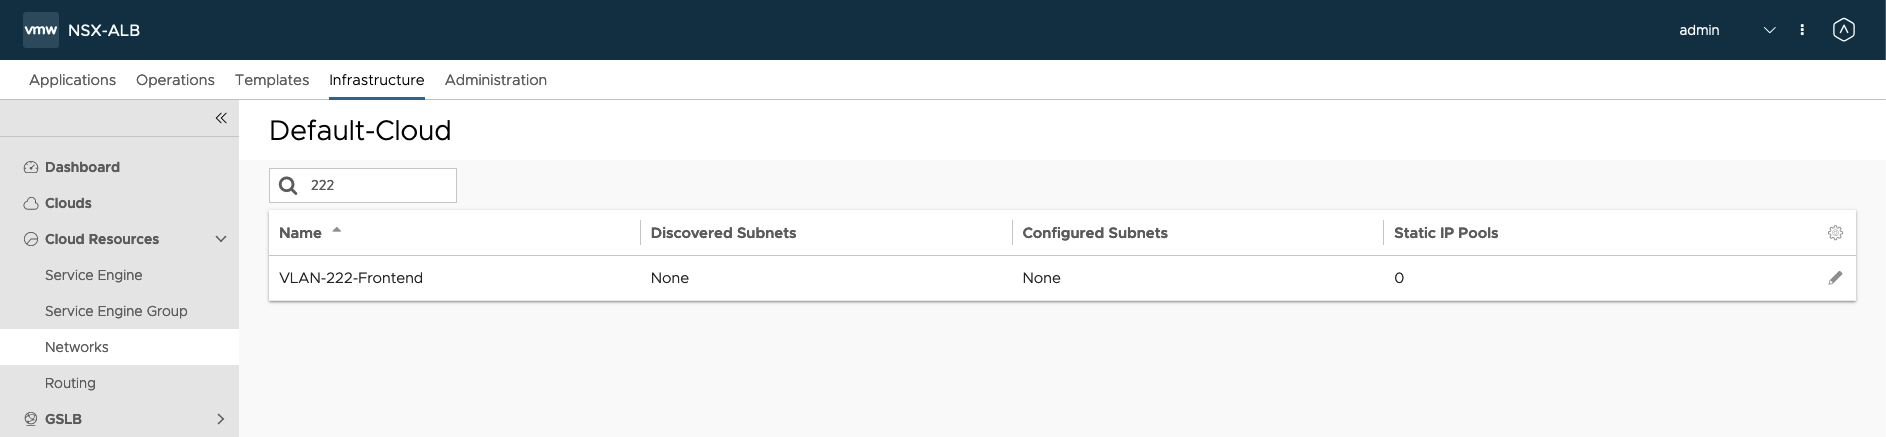
15. Configure Frontend Network – in this section, we tell AVI controller which portgroup ranges use for the load balancer frontends.
Go to Infrastructure -> Cloud Resources -> Networks. Find Frontend network and click pencil icon to edit.
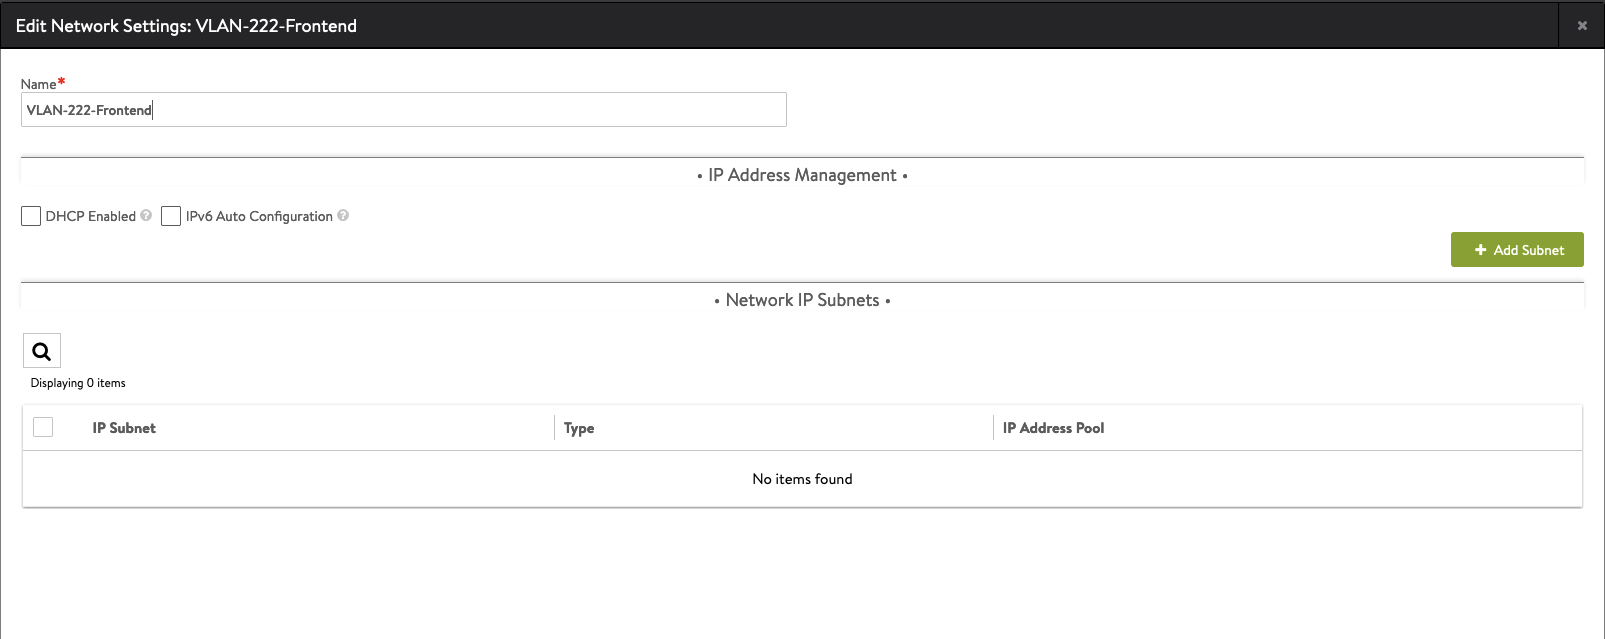
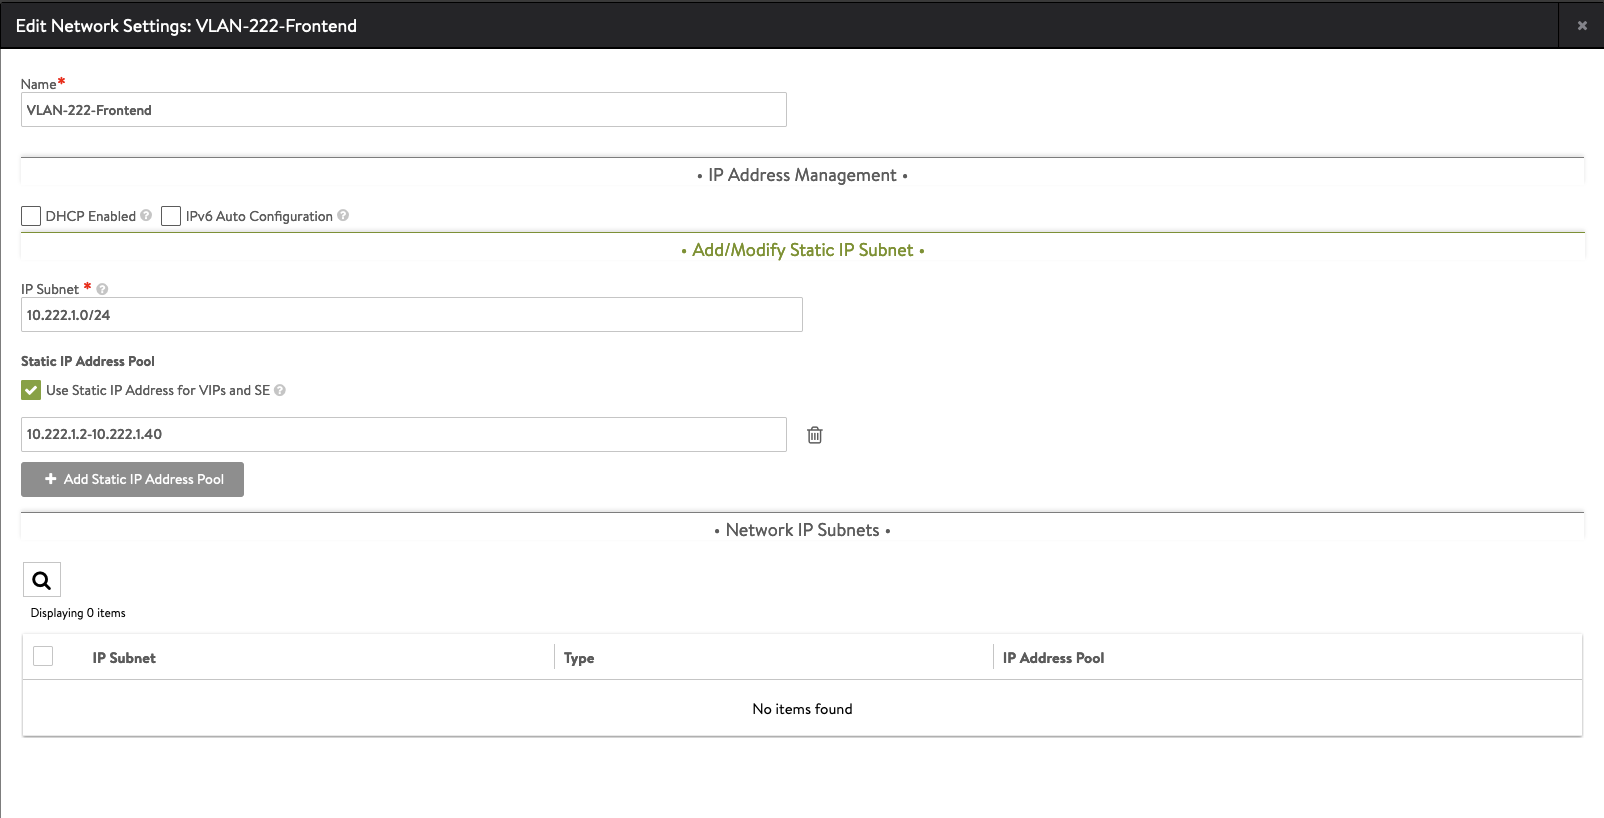
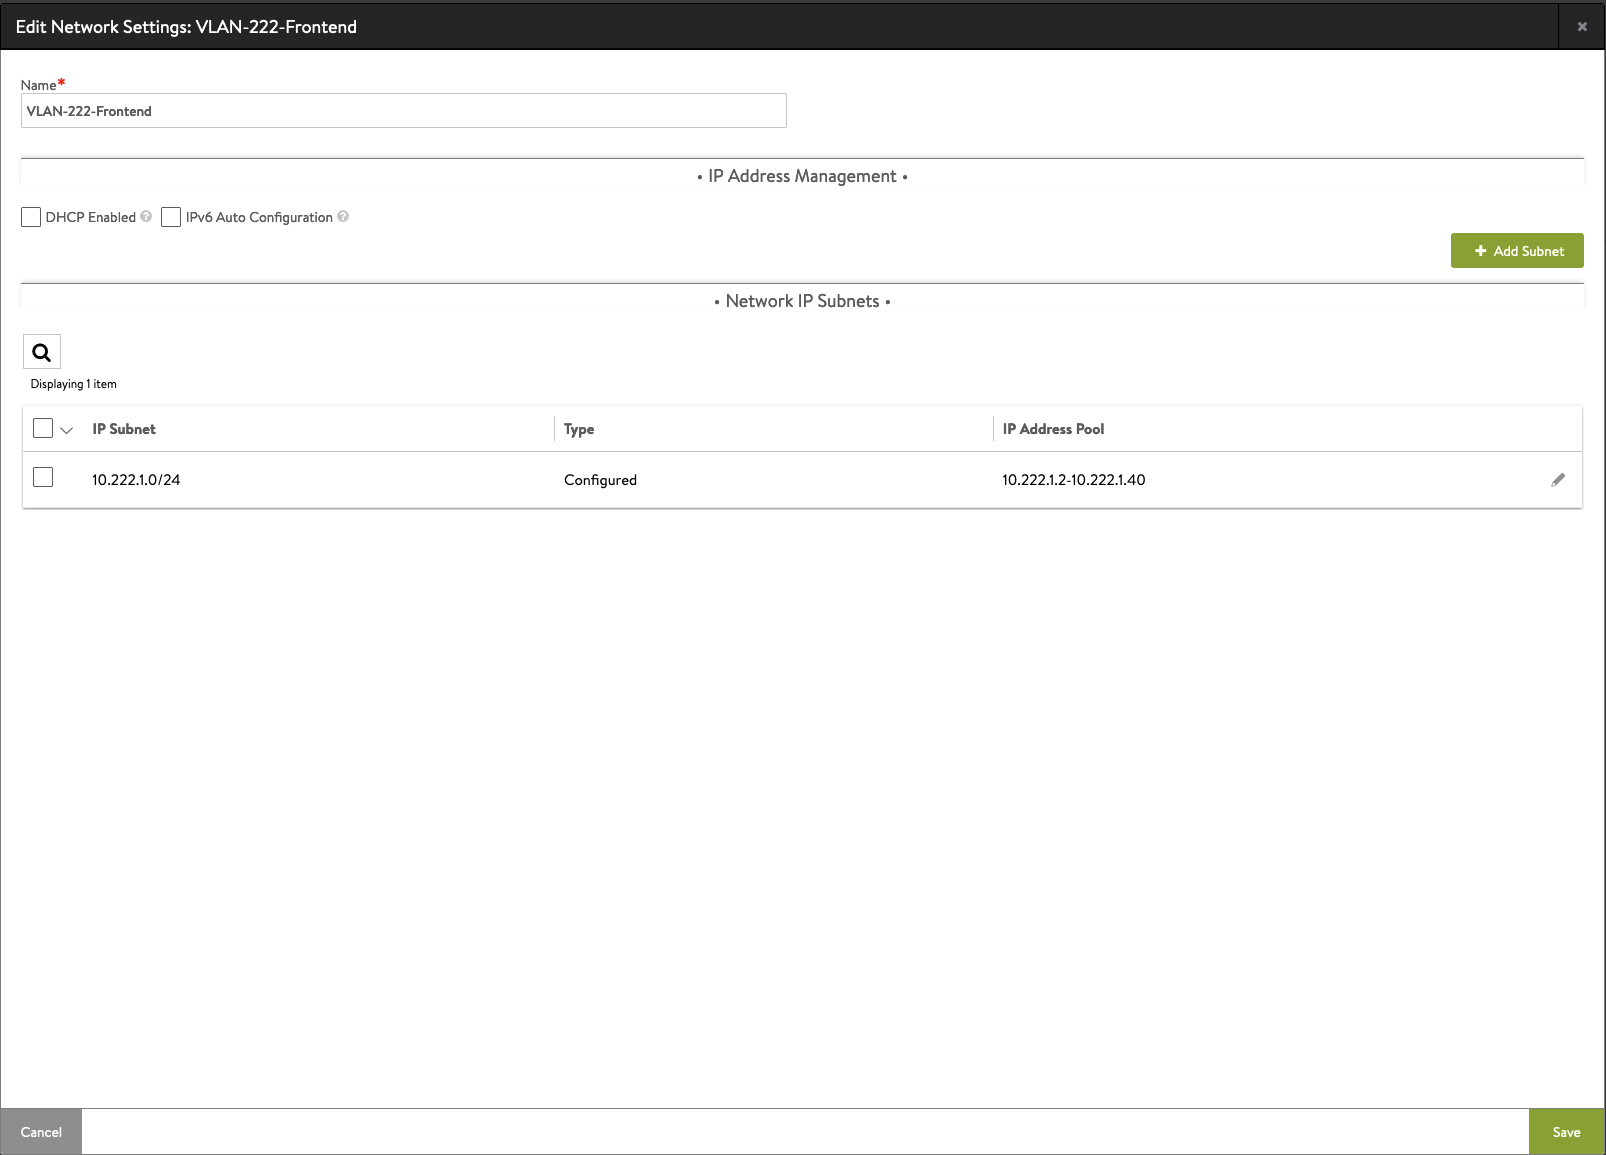
16. Click Add Subnet.
Type IP subnet (Frontend), select Use Static IP Address Pool and type Load Balancer VIPs. Save on this and on the next screen.
17. Configure Static Routes – in this place we setup route from Frontend Network to Workload Network. This is because, Service Engines need to know how to route traffic.
Go to Infrastructure -> Cloud Resources -> Routing -> Static Route tab -> Create
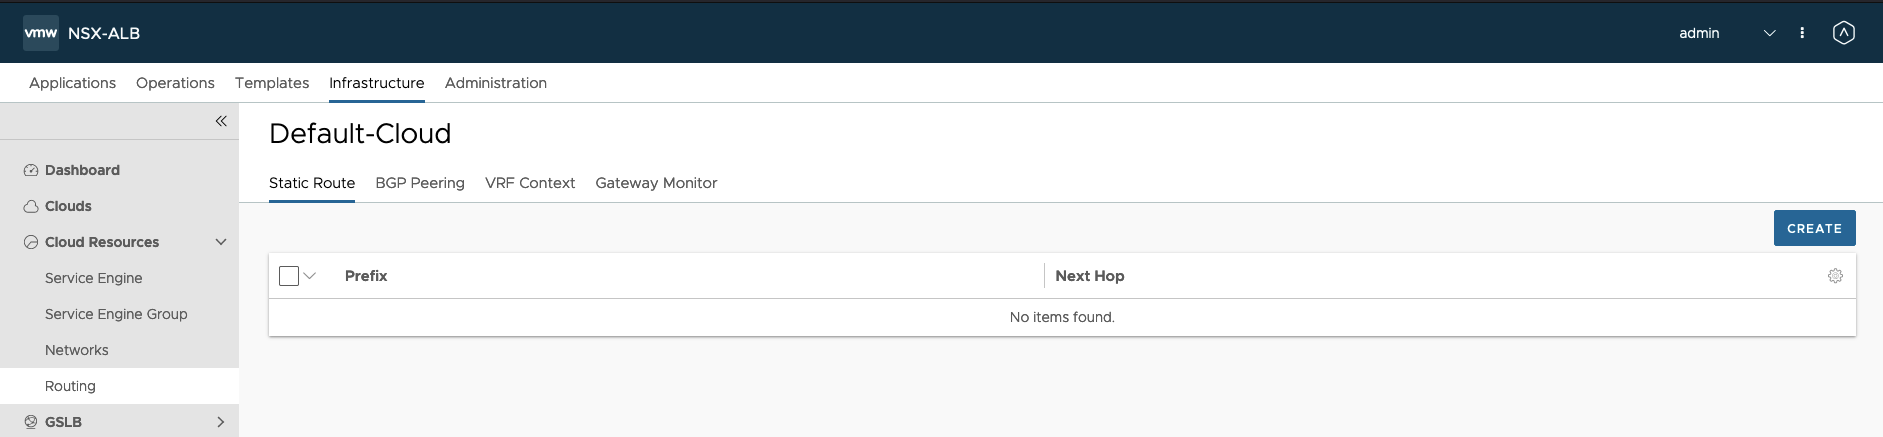
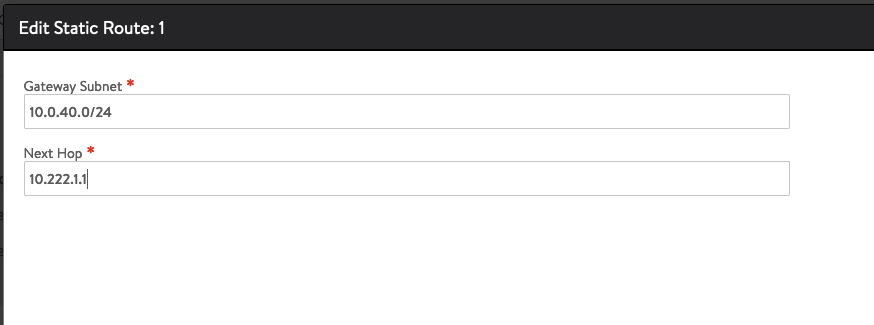
18. In the Gateway Subnet type Workload subnet.
In the Next Hop type Forntend Network Gateway.
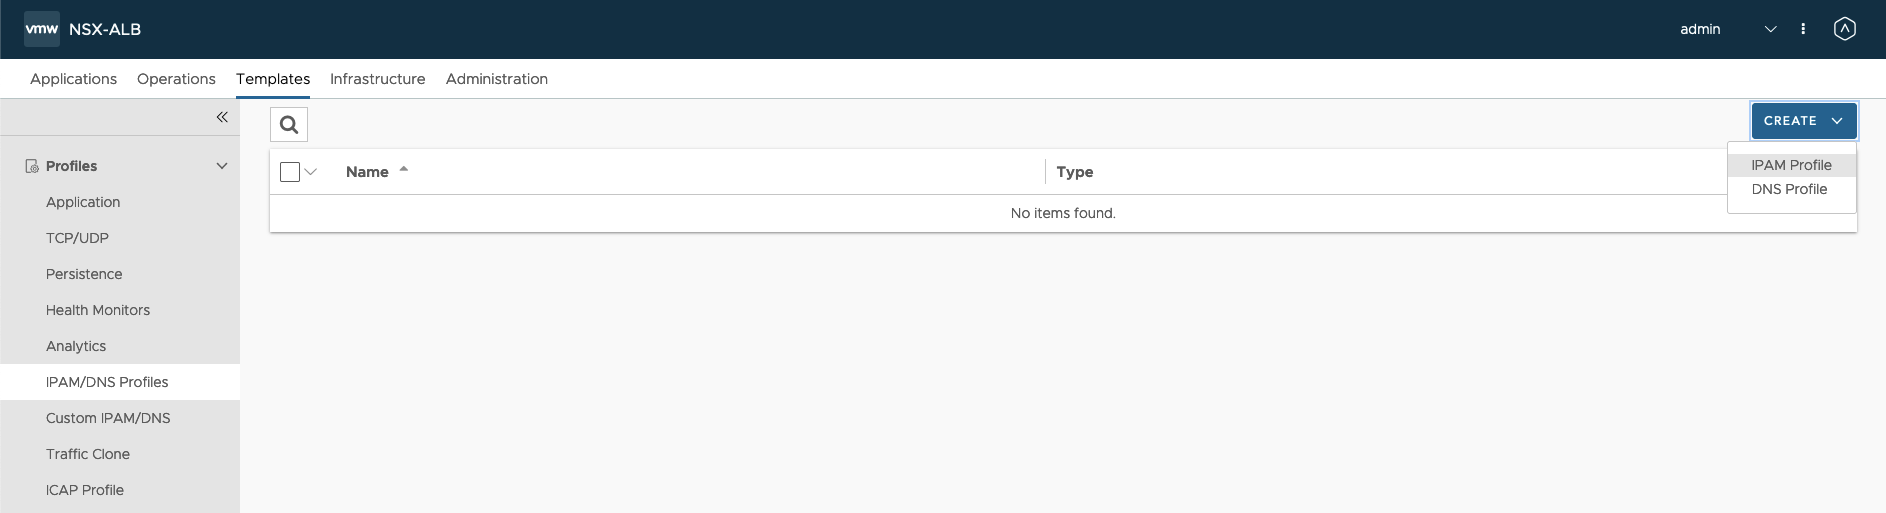
19. Configure IPAM for the Load Balancer VIPs – we need to create IPAM that includes VIP network and than, connect to the default cloud.
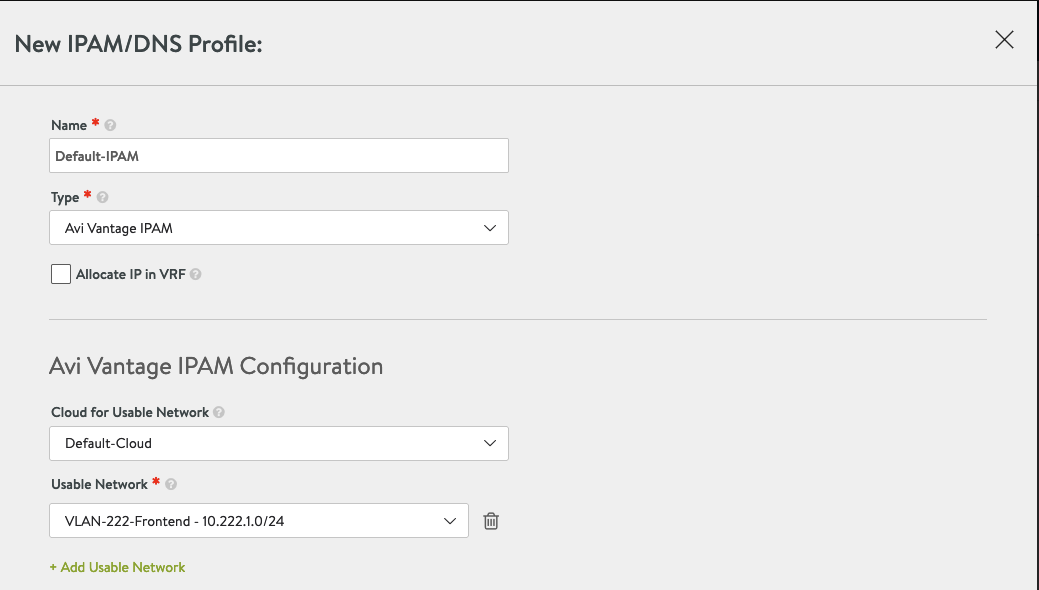
Go to Templates -> IPAM/DNS Profiles -> Create -> IPAM Profile.
20. Type Name, in Cloud For Usable Network choose Default-Cloud, in Usable Network choose Frontend Network.
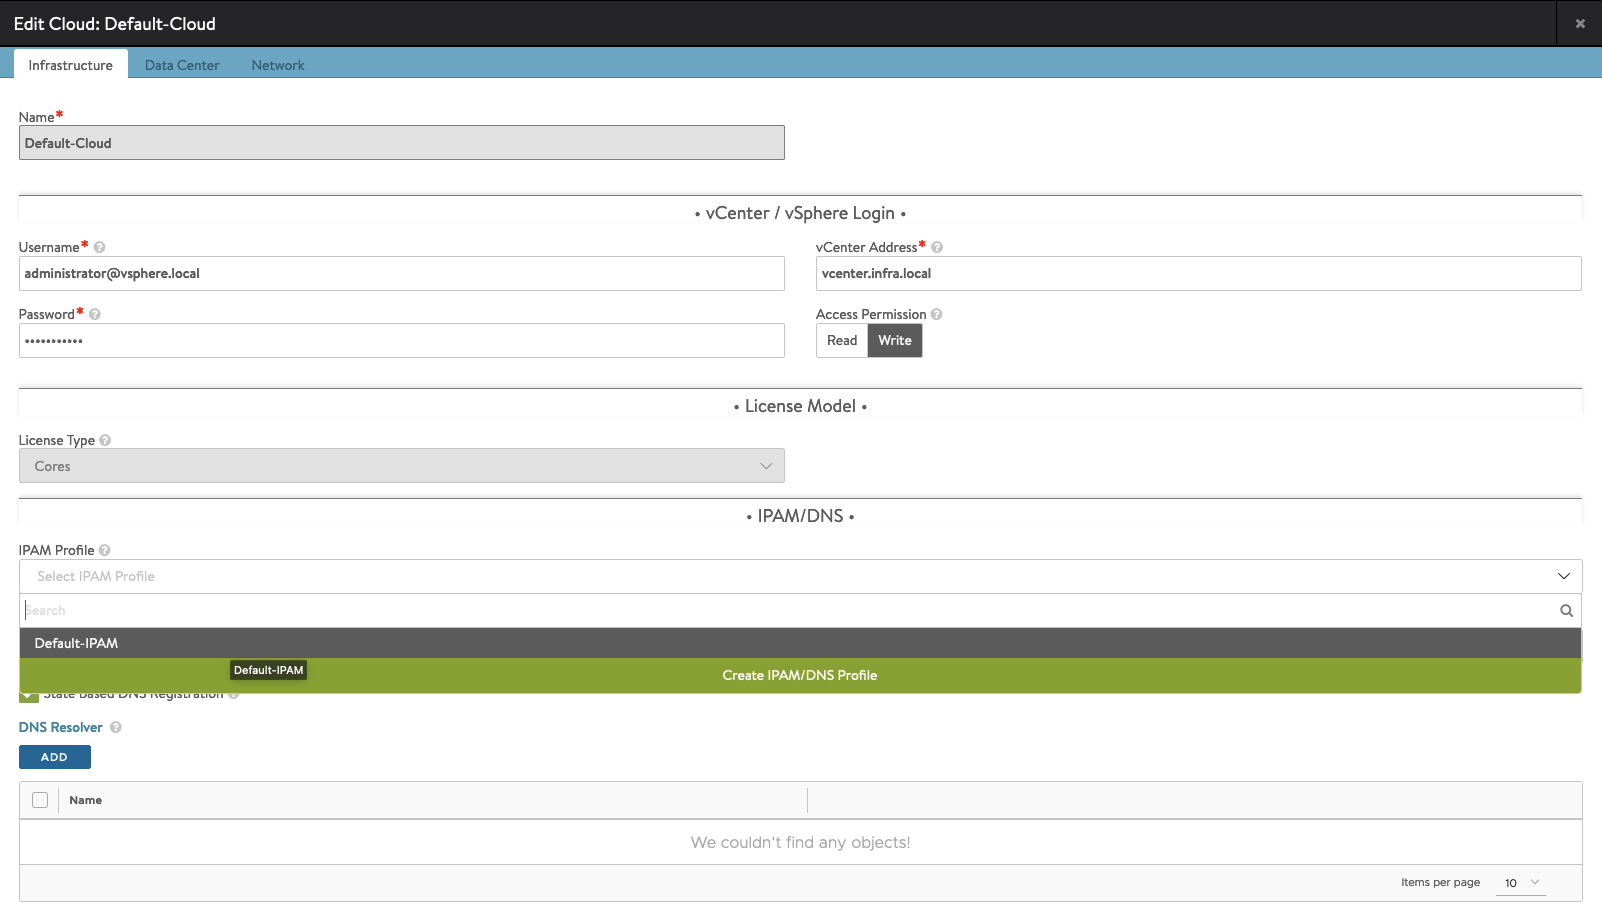
21. Add this IPAM to the Default Cloud.
Go to Infrastructure -> Clouds -> Default-Cloud -> click pencil icon to edit.

22. Go to Infrastructure tab. From the IPAM Profile dropdown list choose Default-IPAM and save.
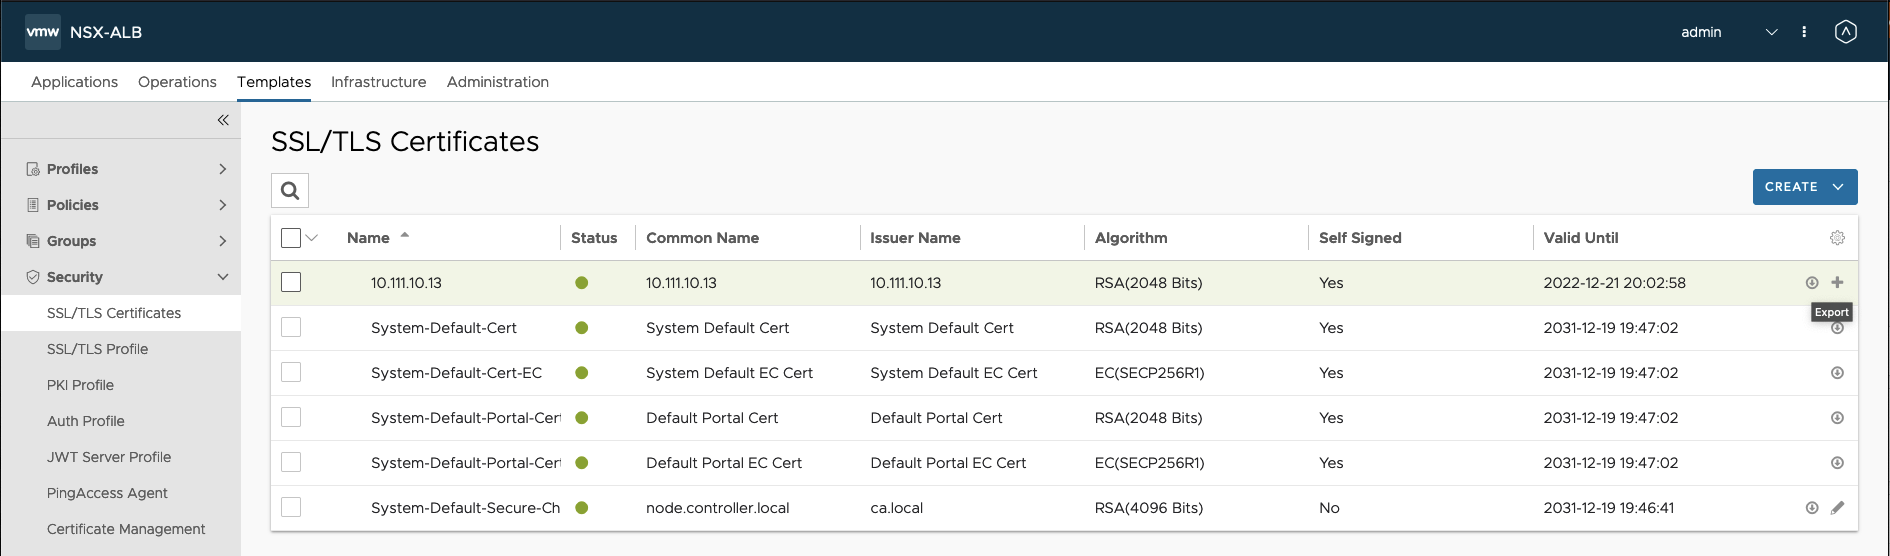
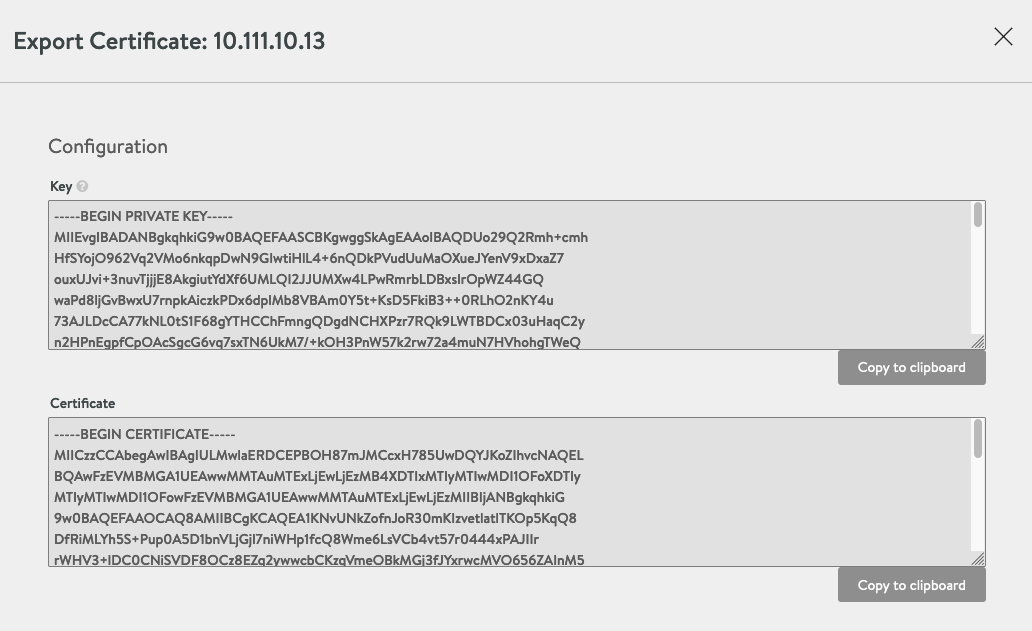
23. Last step is to copy Certificate. We need it in the next section to enable Workload Management.
Go to Templates -> SSL/TLS Certificates-> click down arrow button in the row where is you certifciate (10.111.10.13)
Copy Certificate.
Enabling Workload Management
Workload Management enables deploying and managing Tanzu Kubernetes workloads in vSphere.
- In vSphere Client choose Menu -> Workload Management and choose Get Started button.

2. Choose vSphere Distributed Swtich (VDS) option.

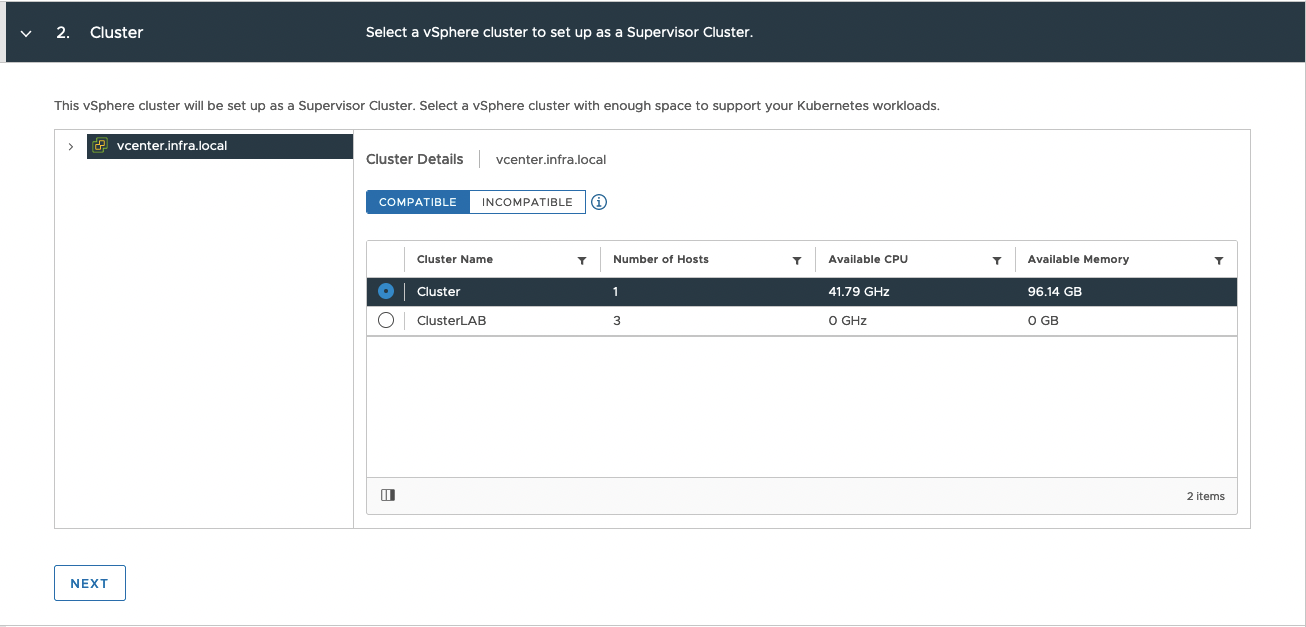
3. Choose cluster.
4. Choose prepared Storage Policy from previous steps.

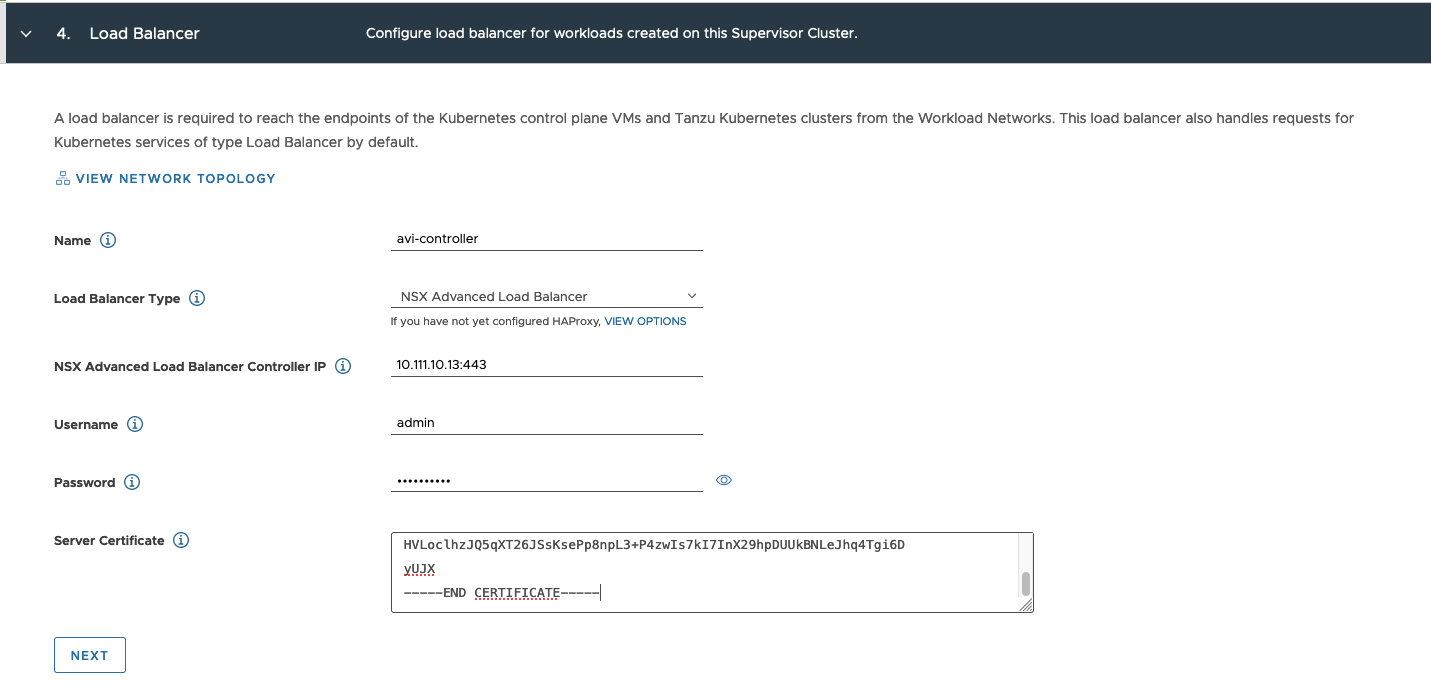
5. Load Balancer configuration:
– type Name and from the list, choose Load Balancer Type: NSX Advanced Load Balancer;
– type NSX Advanced Load Balancer Controller IP (Management IP from LB appliance);
– Username and Password from LB appliance;
– paste AVI Server Certificate (section: Configuration AVI, step 23)
6. Management Network:
– choose Static mode;
– Network – Management portgroup;
– Starting IP Address – you need 5 address, type first free IP;
– Type Subnet Mask, Gateway, DNS, DNS Search Domain and NTP

7. Workload Network:
– choose Static Network Mode and leave Internal Network for Tanzu Kubernetes Services as is;
– from Port Group choose Workload portgroup;
– IP address Range(s) – provide range to Tanzu Kubernetes nodes IPs from Workload portgroup;
– Enter rest of the addresses.

8. Choose Tanzu Content Library.

9. Choose Control Plane Size. Review changes and choose Finish to start deployment.

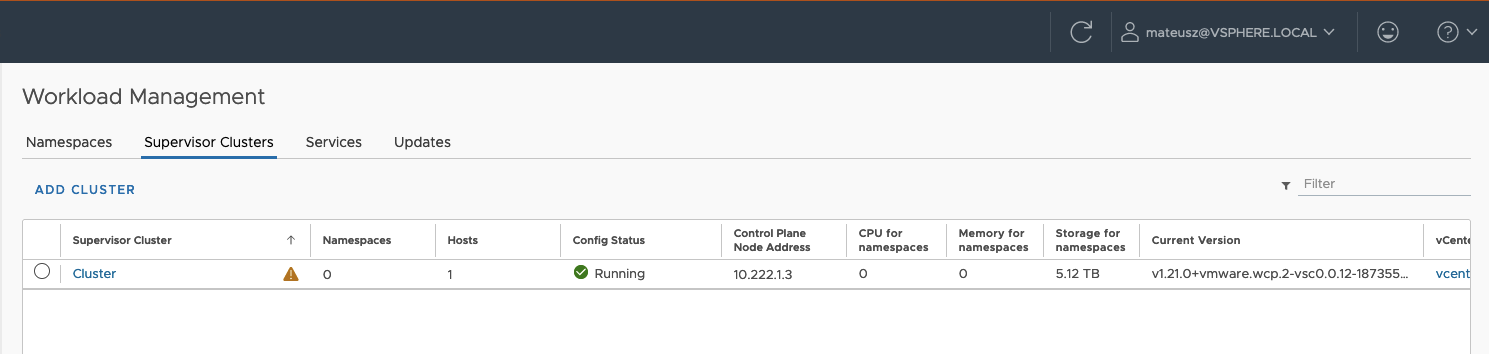
10. Workload Managemnt deployment is in progress. In this time, SupervisorControlPlaneVM(s) will be created. It take some time. Grab a tea or coffee and wait patiently;)
11. Deployment completed without errors, wohoo!
10.222.1.3 is a Control Pane Node Address. That means, this is the endpoint, to which we connect to manage vSphere Tanzu and Kubernetes cluster. As you can see, this is from Frontend range.
Don’t worry about exclamation mark – this is because my licence is expiring;)
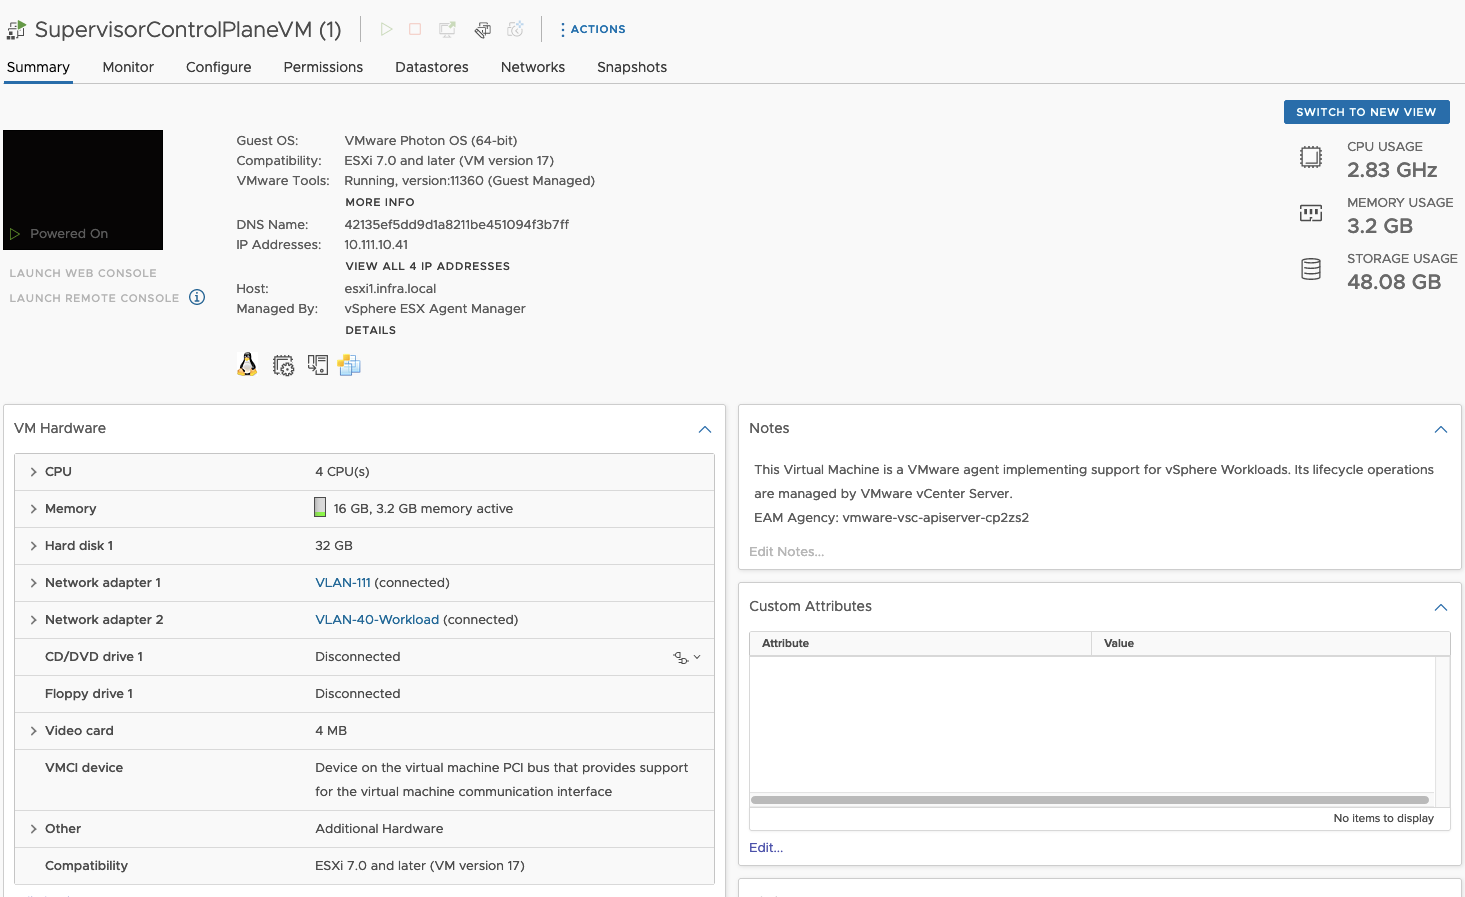
12. View from vSphere perspective there are 3 new objects: 3x SupervisorControlPlaneVM(s) which are management objcets. There are needed to provide maintain and create Tanzu Kubernetes clusters and nodes.
Each SupervisorControlPlaneVM has 2 network adapters: Management & Workload.

Creation of the namespace
Namespace is a space where you can provision and Tanzu Kubernetes clusters.
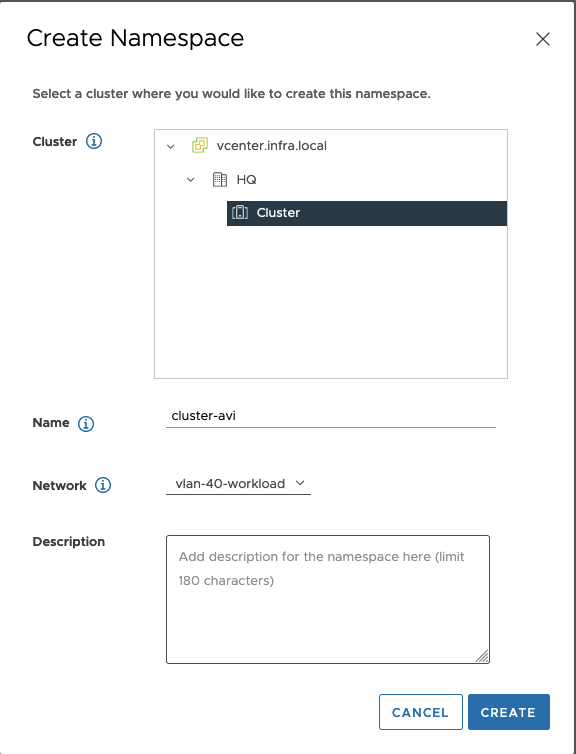
- In vSphere Client choose Menu -> Workload Management, change to the Namespace tab and choose Create namespace button.

2. Choose your cluster and enter Name to the namespace. Leave Network as is. This is a Workload portgroup so it’s OK.
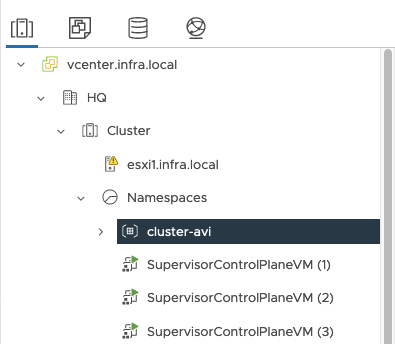
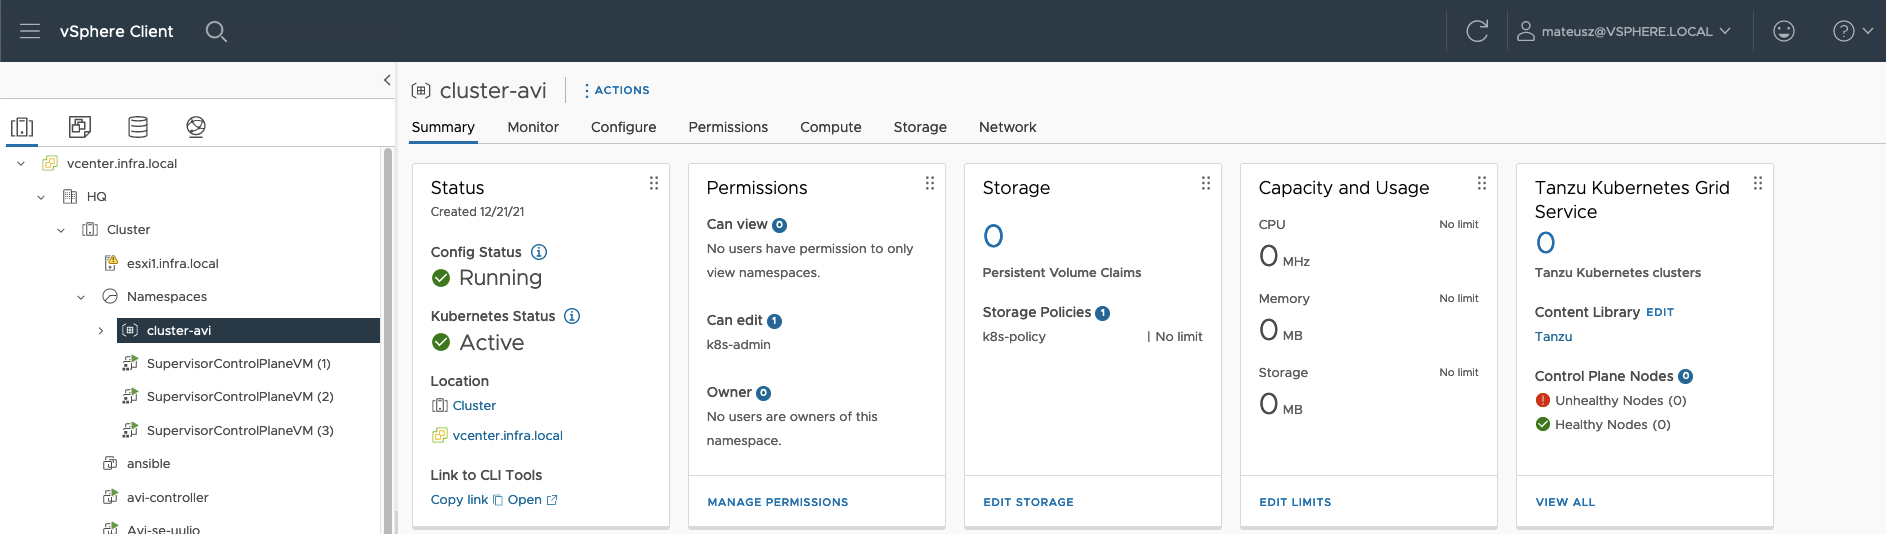
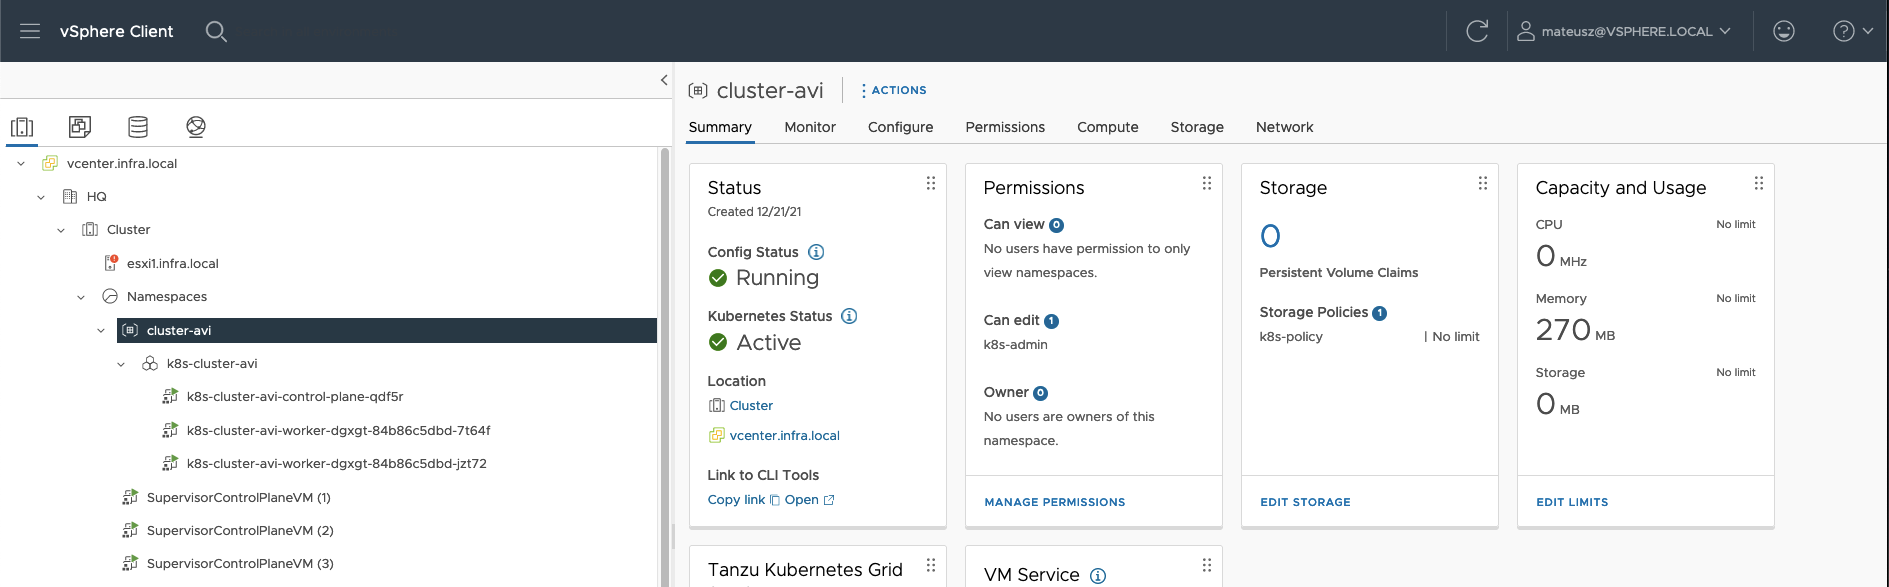
3. View from vSphere perspective there are new object – cluster-avi
If you choose it, you can edit you neamespace with access permissions, storage, CPU/Memory limits…
4.Let’s begin with some modifuciations.
Persmissions – choose user, who will be allowed to login to this namespace. I have some service user with a name k8s-admin@vsphere.local. Choose edit role.

5. Storage – be sure to chose dedicated storage policy. All new obcject will be placed on the datastores with this assinged policy.

6. Content Library – bu sure to choose dedicated Tanzu Content Library.

7. VM Service tab – VM Classes define size (CPU&RAM) of the VMs (Tanzu Kubernetes nodes) which we can create on dedicated namespace.

8. VM Service tab – choose Tanzu Content Library.

9. At the end, screen with configiration should look like this.
I don’t done any changes in Capacity and Usage tab.
Logging in to the namespace and creation Tanzu Kubernetes cluster.
1. Paste Control Plance Node Address to your browser and download CLI Plugin. I use Mac OS so, I’ve got this one. If you using different system, you can change it by clicling select operating system.
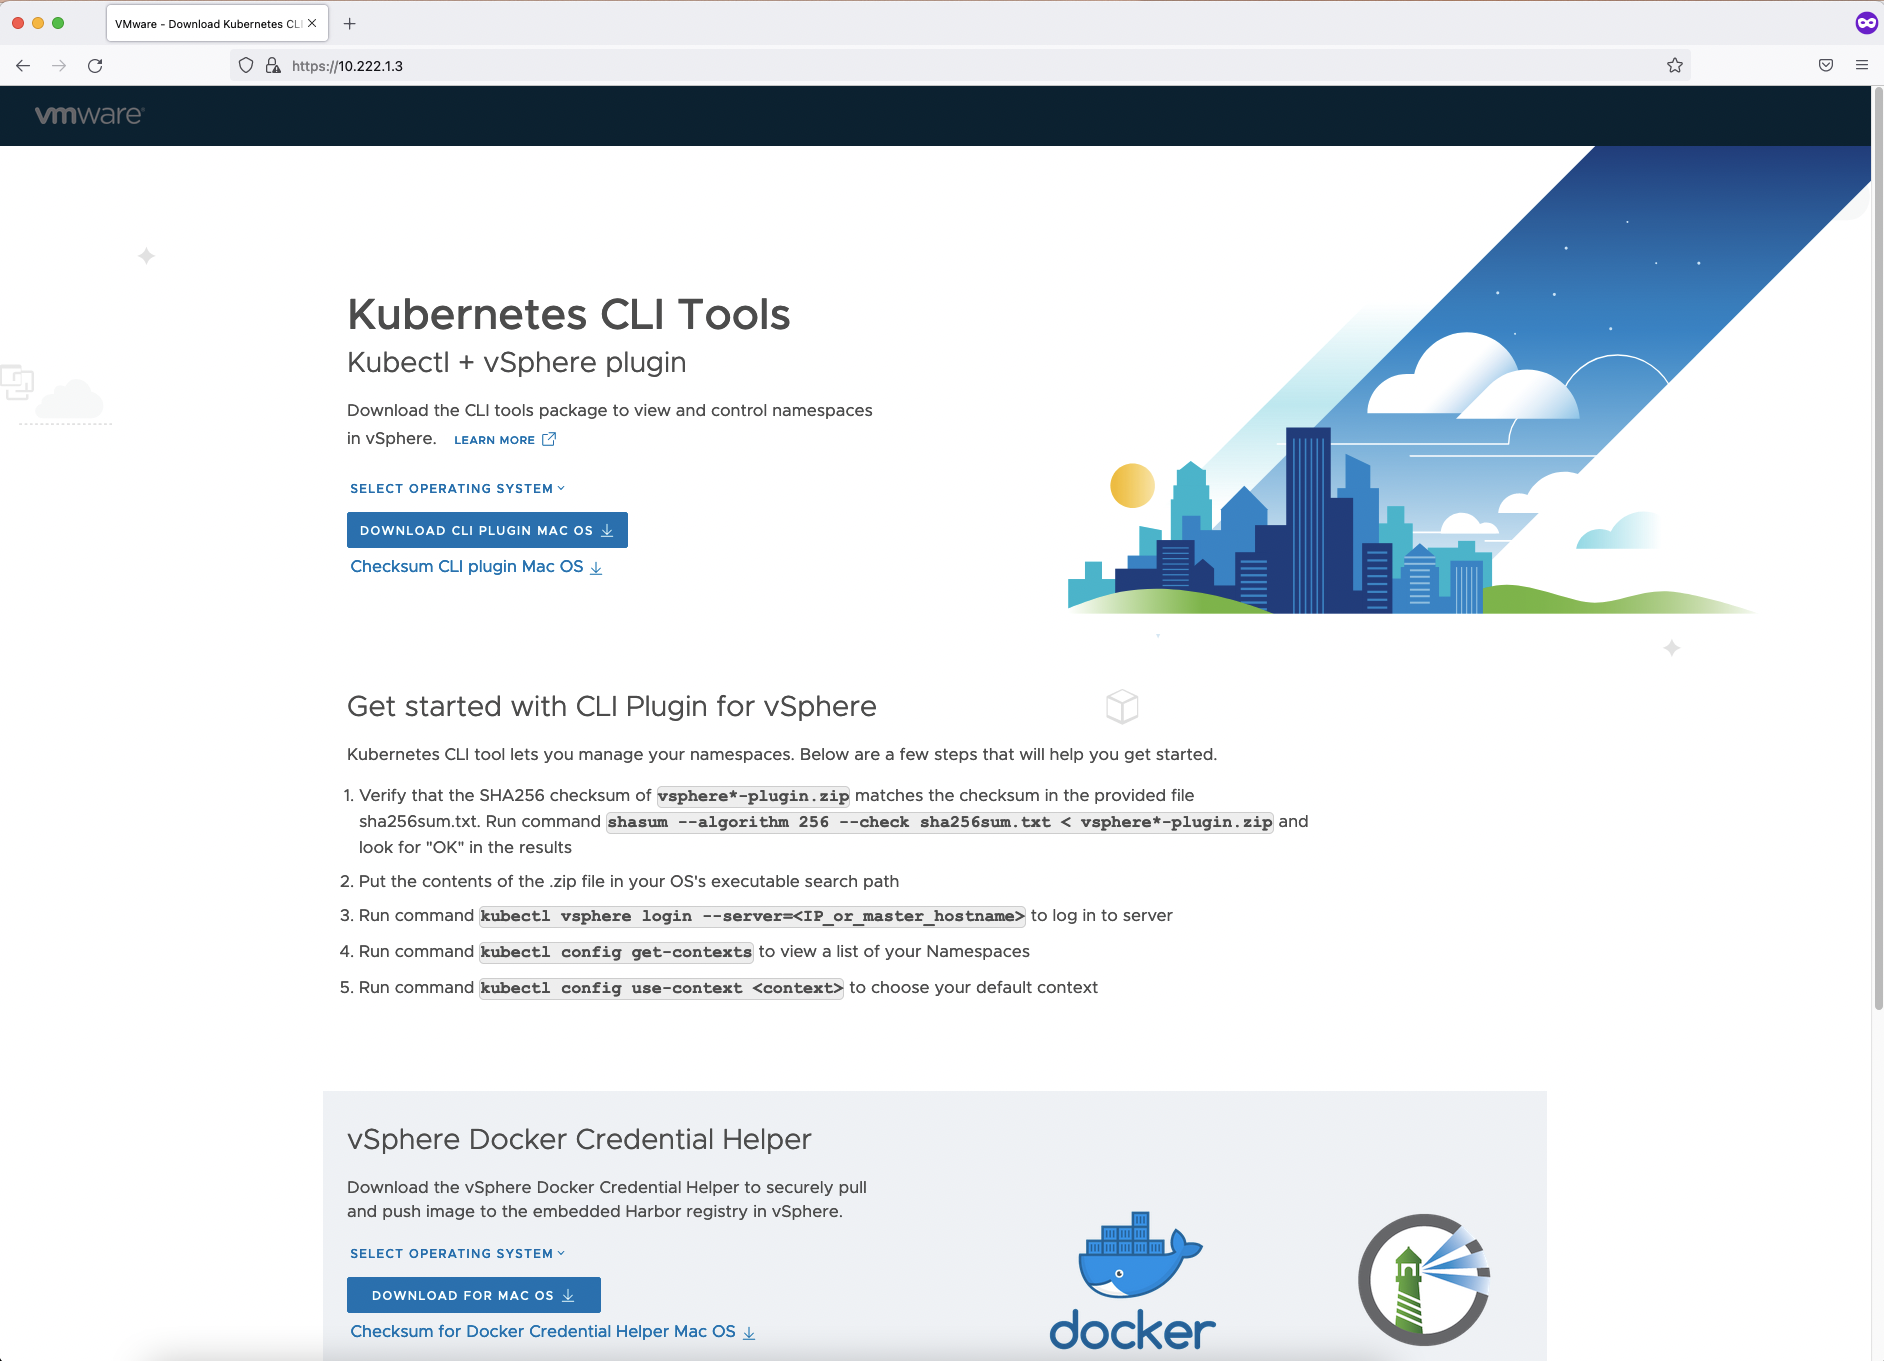
2. Download vsphere-plugin.zip file. After that, unzip it and than you have bin catalog with two files: kubectl and kubectl-vsphere.
Open terminal, change directory where files are unizpped.
If your downloaded files are not executable, give them right privileges: chmod +x kubectl*
Copy two files to your PATH: cp * /usr/local/bin
Tip for Mac users: If you have have ‘permission denied’ remeber to use sudo before command and allow permissions in System Preferences-> Security & Privacy -> in General tab click ‘allow anyway’ if needed.

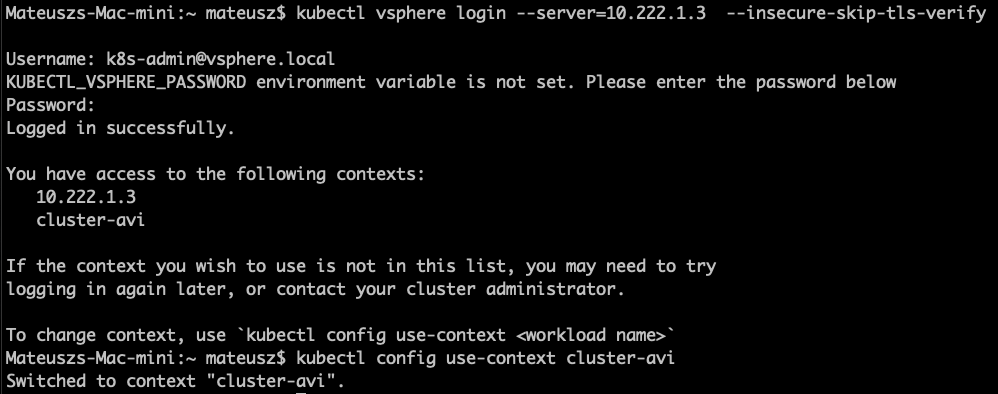
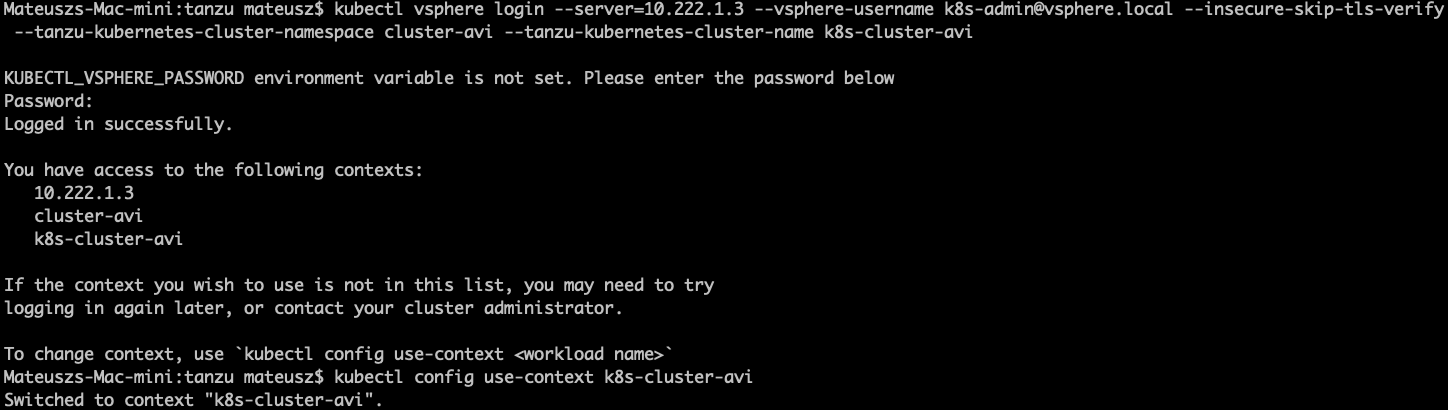
3. In the terminal window type command:
kubectl vsphere login –server=[your Control Plane Node Address] –insecure-skip-tls-verify
Enter Username and Password.
Than, change context to the namespace cluster-avi with a command:
kubectl config use-context cluster-avi
4. In the next step, we need to create YAML file to create Tanzu Kubernetes cluster in the namespace cluster-avi
Here you can find more information about configuration of YAML files:
https://docs.vmware.com/en/VMware-vSphere/7.0/vmware-vsphere-with-tanzu/GUID-B2807BCD-0CE1-4C3A-9C0E-2B78F5DA0E90.html
apiVersion: run.tanzu.vmware.com/v1alpha2
kind: TanzuKubernetesCluster
metadata:
  name: k8s-cluster-avi
  namespace: cluster-avi
spec:
  topology:
    controlPlane:
      replicas: 1
      vmClass: best-effort-small
      storageClass: k8s-policy
      tkr:
        reference:
          name: v1.21.2---vmware.1-tkg.1.ee25d55
    nodePools:
    - name: worker
      replicas: 2
      vmClass: best-effort-small
      storageClass: k8s-policy
      tkr:
        reference:
          name: v1.21.2---vmware.1-tkg.1.ee25d55
  settings:
    network:
      pods:
        cidrBlocks:
        - 100.80.0.0/11
      services:
        cidrBlocks:
        - 100.32.0.0/13
5. Let’s deploy Tanzu K8S cluster!
k8s-cluster-avi.yaml -> this my YAML file name.
Use command:
kubectl apply -f k8s-cluster-avi.yaml

6. You can check the progress with commands kubectl get tanzukubernetesclusters ( short version is kubectl get tkc) or with kubectl describe tkc
When you see, True under READY column, that means Tanzu K8S cluster is ready. Now, you can log to them.

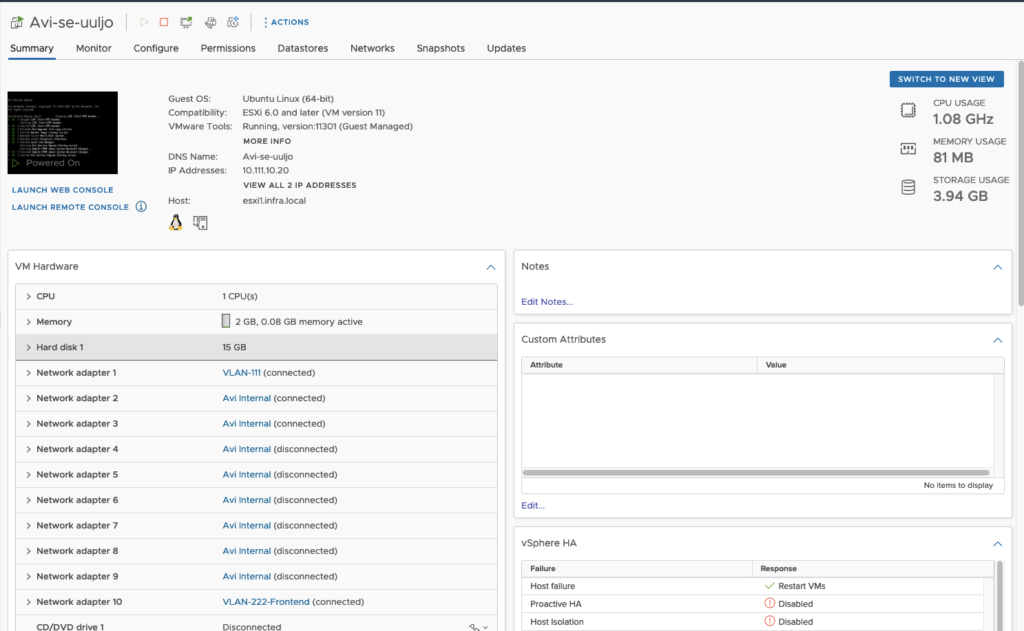
7. From vCenter perspetive, there are created new object k8s-cluster-avi. Under this, there is 1 control plane Tanzu K8S VM and 2 Tanzu K8S worker nodes.
8. From NSX Advanced Load Balancer perspetive, there are created 2 new objects – Virtual Services.
– the upper one with a name: domain-c8–cluster-avi…. is created while new Tanzu Kubernetes cluster is deployed.
Wnen new Tanzu Kubernetes cluster is created, new Virtual Service will appear here.
– the lower one, with a name: domain-c8–kube-system… is created while Worklad Management is created.

8. Additionaly, NSX Advanced Load Balancer deployed in the vCenter Service Engine VM – Avi-se-uuljo. Part is uuljo is a random set of characters.
Service Engine VM is need to load balancing and all client- and server-facing network interactions.
Deploying pods and deployments.
1. Good practice is to logout and log in again. Use command kubectl vsphere logout.
Than, you can log directly to the to newly created cluster. Use command:
kubectl vsphere login –server=10.222.1.3 –vsphere-username k8s-admin@vsphere.local –insecure-skip-tls-verify –tanzu-kubernetes-cluster-namespace cluster-avi –tanzu-kubernetes-cluster-name k8s-cluster-avi
And than swtich context to to k8s-cluster-avi with a command: kubectl config use-context k8s-cluster-avi
–server=10.222.1.3– > Control Plane Node Address;
–vsphere-username k8s-admin@vsphere.local -> user allowed to log into the namespace;
–tanzu-kubernetes-cluster-namespace cluster-01 -> name of the namespace;
–tanzu-kubernetes-cluster-name k8s-cluster-01 -> name of the Kubernetes cluster;
2. Let’s check what nodes do we have.

3. Create ClusterRoleBinding. It grants access to authenticated users run a privileged set of workloads using the default PSP vmware-system-privileged.
More about this you can read here: https://docs.vmware.com/en/VMware-vSphere/7.0/vmware-vsphere-with-tanzu/GUID-4CCDBB85-2770-4FB8-BF0E-5146B45C9543.html?hWord=N4IghgNiBcICYFMBmYCuEAuBaDBrA5lmHALYCWAdiAL5A
Mateuszs-Mac-mini:tanzu mateusz$ kubectl create clusterrolebinding default-tkg-admin-privileged-binding --clusterrole=psp:vmware-system-privileged --group=system:authenticated
clusterrolebinding.rbac.authorization.k8s.io/default-tkg-admin-privileged-binding created
3. Let’s create pod and deployment with a commands:
kubectl run pod-avi --image=nginx
kubectl create deployment dep-avi --image=nginx --replicas=5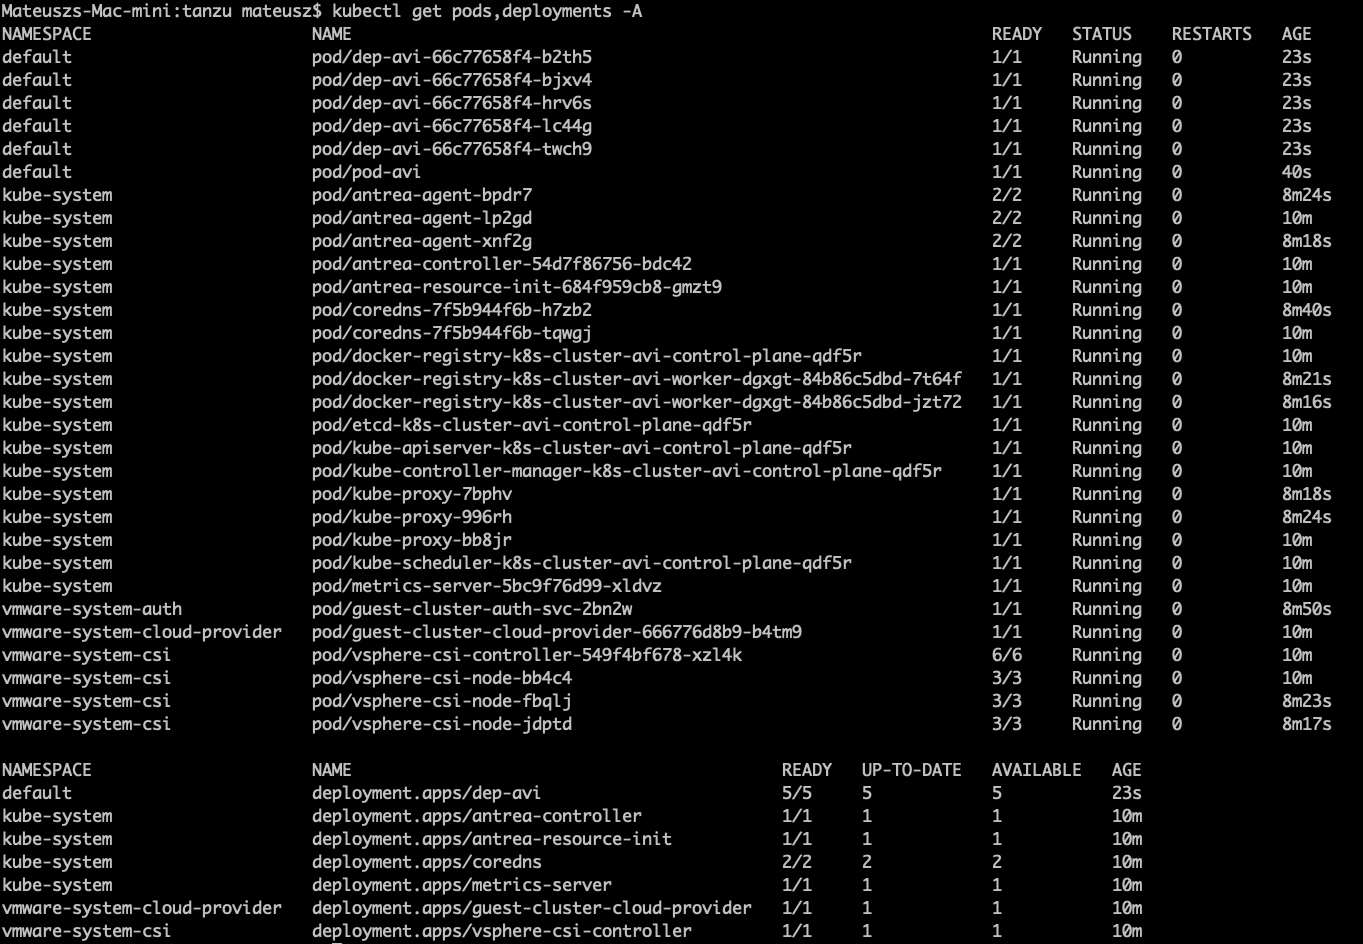
6. To delete Tanzu Kubernetes cluster, switch contex to cluster-avi (namespace) and type command:
kubectl delete tanzukubernetescluster –namespace cluster-avi k8s-cluster-avi
Summary
At the end, there are base, fully functional Kubernetes cluster running on vCenter with NSX Advanced Load Balancer. You can create pods, deployments and other components like in ‘standard’ K8S virtual machine (or bare metal server). If you need less/more control plane/worker nodes, different Kubernetes version or different CIDR change YAML configuration and apply.


4 Comments
Well-written and clear article.
In my test deployment the Supervisor cluster was successfully created, but when I checked on AVI, the Virtual Services were not healthy and were showing as connected to the front end network rather than the workload network. Do you have any clue?