
Kubernetes CSI (Container Storage Interface) is a pivotal standard that facilitates the integration of storage systems with Kubernetes. The CSI standard provides a framework for connecting various storage systems to container orchestration platforms, enabling the use of different storage solutions without modifying Kubernetes core code.
Synology as many other storage providers has an open-source CSI driver that provides scalable, reliable, and secure persistent storage for Kubernetes environments. It supports iSCSI, NFS and SMB/CIFS protocols.
In this tutorial, I will show how to configure Synology CSI for iSCSI volumes in the Red Hat OpenShift.
Requirements:
- Red Hat OpenShift cluster (SNO here);
- oc;
- storage array to expose LUNs.
- enabled iSCSI on the worker nodes – by default, iSCSI service is disabled. Look at my earlier article how to enable it – HERE!
1. Creating a user on the Synology NAS
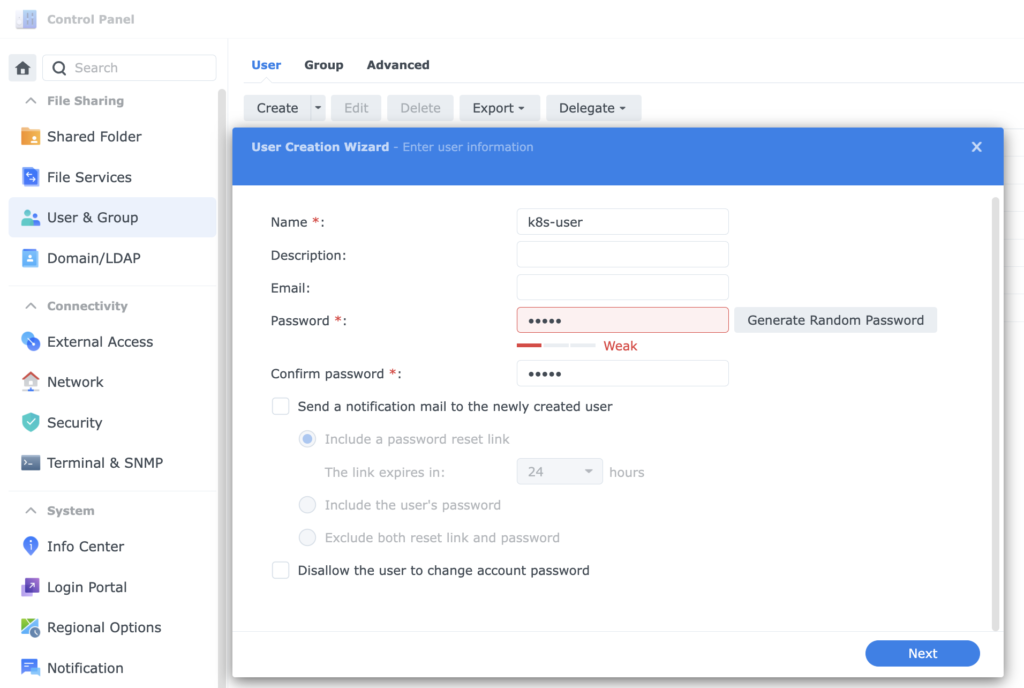
1. Log in to the Synology NAS. Create a new (service) user for future use.
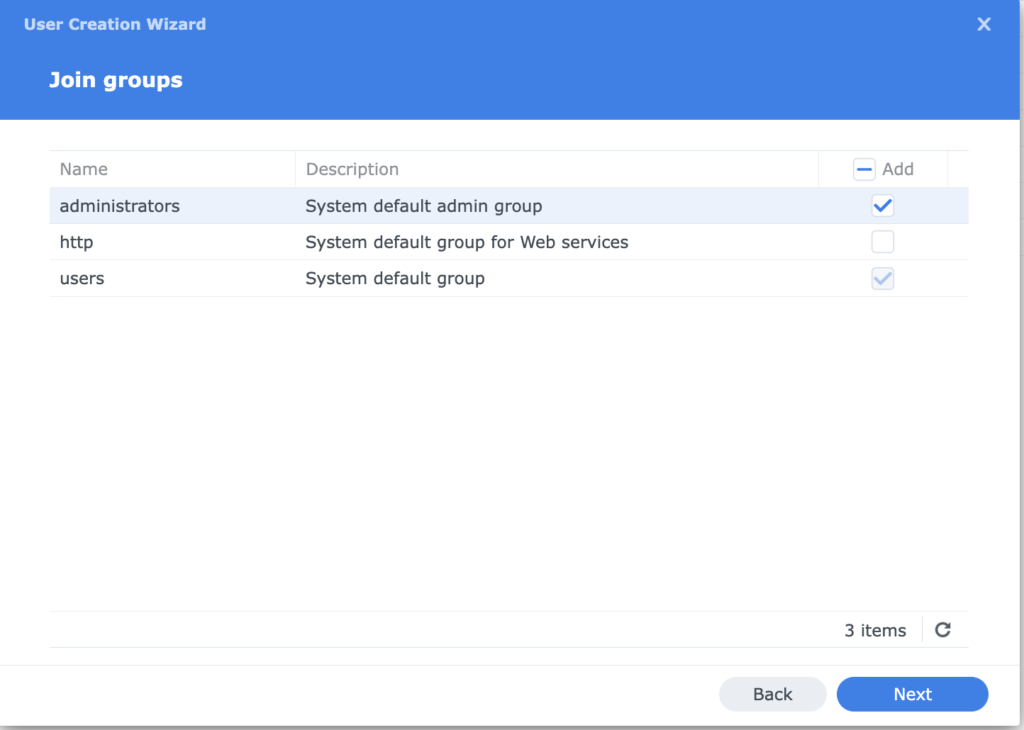
2. Give him “administrator” privileges.
2. Configuring Synology CSI
1. Download (clone) necessary files from the official Synology GitHub repository using a git clone command.

2. First, edit client-info.yml file from the cloned repo: /synology-csi/config/client-info.yml
host: provide Synology NAS IP Address;
port: for HTTP access is 5000, for HTTPS is a 5001;
username and password: credentials created in the section 1.

3. Create a new OpenShift project with a name synology-csi where all new Synology components will be created.
oc new-project synology-csi
4. Create a Secret object using previously edited client-info.yml
oc create secret generic client-info-secret --from-file=./config/client-info.yml
5. In the Red Hat OpenShfit Security Context Constraints (SCC) serve a mechanism for administrators to define and enforce security policies at the pod level, ensuring that containers operate within specified security parameters.
Create a Security Context Constraints file:
---
kind: SecurityContextConstraints
apiVersion: security.openshift.io/v1
metadata:
  name: synology-csi-scc
allowHostDirVolumePlugin: true
allowHostNetwork: true
allowPrivilegedContainer: true
allowedCapabilities:
- 'SYS_ADMIN'
defaultAddCapabilities: []
fsGroup:
  type: RunAsAny
groups: []
priority:
readOnlyRootFilesystem: false
requiredDropCapabilities: []
runAsUser:
  type: RunAsAny
seLinuxContext:
  type: RunAsAny
supplementalGroups:
  type: RunAsAny
users:
- system:serviceaccount:synology-csi:csi-controller-sa
- system:serviceaccount:synology-csi:csi-node-sa
- system:serviceaccount:synology-csi:csi-snapshotter-sa
volumes:
- '*'
6. Create/apply SCC configuration to the cluster.

6. Edit a StorageClass configuration from /synology-csi/deploy/kubernetes/v1.20/storage-class.yml
Name: name of the StorageClass;
storageclass.kubernetes.io/is-default-class: “true”: set this parameter to “true” to use the new SC as a default one;
provisioner: leave as is;
dsm: provide Synology NAS IP Address;
location: /volume1, because this is the target volume on my NAS;
fsType: leave ext4 format;
protocol: iscsi, because we will use iSCSI protocol;
reclaimPolicy: delete, because we want to delete PV from the NAS after deleting pod, deployments etc.
apiVersion: storage.k8s.io/v1
kind: StorageClass
metadata:
  name: synology-iscsi-storage
  annotations:
    storageclass.kubernetes.io/is-default-class: "true"
provisioner: csi.san.synology.com
parameters:
   dsm: '[Synology_NAS_IP_Address'
   location: '/volume1'
   fsType: 'ext4'
   protocol: 'iscsi'
reclaimPolicy: Delete
allowVolumeExpansion: true
7. Edit a VolumeSnapshotClass configuration from /synology-csi/deploy/kubernetes/v1.20/snapshotter/volume-snapshot-class.yml
name: name of the VolumeSnapshotClass;
storageclass.kubernetes.io/is-default-class: “true”: set this parameter to “true” to use the new SC as a default one.
apiVersion: snapshot.storage.k8s.io/v1
kind: VolumeSnapshotClass
metadata:
  name: synology-snapshot-sc
  annotations:
    storageclass.kubernetes.io/is-default-class: "true"
driver: csi.san.synology.com
deletionPolicy: Delete
# parameters:
#   description: 'Kubernetes CSI' # only for iscsi protocol
#   is_locked: 'false'
8. Create all required files to install and configure CSI on the OpenShift cluster.
controller, csi-driver, node, storage-class from /synology-csi/deploy/kubernetes/v1.20
snapshotter and volume snapshot class (I changed the name to synology-snapshot-sc) from /synology-csi/deploy/kubernetes/v1.20/snapshotter/
oc create -f controller.yml
oc create -f csi-driver.yml
oc create -f node.yml
oc create -f storage-class.yml
oc create -f snapshotter.yaml
oc create -f synology-snapshot-sc.yml


9. Confirm that new StorageClass was created and new synology-csi Pods are running.


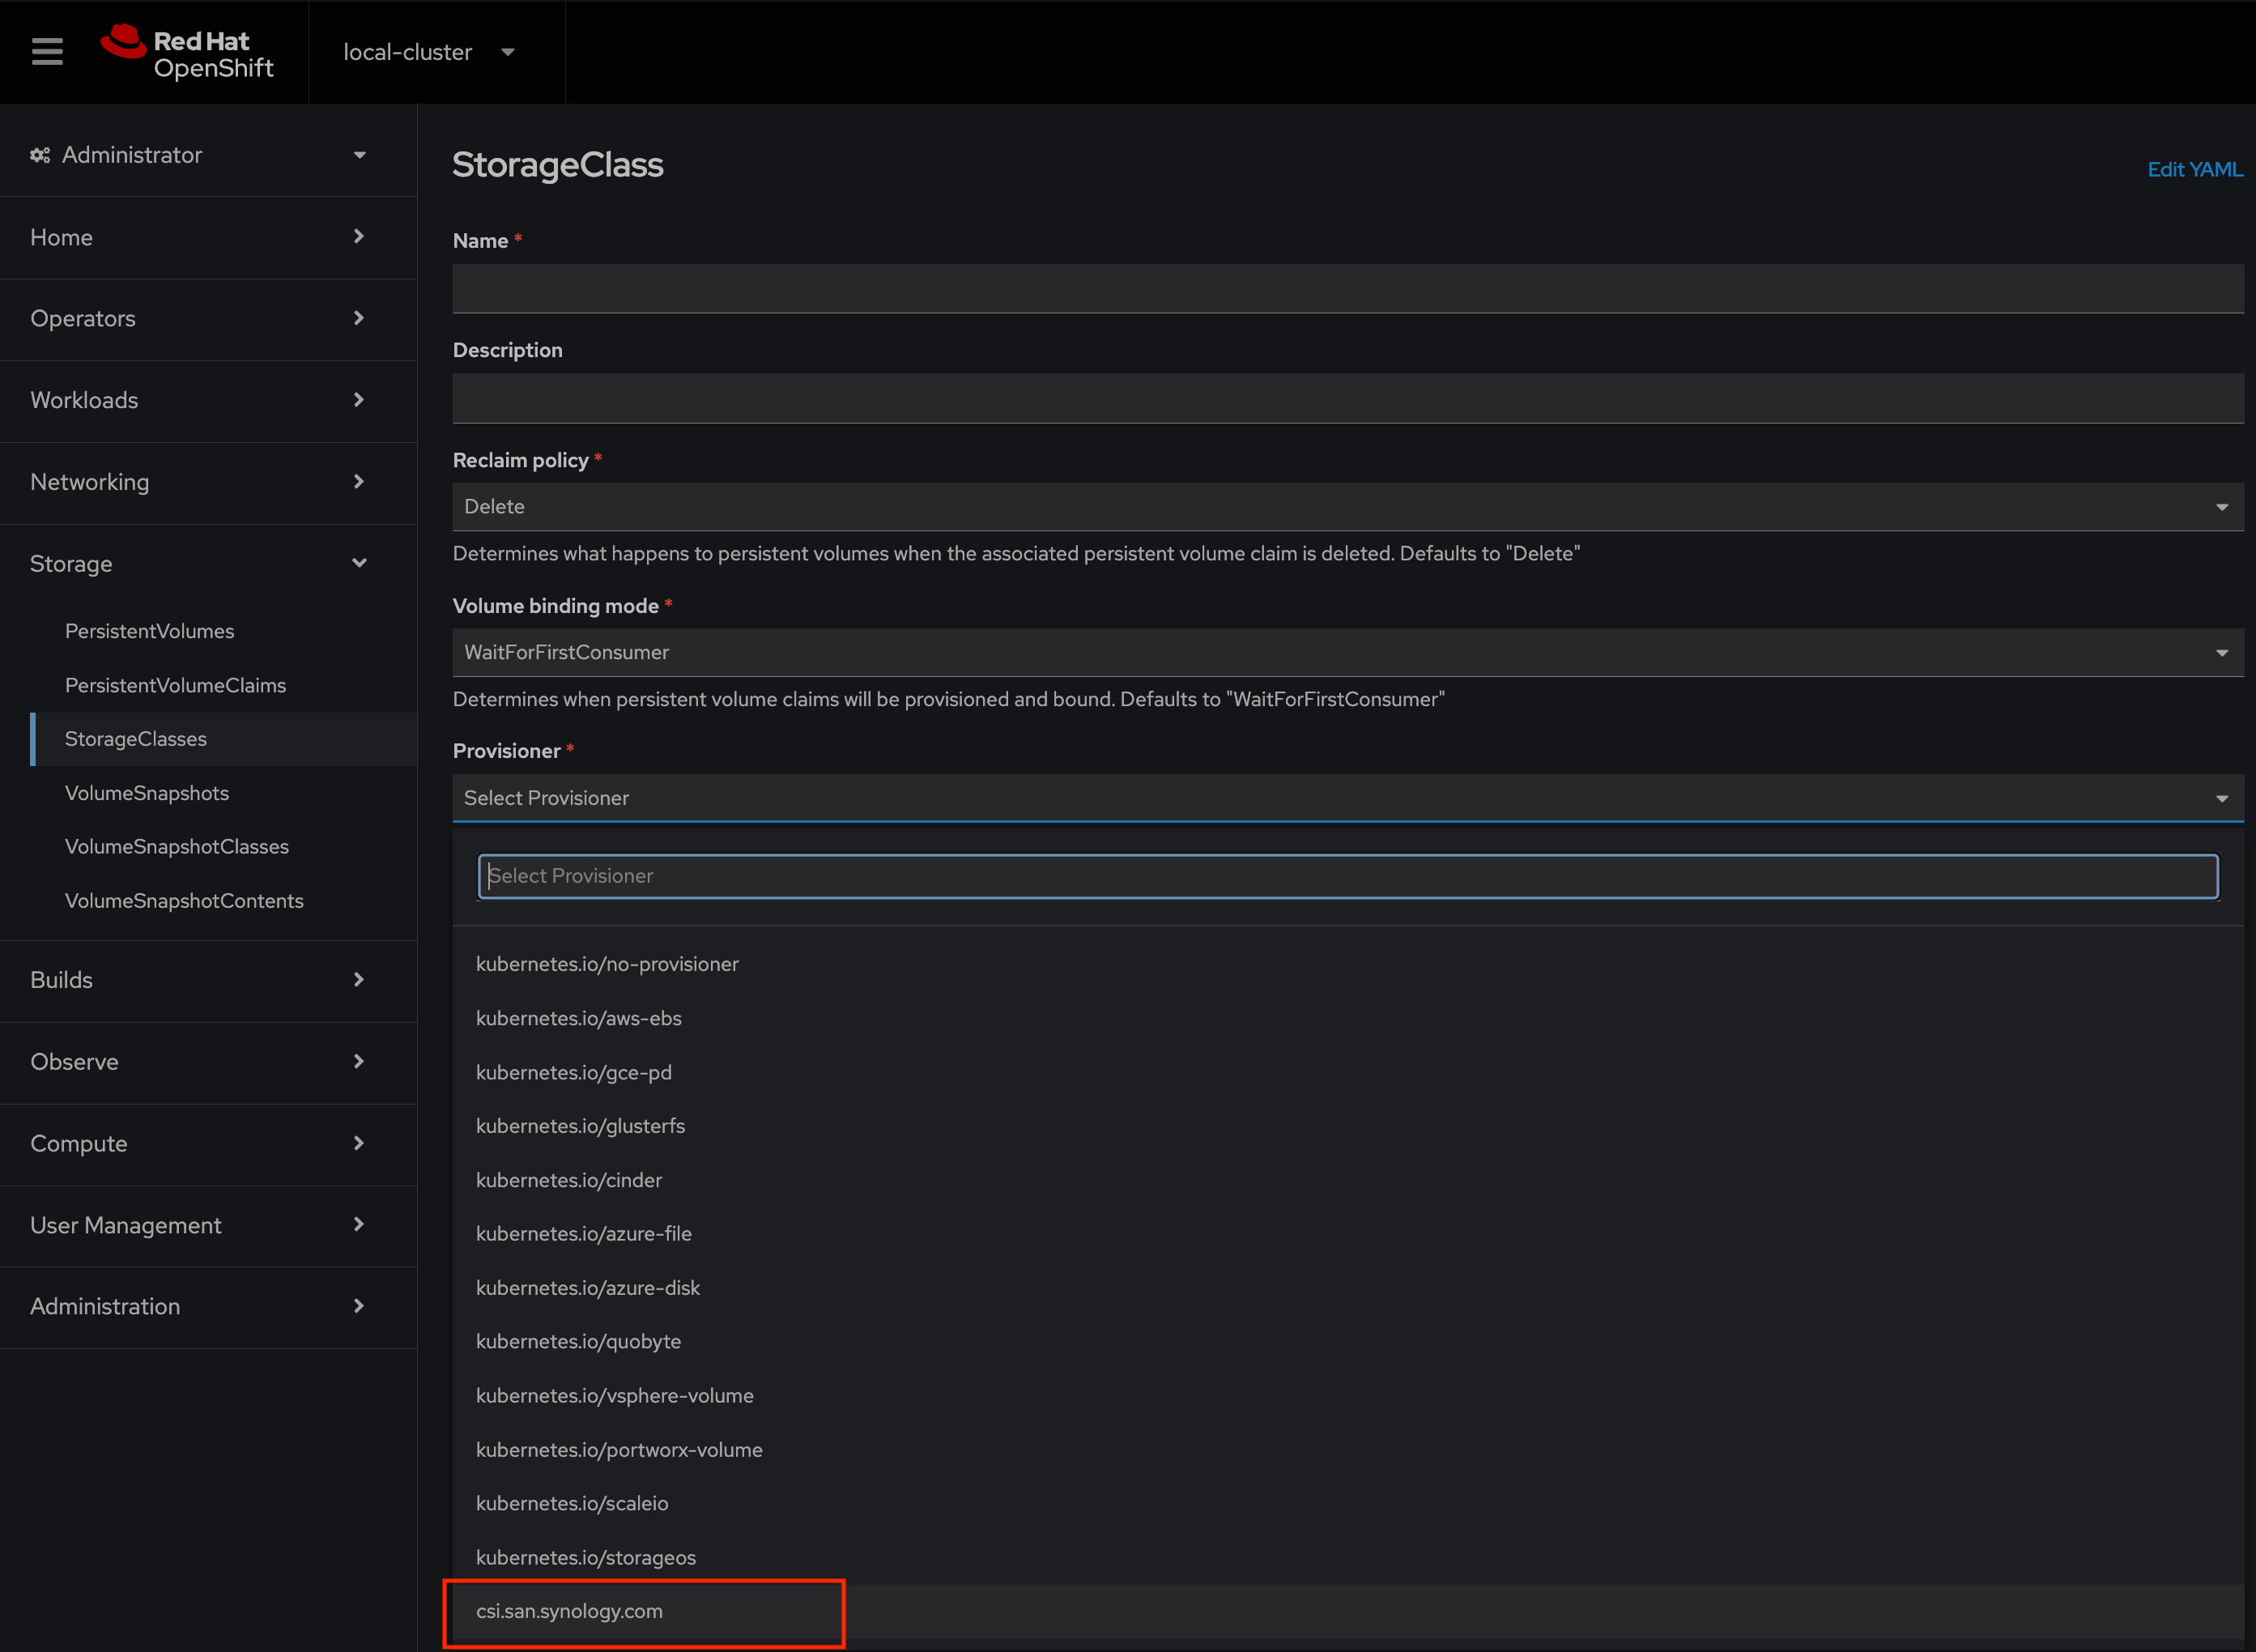
10. From the Red Hat OpenShift Web Console, confirm that new Provisioner csi.san.synology.com in StorageClass section is visible.
3. Creating a PersistentVolumeClaim using Synology CSI
1. Prepare test PVC yaml file to check functionality of the new CSI.
accessModes: set RWO;
storage: 5Gi or less/more;
storageClassName: name of to default Synology CSI StorageClass created in the previous section.
kind: PersistentVolumeClaim
apiVersion: v1
metadata:
  name: pvc-csi-01
  namespace: default
spec:
  accessModes:
    - ReadWriteOnce
  resources:
    requests:
      storage: 5Gi
  storageClassName: synology-iscsi-storage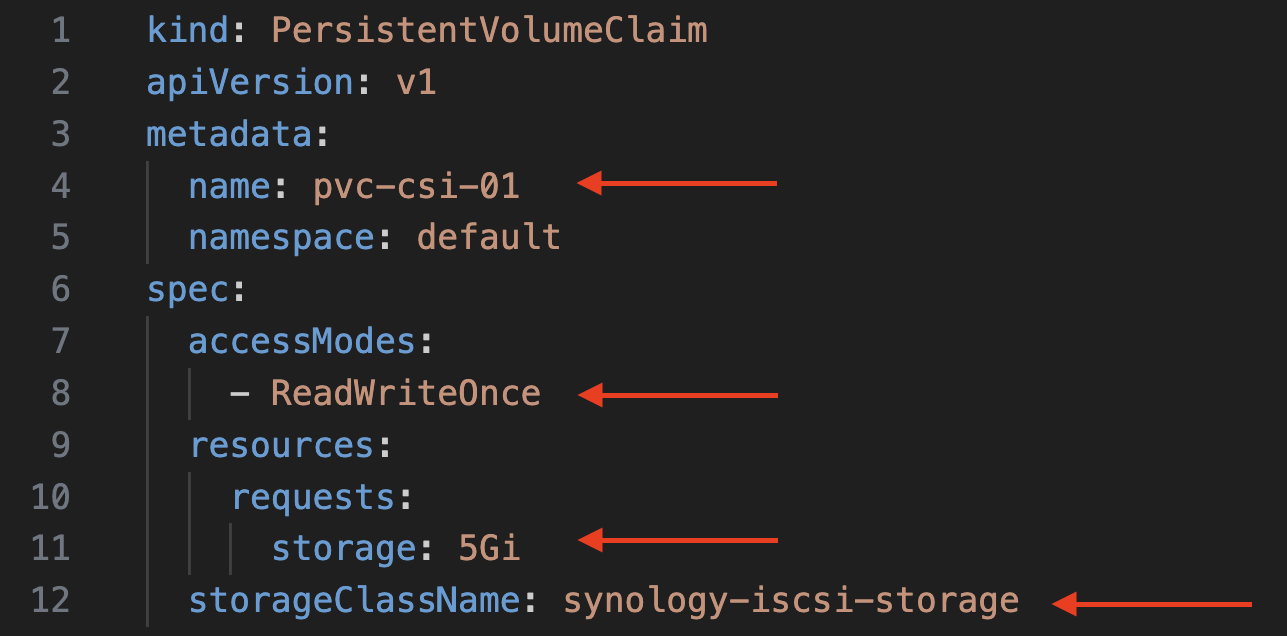
2. Create a new PVC and list all PVs and PVCs. It’s here! 😉
oc create -f pvc-csi-01.yaml
oc get pv,pvc
3. Also, let’s look to the Web Console.


4. From the Synology, there was automatically created PV.

4. Testing: create a Pod
1. Create another PVC for the new Pod.
kind: PersistentVolumeClaim
apiVersion: v1
metadata:
  name: pvc-csi-pod01
  namespace: default
spec:
  accessModes:
    - ReadWriteOnce
  resources:
    requests:
      storage: 2Gi
  storageClassName: synology-iscsi-storage
2. Create a simple nginx Pod definition.
apiVersion: v1
kind: Pod
metadata:
  name: csi-pod01
spec:
  containers:
  - name: csi-pod01
    image: nginx
    volumeMounts:
    - mountPath: "/var/www/html"
      name: csi-vol
  volumes:
  - name: csi-vol
    persistentVolumeClaim:
     claimName: pvc-csi-pod01
3. Pod is up and has a “Running” status. After describing a Pod, in the Volumes and Events section there is an info about claiming the new 2 GB PVC.

4. On the Synology, there was automatically created new 2 GB PV.

Summary
Kubernetes CSI significantly enhances the flexibility and capability of storage management in Kubernetes environments. By providing a standardized interface for integrating various storage solutions, it empowers developers to leverage advanced storage features while maintaining robust application performance and reliability.
Keep looking at my blog, new posts are coming! There is so much more great features to explore 😉






One Comment