vSphere with Tanzu gives you ability to run Kubernetes clusters natively on VMware vSphere.
With VMware Sphere 7.0 U1, there is a possibility to run it by using vSphere Distributed Switch Portgroups with your own network topology. In contrast to configuring vSphere with Tanzu with NSX-T, where you need to build and prepare new infrastructure.
As a load balancer is a third-party HAProxy or a Advanced Load Balancer (known as AVI).
Todays configuration use HAProxy. Setup with AVI comming soon.
Requriements:
- vCenter – min. v7.0 U1. Here is 7.0 U3;
- Officially minimum 3x ESXi 7.0 hosts. But, of course you can do this on a single physical host like me and get fullly functional Tanzu cluster;
- vSphere cluster – in this tutorial cluster consist from one ESXi host;
- HA + DRS enabled;
- vSphere Distributed Swtich (VDS), remember to set min. MTU=1600;
- Three Networks (portgroups created on DVS).
- Storage.
CIDRs of three networks:
| VLAN-111 | 10.111.10.0/24 | Management |
| VLAN-40-Tanzu-Workload | 10.0.40.0/24 | Workload |
| VLAN-41-Tanzu-Frontend | 10.0.41.0/24 | Frontend |
IP assigments:
| 10.111.10.12 | HAProxy IP Address |
| 10.111.10.20-10.111.10.24 | SupervisorControlPlaneVM(s) |
| 10.0.40.10-10.0.40.254 | Workload Network (IP range) for the Cluster (K8S) Nodes |
| 10.0.41.128/25 (10.0.41.128-10.0.41.254) | Load Balancer IP Range (VIPs) |
| 192.168.1.121 | DNS |
| 0.pl.pool.ntp.org | NTP |
Main steps:
- Configuration Storege Policy and Tags.
- Creating Tanzu Content Library.
- Deploying load balancer – HAProxy.
- Enabling Workload Management.
- Creation of the namespace.
- Logging in to the namespace and creation Tanzu Kubernetes cluster.
- Deploying pods and deployments.
Configuration Storage Policy and Tags
Storage Policy and Tags are needed to locate dedicated datastore to provision components like SupervisorControlPlaneVMs and Tanzu Kubernetes nodes.
- In vSphere Client choose Menu -> Tags & Custom Attributes.
- In Categories tab, create Storage for Tanzu Kubernetes and leave all objcets as is.

3. In TAGS tab, create Tag for Kubernetes and choose Category from last step.

4. From datastore view, choose datastrore(s) click Assign in Tags section and add tag.
Tag assigned to datastore VMware-iSCSI-01. I’ve repeated the same step to another datatstore – VMware-iSCSI-02.

5. In vSphere Client choose Menu -> Policies and Profiles. Choose VM Storage Policies from the left pane and choose CREATE. Enter name to the new storage policy.

6. Choose last option: Enable tag based placement rules.

7. Tag category: from step 2. Usage options – no changes. Tags – from Browse Tags choose tag from step 3.

8. Here, should be visible compatibile datastore(s) with assigned Tag.

9. Review and finish creation of storage policy.

Creating Tanzu Content Library
Content Library for Tanzu has included all templates needed to provision Tanzu Kubernetes nodes. Thare are Photon and Ubuntu ova’s with different Tanzu K8S versions.
- In vSphere Client choose Menu -> Content Libraries > CREATE. Type Name of the new Content Library.

2. Choose Subscribed content library and provide Subscribtion URL :
https://wp-content.vmware.com/v2/latest/lib.json

3. Leave security policy as is.

4. Choose datastore where Tanzu Content Library should be stored.

5. Review settings and Finish configuration.

6. Tanzu Kubernetes OVA images start downloading. It takes some time. After a while, in the newly created Content Library there will be many of them.

Deploying load balancer – HAProxy
Load balancer is needed to provide load balancing cababilities to vSphere with Tanzu Kubernetes workloads.
- Download haproxy OVA image: https://github.com/haproxytech/vmware-haproxy#note
- Deploy OVA template to vCenter. Choose Deploy OVF Template from ESXi or Cluster level.

3. Choose Local file -> Upload files and select haproxy-v0.2.0.ova from your local disk.

4. Choose Virtual machine name and target location folder.

5. Choose ESXi where haproxy appliance should be deployed.

6. Accept License agreements.

7. Choose Frontend Network option.

8. Choose datastore where haproxy should be placed.

9. Choose Management, Workload and Frontend Network (portgroups).

10. Type Root Password to appliance. Provide Hostname and DNS.

11. Type :
– Management IP & Management Gateway(from Management Network);
– Workload IP & Workload Gateway (from Workload Network);
– Frontend IP & Frontend Gateway (from Frontend Network).

12. Type Load Balancer IP Ranges from Frontend portgroup.
Type HAProxy User ID and Password.

13. Review settings and Finish configuration.

14. After deployment, when VM will be powered on, you should see 3 IPs and 3 attached portgroups: VLAN-111 (Management), VLAN-40 Workload, VLAN-41-Frontend.

15. Log in to haproxy VM (through Management IP) and type cat /etc/haproxy/ca.crt
Certificate is needed to configure Workload Management in the next steps.

Enabling Workload Management
Workload Management enables deploying and managing Tanzu Kubernetes workloads in vSphere.
- In vSphere Client choose Menu -> Workload Management and choose Get Started button.

2. Choose vSphere Distributed Swtich (VDS) option.

3. Choose cluster.
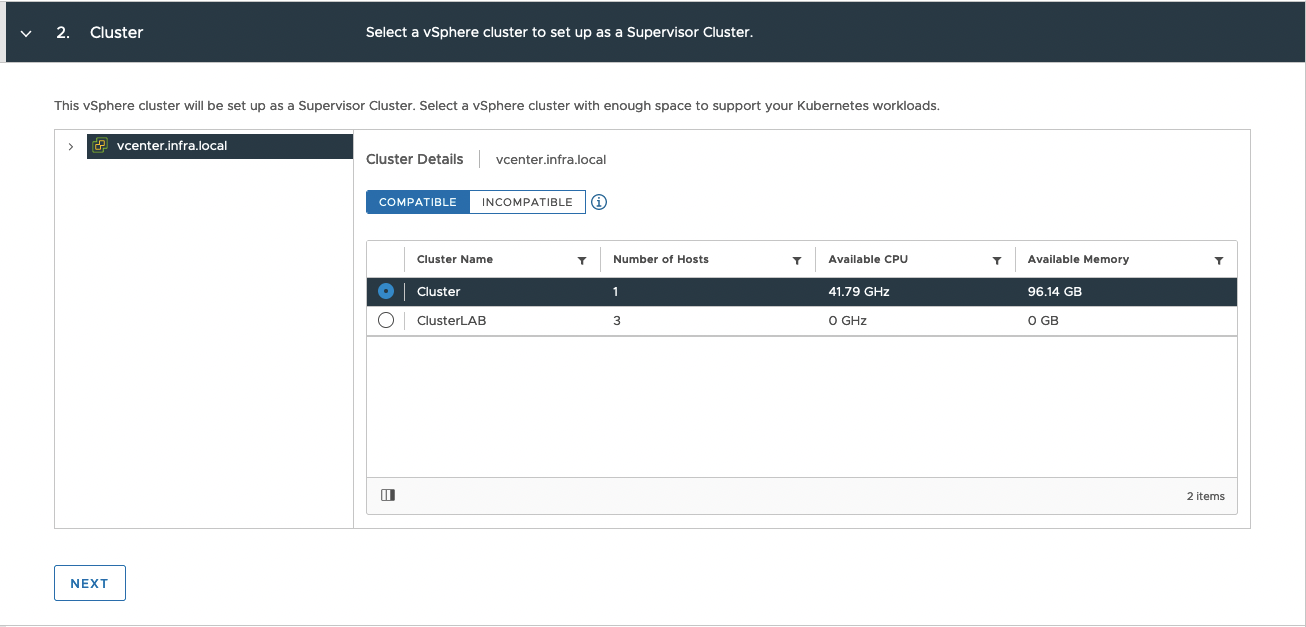
4. Choose prepared Storage Policy from previous steps.

5. Load Balancer configuration:
– type Name and from the list, choose Load Balancer Type: HAPorxy;
– type Management IP Address (Management IP from haproxy appliance);
– Username and Password from haproxy appliance;
– Virtual IP Ranges (from Workload portgroup);
– paste HAProxy Management TLS Certificate (section: Deploying load balancer– HAProxy step 15).

6. Management Network:
– choose Static mod;
– Network – Management portgroup;
– Starting IP Address – you need 5 address, type first free IP;
– Type Subnet Mask, Gateway, DNS, DNS Search Domain and NTP

7. Workload Network:
– choose Static Network Mode and leave Internal Network for Tanzu Kubernetes Services as is;
– from Port Group choose Workload portgroup;
– IP address Range(s) – provide range to Tanzu Kubernetes nodes IPs from Workload portgroup ;
– Enter rest of the addresses.

8. Choose Tanzu Content Library.

9. Choose Control Plance Size. Review changes and choose Finish to start deployment.

10. Workload Managemnt deployment in progress. In this time, SupervisorControlPlaneVM(s) will be created. It take some time. Grab a tea or coffee and wait patiently;)
Don’t worry about exclamation mark – this is because my licence is expiring;)


11. Deployment completed without errors, wohoo!
10.0.41.129 is Control Pane Node Address. That means, this is the endpoint, to which we connect to manage vSphere Tanzu and Kubernetes cluster. As you can see, this is from Frontend range.

12. View from vSphere perspective there are 3 new objects: 3x SupervisorControlPlaneVM(s) which are management objcets. There are needed to provide maintain and create Tanzu Kubernetes clusters and nodes.
Each SupervisorControlPlaneVM has 2 network adapters: Management + Workload.


Creation of the namespace
Namespace is a space where you can provision and Tanzu Kubernetes clusters.
- In vSphere Client choose Menu -> Workload Management, change to the Namespace tab and choose Create namespace button.

2. Choose your cluster and enter Name to the namespace. Leave Network as is. This is a Workload portgroup so it’s OK.

3. This is a configuration page for the namespace. Let’s begin with some modifuciations.

4. Persmissions – choose user, who will be allowed to login to this namespace. I have some service user with a name k8s-admin@vsphere.local. Choose edit role.

5. Storage – be sure to chose dedicated storage policy. All new obcject will be placed on the datastores with this assinged policy.

6. Content Library – bu sure to choose dedicated Tanzu Content Library.

7. VM Service tab – VM Classes define size (CPU&RAM) of the VMs (Tanzu Kubernetes nodes) which we can create on dedicated namespace. Good practice is to not giving all of them. Choose few classes.
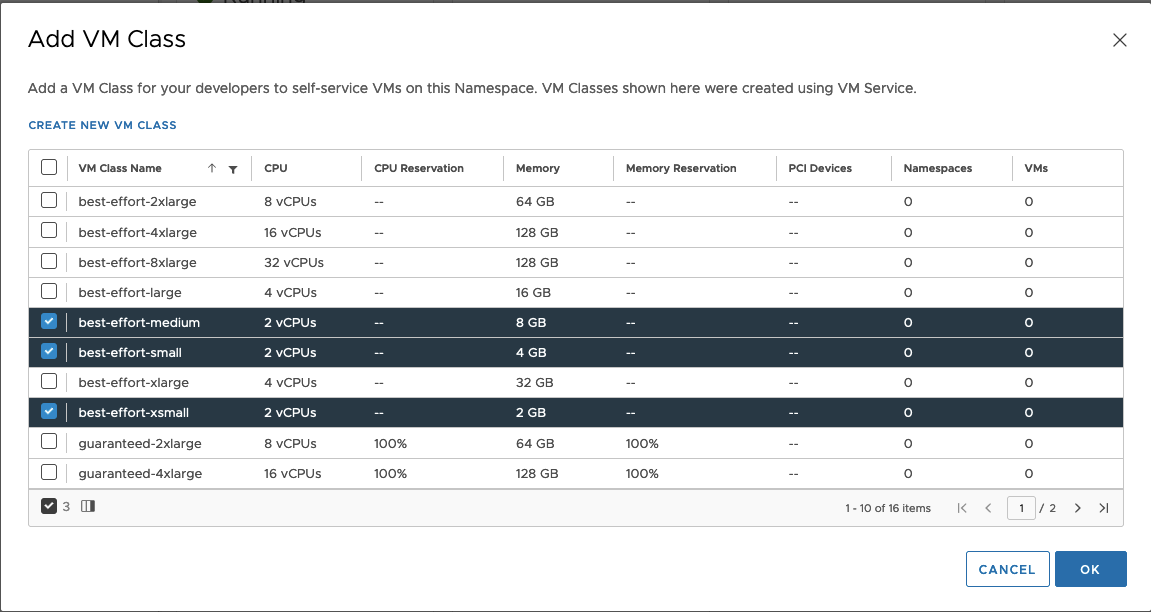
8. VM Service tab – choose Tanzu Content Library.

9. At the end, screen with configiration should look like this.
I don’t done any changes in Capacity and Usage tab.

Logging in to the namespace and creation Tanzu Kubernetes cluster.
1. Paste Control Plance Node Address to your browser and download CLI Plugin. I use Mac OS so, I’ve got this one. If you using different system, you can change it by clicling select operating system.

2. Download vsphere-plugin.zip file. After that, unzip it and than you have bin catalog with two files: kubectl and kubectl-vsphere.
Open terminal, change directory where files are unizpped.
If your downloaded files are not executable, give them right privileges: chmod +x kubectl*
Copy two files to your PATH: cp * /usr/local/bin
Tip for Mac users: If you have have ‘permission denied’ remeber to use sudo before command and allow permissions in System Preferences-> Security & Privacy -> in General tab click ‘allow anyway’ if needed.

3. In the terminal window type command:
kubectl vsphere login –server=[your Control Plane Node Address] –insecure-skip-tls-verify
Enter Username and Password.
Than, change context to the namespace cluster-01 with a command:
kubectl config use-context cluster-01

4. In the next step, we need to create YAML file to create Tanzu Kubernetes cluster in the namespace cluster-01.
Here you can find more information about configuration of YAML files:
https://docs.vmware.com/en/VMware-vSphere/7.0/vmware-vsphere-with-tanzu/GUID-B1034373-8C38-4FE2-9517-345BF7271A1E.html
apiVersion: run.tanzu.vmware.com/v1alpha1     #TKGS API endpoint
kind: TanzuKubernetesCluster                  #required parameter
metadata:
  name: k8s-cluster-01                        #Kubernetes cluster name
  namespace: cluster-01                       #vSphere namespace (created in earlier)
spec:
  distribution:
    version: v1.21.6---vmware.1-tkg.1.b3d708a  #Kubernetes version (TKR)
  topology:
    controlPlane:
      count: 3                                #number of control plane nodes
      class: best-effort-small                #vm class for control plane nodes
      storageClass: k8s-policy                #storage policy for control plane
    workers:
      count: 3                                #number of worker nodes
      class: best-effort-small                #vm class for workernodes
      storageClass: k8s-policy                #storage policy for worker nodes
  settings:
    network:
      cni:
        name: antrea                          #use antrea CNI
      pods:
       cidrBlocks:
        - 193.0.1.0/16                        #Must not overlap with SVC
      services:
       cidrBlocks:
       - 195.51.100.0/12                      #Must not overlap with SVC
5. Let’s deploy Tanzu K8S cluster!
k8s-cluster-01.yaml -> this my YAML file name.
Use command:
kubectl apply -f k8s-cluster-01.yaml
Mateuszs-Mac-mini:tanzu mateusz$ kubectl apply -f k8s-cluster-01.yaml
tanzukubernetescluster.run.tanzu.vmware.com/k8s-cluster-01 created
6. You can check the progress with commands kubectl get tanzukubernetesclusters ( short version is kubectl get tkc) or with kubectl describe tkc


7. When you see, True under READY column, that means Tanzu K8S cluster is ready. Now, you can log to them.

8. From vCenter perspetive, there are created new object k8s-cluster-01. Under this, there are 3 control plane Tanzu K8S VMs and 3 Tanzu K8S worker nodes.

Deploying pods and deployments.
1. Good practice is to logout and log in again. Use command kubectl vsphere logout.
Than, you can log directly to the to newly created cluster. Use command:
kubectl vsphere login –server=10.0.41.129 –insecure-skip-tls-verify –tanzu-kubernetes-cluster-namespace cluster-01 –tanzu-kubernetes-cluster-name k8s-cluster-01
–server=10.0.41.129 -> Control Plane Node Address;
–tanzu-kubernetes-cluster-namespace cluster-01 -> name of the namespace;
–tanzu-kubernetes-cluster-name k8s-cluster-01 -> name of the Kubernetes cluster;

2. Let’s check what nodes do we have.
Mateuszs-Mac-mini:tanzu mateusz$ kubectl get nodes
NAME                                            STATUS   ROLES                  AGE   VERSION
k8s-cluster-01-control-plane-5wlhp              Ready    control-plane,master   10m   v1.21.6+vmware.1
k8s-cluster-01-control-plane-gkxjx              Ready    control-plane,master   19m   v1.21.6+vmware.1
k8s-cluster-01-control-plane-jbg4v              Ready    control-plane,master   13m   v1.21.6+vmware.1
k8s-cluster-01-workers-pmd4z-858b449c44-6lbgj   Ready    <none>                 16m   v1.21.6+vmware.1
k8s-cluster-01-workers-pmd4z-858b449c44-867qx   Ready    <none>                 16m   v1.21.6+vmware.1
k8s-cluster-01-workers-pmd4z-858b449c44-kgpqz   Ready    <none>                 16m   v1.21.6+vmware.1
3. Let’s create first pod.
Mateuszs-Mac-mini:tanzu mateusz$ kubectl run pod-01 --image=nginx
pod/pod-01 created
Mateuszs-Mac-mini:tanzu mateusz$ kubectl get pods
NAME     READY   STATUS              RESTARTS   AGE
pod-01   0/1     ContainerCreating   0          13s
Mateuszs-Mac-mini:tanzu mateusz$ kubectl get pods
NAME     READY   STATUS    RESTARTS   AGE
pod-01   1/1     Running   0          21s
4. Let’s create deployment.
Mateuszs-Mac-mini:tanzu mateusz$ kubectl create deployment dep01 --image=nginx
deployment.apps/dep01 created
Mateuszs-Mac-mini:tanzu mateusz$ kubectl get deployments
NAME    READY   UP-TO-DATE   AVAILABLE   AGE
dep01   0/1     0            0           25s
Here is a problem, deployment can’t create. When we type command kubectl describe deployment dep01, under Conditions sections there are ReplicaFailure.
Conditions:
  Type             Status  Reason
  ----             ------  ------
  Progressing      True    NewReplicaSetCreated
  Available        False   MinimumReplicasUnavailable
  ReplicaFailure   True    FailedCreate
OldReplicaSets:    <none>
NewReplicaSet:     dep01-549f7646cd (0/1 replicas created)
Let’s quick check ReplicaSet of this deplyment. At the bottom there is a Warning about PodSecurityPolicy.
Mateuszs-Mac-mini:tanzu mateusz$ kubectl get replicaset
NAME               DESIRED   CURRENT   READY   AGE
dep01-549f7646cd   1         0         0       43s
Mateuszs-Mac-mini:tanzu mateusz$ kubectl describe replicaset dep01-549f7646cd
Name:           dep01-549f7646cd
Namespace:      default
Selector:       app=dep01,pod-template-hash=549f7646cd
Labels:         app=dep01
                pod-template-hash=549f7646cd
Annotations:    deployment.kubernetes.io/desired-replicas: 1
                deployment.kubernetes.io/max-replicas: 2
                deployment.kubernetes.io/revision: 1
Controlled By:  Deployment/dep01
Replicas:       0 current / 1 desired
Pods Status:    0 Running / 0 Waiting / 0 Succeeded / 0 Failed
Pod Template:
  Labels:  app=dep01
           pod-template-hash=549f7646cd
  Containers:
   nginx:
    Image:        nginx
    Port:         <none>
    Host Port:    <none>
    Environment:  <none>
    Mounts:       <none>
  Volumes:        <none>
Conditions:
  Type             Status  Reason
  ----             ------  ------
  ReplicaFailure   True    FailedCreate
Events:
  Type     Reason        Age                 From                   Message
  ----     ------        ----                ----                   -------
  Warning  FailedCreate  26s (x14 over 67s)  replicaset-controller  Error creating: pods "dep01-549f7646cd-" is forbidden: PodSecurityPolicy: unable to admit pod: []
5. To fix this, you need to create ClusterRoleBinding. It grants access to authenticated users run a privileged set of workloads using the default PSP vmware-system-privileged.
More about this you can read here: https://docs.vmware.com/en/VMware-vSphere/7.0/vmware-vsphere-with-tanzu/GUID-4CCDBB85-2770-4FB8-BF0E-5146B45C9543.html?hWord=N4IghgNiBcICYFMBmYCuEAuBaDBrA5lmHALYCWAdiAL5A
Mateuszs-Mac-mini:tanzu mateusz$ kubectl create clusterrolebinding default-tkg-admin-privileged-binding --clusterrole=psp:vmware-system-privileged --group=system:authenticated
clusterrolebinding.rbac.authorization.k8s.io/default-tkg-admin-privileged-binding created
Delete old deployment and try again. Now, deployment was created without problems. We can scale it too.
Mateuszs-Mac-mini:tanzu mateusz$ kubectl create deployment dep01 --image=nginx
deployment.apps/dep01 created
Mateuszs-Mac-mini:tanzu mateusz$ kubectl get deployments
NAME    READY   UP-TO-DATE   AVAILABLE   AGE
dep01   1/1     1            1           28s
Mateuszs-Mac-mini:tanzu mateusz$ kubectl get pods
NAME                     READY   STATUS    RESTARTS   AGE
dep01-549f7646cd-4l6tj   1/1     Running   0          22s
pod-01                   1/1     Running   0          3m35s
Mateuszs-Mac-mini:tanzu mateusz$ kubectl scale deployment dep01 --replicas=10
deployment.apps/dep01 scaled
Mateuszs-Mac-mini:tanzu mateusz$ kubectl get pods
NAME                     READY   STATUS    RESTARTS   AGE
dep01-549f7646cd-24rmh   1/1     Running   0          26s
dep01-549f7646cd-4l6tj   1/1     Running   0          66s
dep01-549f7646cd-7jbzx   1/1     Running   0          26s
dep01-549f7646cd-fbgxf   1/1     Running   0          26s
dep01-549f7646cd-m267j   1/1     Running   0          26s
dep01-549f7646cd-mqmcx   1/1     Running   0          26s
dep01-549f7646cd-qdsr6   1/1     Running   0          26s
dep01-549f7646cd-spbh6   1/1     Running   0          26s
dep01-549f7646cd-td94w   1/1     Running   0          26s
dep01-549f7646cd-tlhh7   1/1     Running   0          26s
pod-01                   1/1     Running   0          4m19s
6. To delete Tanzu Kubernetes cluster, switch contex to cluster-01 (namespace) and type command:
kubectl delete tanzukubernetescluster –namespace cluster-01 k8s-cluster-01
Summary
At the end, there are base, fully functional Kubernetes cluster running on vCenter. You can create pods, deployments and other components like in ‘standard’ K8S virtual machine (or bare metal server). If you need less/more control plane/worker nodes, different Kubernetes version or different CIDR change YAML configuration and apply.






6 Comments
Thank you very much for this post. It helped me a lot
I created the supervisor cluster and three SupervisorControlPlaneVM were added, but each machine has only one network adapter(Management) instead of 2 network adapters: Management + Workload. I don’t know what is the reason. In addition, it is not possible to modify the virtual machines.
Best regard.
In addition, in the Workload Management section, there are three similar errors below:
Unable to connect to vCenter (https://192.168.1.100:443/vapiendpoint/health) from control plane VM 421430097abf32c6fff8a12f7e22d91b. Error: Get “https://192.168.1.100:443/vapiendpoint/health”: dial tcp 192.168.1.100:443: connect: no route to host.
have three Host in my supervisor cluster and VC IP is 192.168.1.100.
I would be grateful if anyone could help or have a suggestion. Thank You
hi, I have the same problem. Did you find a solution?
I have the same problem dude. whats happened?
i also have the same problem