In this post I’will show you how to deploy Linux virtual machine from template on vCenter using Ansible. This is a simple tutorial how to automate repeatable task.
What is Ansible?
Ansible is a open-source automation tool that provides ability to provision, manage, application deployment and orchestration infrastructure. Ansible has varius possibilities and a lot of modules. Today we use vmware_guest module which can help to use vSphere API to do some things in virtual environment.
Requriements:
- Linux server – in this tutorial I use CentOS 8 but you can choose Ubuntu or Debian machine too.
- Existing virtual machine template in the vCenter.
- Service user in the vCenter (additional step).
- Python >= 2.6 – I use Python in version 3.8.
- pyvmomi – Python SDK for the VMware vSphere API that allows you to manage ESXi and vCenter.
- Ansible
I’ve tested this procedure on vCenter 7.0.3.00100 (7.0 U3a) with ESXi 7.0.2 (7.0 U2d).
Create service user
It’s not obligatory step but to keep your work under control and be more secure let’s create ansible service user with dedicated role. You can use administrator@vsphere.local account too. It’s a good habit to create separate accounts for different systems.
First, we need to create service user.
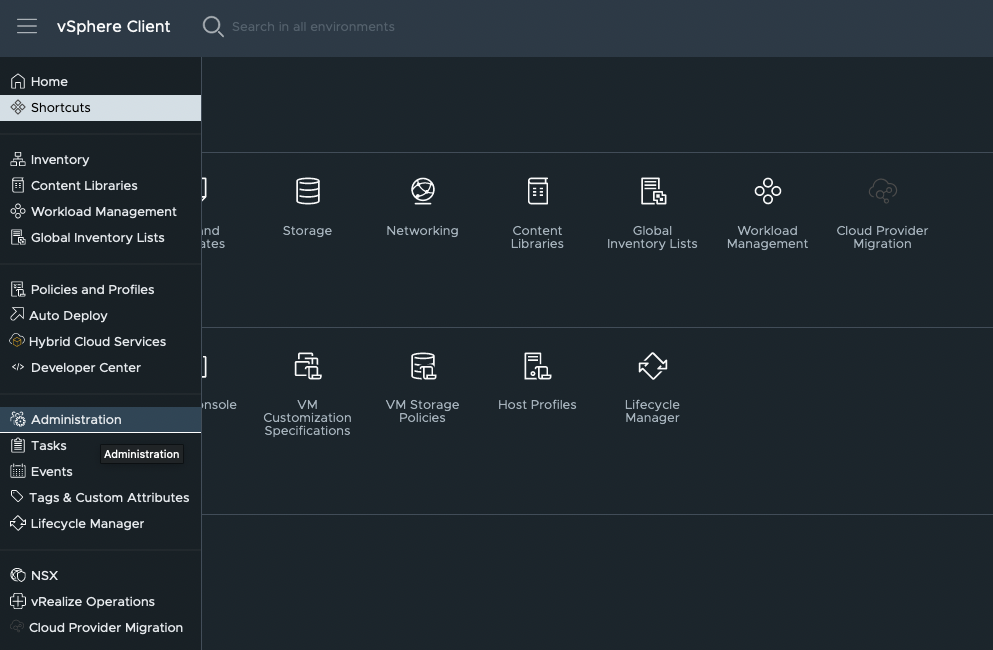
- Login to vCenter with administrator privileges account. On the left pane choose 3 horizontal stripes. From the menu, choose Administration tab.
2. Choose User and Groups and from Domain drop-down list find vsphere.local.
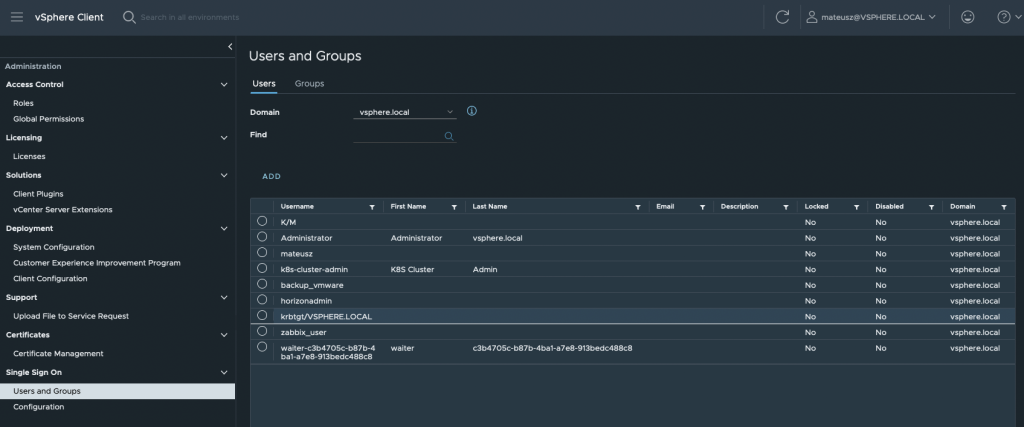
3. Click ADD button and type Username and Password for the service user.
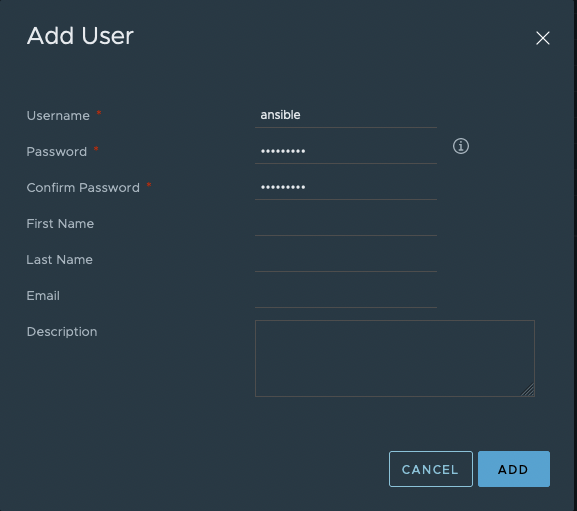
4. The user ansible@vsphere.local has been created.

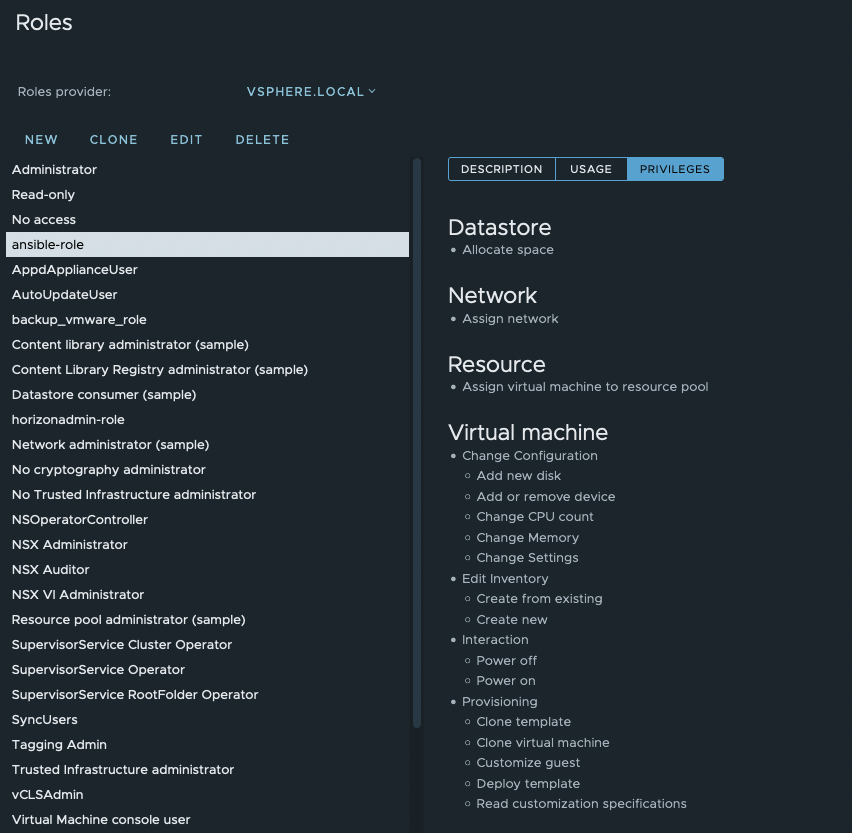
Next, we need to create dedicated ansible role.
- In the same window, select Roles on the left and click NEW.
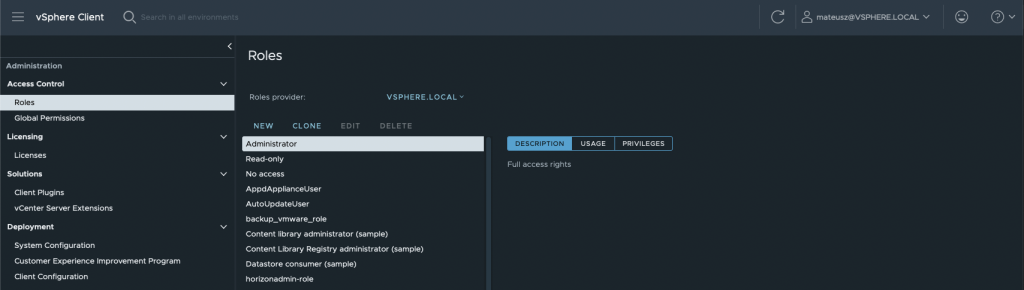
2. In the new window give Role name and Description if you need. Tick roles from the list and after that, CREATE button.
Datastore -> Allocate space
Network – > Assign network
Resource -> Assign virtual machine to resource pool
Virtual machine -> Change Configuration -> Add new disk
Virtual machine -> Change Configuration -> Add or remove device
Virtual machine -> Change Configuration -> Change CPU count
Virtual machine -> Change Configuration -> Change Memory
Virtual machine -> Change Configuration -> Change Settings
Virtual machine -> Edit Inventory -> Create from existing
Virtual machine -> Edit Inventory -> Create new
Virtual machine -> Interaction -> Power off
Virtual machine -> Interaction -> Power on
Virtual machine -> Interaction -> Reset
Virtual machine -> Interaction -> Suspend
Virtual machine -> Provisioning -> Clone template
Virtual machine -> Provisioning -> Clone virtual machine
Virtual machine -> Provisioning -> Customize guest
Virtual machine -> Provisioning -> Deploy template
Virtual machine -> Provisioning -> Read customization specifications
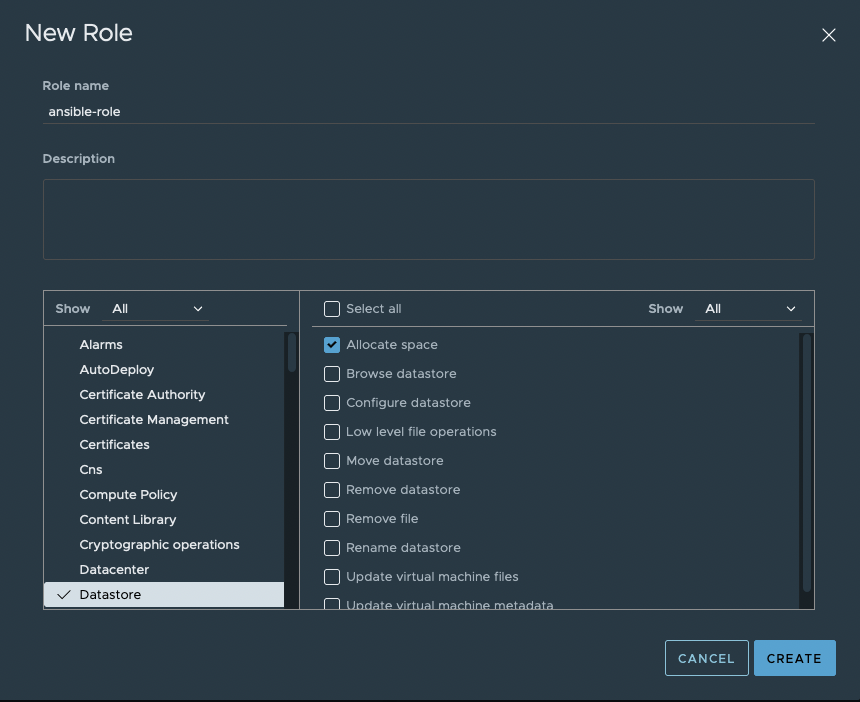
3. The ansible-role has been created.
At the end, attach this user with role to vCenter.
- Choose vCenter object from Hosts and Clusters view. Than, change tab to Permissions and click ADD.

2. In the new window make sure to choose vsphere.local Domain, find user ansible in User/Group line and than, locate Role ansible-role. Check Propagate to children nad hit OK.
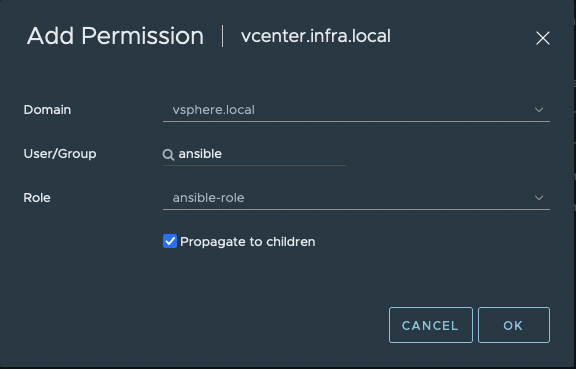
3. After all this steps, we have created service user ansible@vsphere.local, dedicated user role ansible-role and attach it to vCenter. Now we can use it in the deployment.

How to install Ansible?
There are few ways to install Ansible on your machine. You can use pip (which is the package installer for Python) or EPEL repository. Here I will show you first method.
1. At first install python-pip in version 3.8
yum install python38-pip[root@ansible ~]# python3.8 --version
Python 3.8.82. Next install ansible
pip3.8 install ansible[root@ansible ~]# ansible --version
ansible [core 2.12.0]
config file = None
configured module search path = ['/root/.ansible/plugins/modules', '/usr/share/ansible/plugins/modules']
ansible python module location = /usr/local/lib/python3.8/site-packages/ansible
ansible collection location = /root/.ansible/collections:/usr/share/ansible/collections
executable location = /usr/local/bin/ansible
python version = 3.8.8 (default, Aug 25 2021, 16:13:02) [GCC 8.5.0 20210514 (Red Hat 8.5.0-3)]
jinja version = 3.0.3
libyaml = True3. Install pyvmomi
pip3.8 install pyvmomi4. Create ansible catalog in /etc. We will use it in the next step.
[root@ansible ~]# mkdir /etc/ansibleVM deployment – create an Ansible Playbook
Ansible Playbooks are YAML configuration files (instructions) that describe what actions and tasks to run on a remote machines.
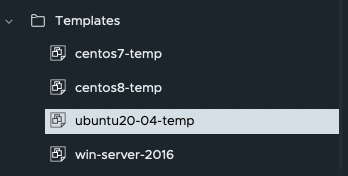
We use ubuntu20-04-temp – this is my earlier prepared VM template with Ubuntu 20.04 OS.
1. Go to ansible catalog
[root@ansible ~]# cd /etc/ansible/2. Create simple playbook file with a name: ansible-vm-deploy.yaml
[root@ansible ansible]# vim ansible-vm-deploy.yaml3. You can add this content to your file, but remember to change variables that matches in you environment. Save it.
- hosts: localhost
  gather_facts: no
  vars:
    vcenter_server: "vcenter.infra.local"
    vcenter_user: "ansible@vsphere.local"
    vcenter_pass: "Passw0rd!"
    datacenter_name: "HQ"
    cluster_name: "Cluster"
  tasks:
  - name: Clone the VM template and customize
    vmware_guest:
      hostname: "{{ vcenter_server }}"
      username: "{{ vcenter_user }}"
      password: "{{ vcenter_pass }}"
      validate_certs: False
      name: ansible-vm
      template: ubuntu20-04-temp
      datacenter: "{{ datacenter_name }}"
      folder: /{{ datacenter_name }}/vm/Ansible-test
      cluster: "{{ cluster_name }}"
      datastore: "VMware-iSCSI-02"
      networks:
      - name: VLAN-111
        start_connected: yes
        ip: 10.111.10.100
        netmask: 255.255.255.0
        gateway: 10.111.10.1
        type: static
        dns_servers: 192.168.1.1
      customization:
        hostname: "ansible-vm"
        dns_servers:
        - 192.168.1.121
        - 8.8.8.8
      state: poweredon
      wait_for_ip_address: yes
    delegate_to: localhost
Descrption for few variables:
vmware_guest -> Ansible VMware module
vcenter_server: “vcenter.infra.local” -> name of vCenter server
vcenter_user: “ansible@vsphere.local” -> ansible service user
vcenter_pass: “Passw0rd!” -> password to ansible service user
datacenter_name: “HQ” -> vCenter datacenter name
cluster_name: “Cluster” -> vCenter cluster name
name: ansible-vm -> this is a name of VM we’ll create
template: ubuntu20-04-temp -> name of the template
folder: /{{ datacenter_name }}/vm/Ansible-test -> name of the folder, where we want to store new VM
datastore: “VMware-iSCSI-02” -> name of the datastore we want to store new VM
in the networks section:
name: VLAN-111 -> name of the vCenter network portgroup
in the customization section:
hostname: “ansible-vm” -> this a hostname for new VM
Here you can find parameters to vmware_guest module to add it to the YAML file: https://docs.ansible.com/ansible/2.9/modules/vmware_guest_module.html#
Run Ansible Playbook
Now, we execute ansible-playbook command to create new object in vCenter. Depends of how many customization we want, it takes a different time.
- Run command ansible-playbook ansible-vm-deploy.yaml to start deploying playbook.
[root@ansible ansible]# ansible-playbook ansible-vm-deploy.yaml
2. In the vCenter Recent Taks section we can see two new taks initialated by ansible@vsphere.local user:
– Clone virtual machine
– Power On virtual machine

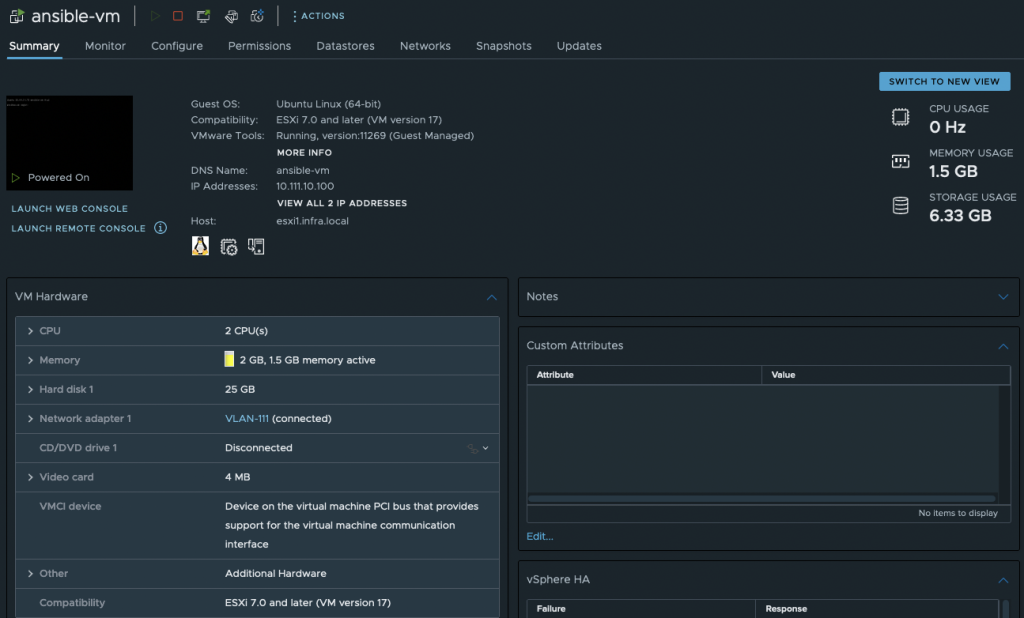
3. After few minutes ansible-vm was created with DNS name ansible-vm and IP Address 10.111.10.100.
4. Let’s check the communication from diffrent sever with diffrent subnet.
mateusz@vm1:~$ ip a
1: lo: <LOOPBACK,UP,LOWER_UP> mtu 65536 qdisc noqueue state UNKNOWN group default qlen 1000
    link/loopback 00:00:00:00:00:00 brd 00:00:00:00:00:00
    inet 127.0.0.1/8 scope host lo
       valid_lft forever preferred_lft forever
    inet6 ::1/128 scope host
       valid_lft forever preferred_lft forever
2: ens160: <BROADCAST,MULTICAST,UP,LOWER_UP> mtu 1500 qdisc mq state UP group default qlen 1000
    link/ether 00:50:56:93:fe:3f brd ff:ff:ff:ff:ff:ff
    inet 10.50.66.151/24 brd 10.50.66.255 scope global dynamic ens160
       valid_lft 86086sec preferred_lft 86086sec
    inet6 fe80::250:56ff:fe93:fe3f/64 scope link
       valid_lft forever preferred_lft forever
mateusz@vm1:~$ ping 10.111.10.100
PING 10.111.10.100 (10.111.10.100) 56(84) bytes of data.
64 bytes from 10.111.10.100: icmp_seq=1 ttl=63 time=0.812 ms
64 bytes from 10.111.10.100: icmp_seq=2 ttl=63 time=0.962 ms
64 bytes from 10.111.10.100: icmp_seq=3 ttl=63 time=1.08 ms
64 bytes from 10.111.10.100: icmp_seq=4 ttl=63 time=0.819 ms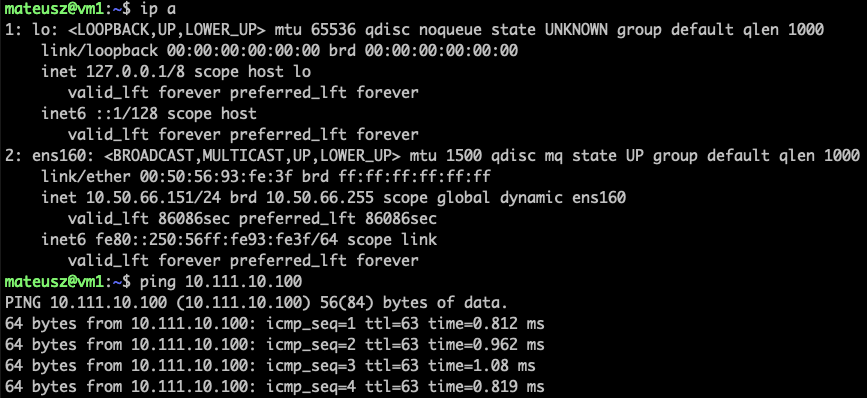
Summary
That’s it, we performed automate deployment of virtual machine template using Ansible. In this example there are not many camplicated changes. Ansible is a powerfull tool and you can do much many more instructions. This is a basic one.
In the future I’ll show how to do more tricky automation tasks with Ansible and VMware.


One Comment
Awesome One